


Have questions? Contact our team for answers.
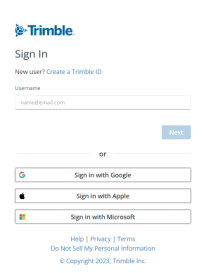
Access your Trimble Ag Software online account from your web browser on any computer, laptop or tablet. Trimble Ag Online is fully compatible with the latest Google Chrome browser.
- Visit our secure website
- Click Sign In - Trimble Ag Software, and add this link to your browser’s favorites or bookmarks
- Enter your Trimble user ID (email address) and password
- You're good to go!
Learn more about signing up for the Trimble Ag Mobile app for iOS or Android.
Sometimes the simplest solutions are the best. Use our secure, single sign-on technology to log in to all of your Trimble services with one ID. Use this email address and password whenever you sign into Trimble Ag Software online or mobile app.
Need to update your email address associated with your Trimble ID? Click here to email customer support and we’ll help you out.
Don’t have a Trimble ID yet? Click here for help on setting one up.
If you already have an online account, you can download the Trimble Ag Mobile app for iOS or Android for use on your phone or tablet. (Don't have an account? Click here to browse our plans or contact our sales team to find the best match for you.)
Get the app here:
- From your phone or tablet, search the app store for the Trimble Ag Mobile app
- Click the download icon
- Close the app store screen
- Find and tap the Trimble Ag Mobile icon to launch the app
- Enter your Trimble user ID (email address) and password
- Click Sign in
- Click Allow to permit Trimble Ag Software to access your location (you can change this later in your mobile device settings)
- Click Continue to review the Terms of Use and click Accept
- Adjust your mobile device settings as desired to allow the app to access your location, use cellular or wireless data, install updates automatically or access your device camera. (Using Android? View the next FAQ entry for one more step.)
Watch the short video for download success.
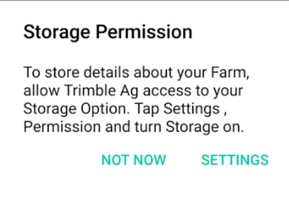
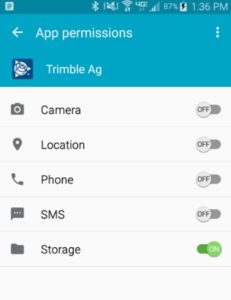
Running or installing a new version of the Trimble Ag Mobile app? Android requires that app users also give permission for the app to access Storage on your phone. Users will get a notification when they first run the new version. Settings can also be accessed from the alert that pops up when you first run the app. The app will not run without this permission (selecting Not Now will shut down app). Users can also go to Settings and turn on permission for storage.
Forgot your password? We’ve got you covered, day or night.
- Visit our login webpage and click Sign In - Trimble Ag Software
- Click on the Forgot password? link (bottom)
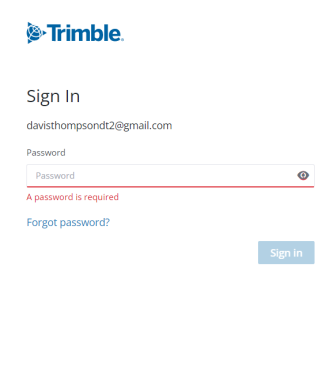
- Enter your email address
- Click Reset password
- Check your inbox (or junk folder) for an automated message with a link to reset your password (expires within 72 hours)
- Click on the link provided in the email
- Enter your new password
- Use this new password to access all of your Trimble accounts, from any platform including desktop, online or mobile app
Contact support here. Need to update the email address used in your Trimble ID? Click here for more info.
Software updates are applied automatically to your Trimble Ag Software online account. No installation or manual updates are necessary.
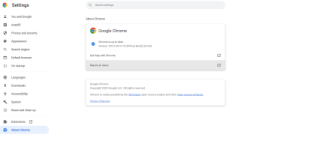
Check that your web browser (Google Chrome is recommended) is up-to-date so that you always have access to the latest features and fixes.
Visit our release notes page to learn more about the latest fixes and features available, and get email updates by signing up for our Precision Ag Insider newsletter.
Updates for the Trimble Ag Mobile app are not automatically installed, unless you select this option on your mobile device. As with any app installed on your mobile device, you can decide when to install updates, so that you can control download speed and data usage costs.
- Check your iOS or Android mobile device for Settings associated with an app store or purchases
- Turn the option on or off to automatically download updates
- Turn the option on or off to use cellular data during downloads
- For more help with your specific mobile device’s settings, visit the manufacturer’s website.
To see what’s new on the Trimble Ag Mobile app, visit our release notes page to learn more about the latest fixes and features available and get email updates by signing up for our Precision Ag Insider newsletter, or visit the app store for your mobile device Google Play and/or Apple
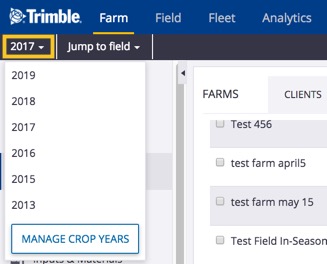
Each time that you login or use your account, you’ll start by selecting your preferred crop year, which will default to the latest crop year saved. The crop year ties your activities and records together under a single point of reference so that you can organize and view information year over year.
When you first use your account, you’ll be prompted to set up your crop year and primary crop, as shown below (you can change it later, if needed). This initial setup for crop year needs to completed online so that the system can organize your records, and prior to using the mobile app for the first time.
The online account has more options that you can review during initial setup, or change as needed, such as adding additional crop years, adding seed varieties to your purchased materials used during planting, and more. Follow these steps or scroll down to watch our video:
- Log in to your account online
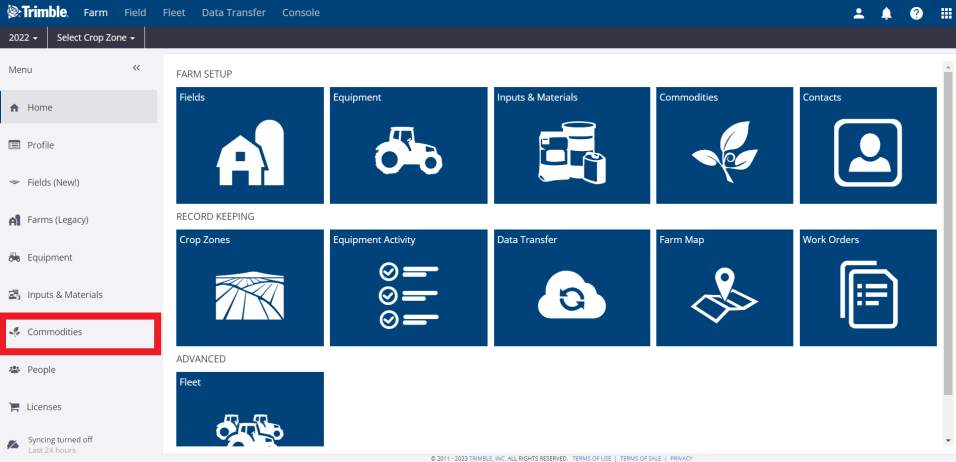
- On the Menu on the left, select commodities
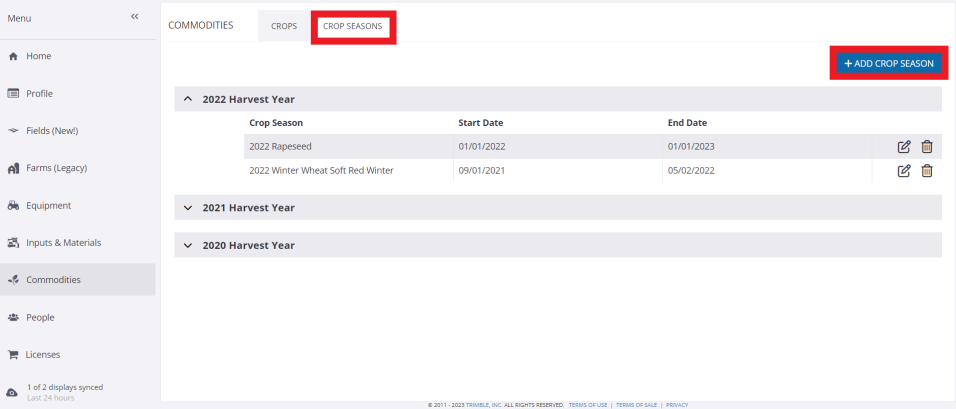
- Select the Crop Season page at the top then select Add Crop Season
- On the Create Crop Season pop-up window, select options in each dropdown list or enter changes as needed (required fields are displayed with an asterisk*)
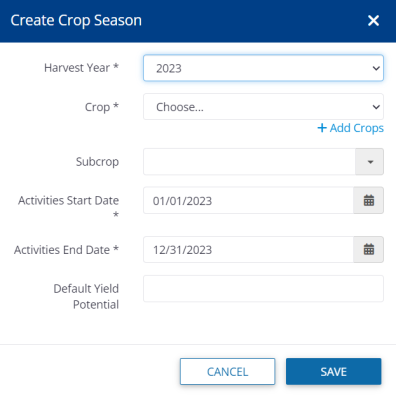
- Harvest Year (required) – also known as crop year; select from the dropdown list
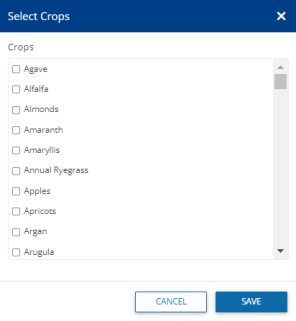
- Crop (required) – select from the list of crops already entered your account, or click the +Add Crops link to select from the master list of crops available in your region
- Subcrop (optional) – enter a name (for example, if your crop is corn, your subcrop could be entered as popcorn)
- Activities Start Date and Activities End Date (required) – click the calendar icons to adjust dates (for example, depending on the crop, climate zone and type of activities planned for your operation including soil testing and prep, you can set your own start and end date outside of standard seasonal cycles; as well, if you’re connecting data to your account from vehicle equipment displays that don’t have a crop season defined, these start and end dates are used to match your data to the correct crop season for the field)
- Default Yield Potential (optional) – enter an estimated average crop yield that can serve as a benchmark when comparing crop plans on your account
- Click Save (or Cancel)
For help with deleting a crop year from your account, contact customer support.
Learn more about crops under Tracking Commodities, or watch our video on how to set up your crop year (starts at 3:48):
With just a few quick clicks online, organization administrators can add a vehicle and organize vehicle groups on your Trimble Ag Software account, with the option to add device serial numbers to wirelessly connect precision ag data to your account. Automatically import field, boundary and job data once your vehicle connection is established. Our software uses spatial selection to look for matches between your data and our software, starting with the field name. If field names are different, Trimble Ag Software looks for similar field boundaries to find a match.
Getting set up
- Log in to your Trimble Ag Software online account (learn more)
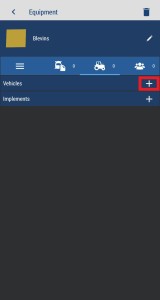
- Under the Farm tab (top menu), select Vehicles in the Equipment section
- Click on the Manage button (top right) and select New Vehicle
- Complete the Vehicle Properties form, as shown below (required fields are displayed with an asterisk*):
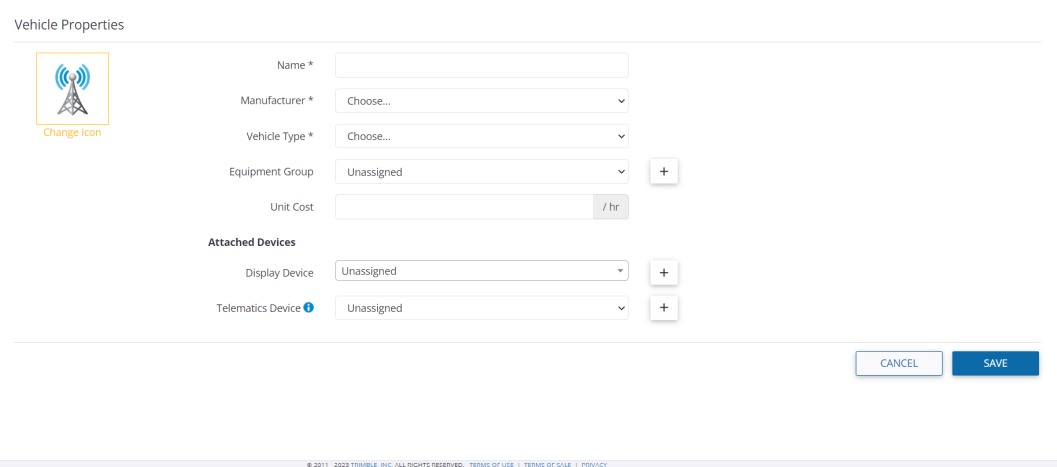
- Add a Name (required) for your vehicle
- Select the Manufacturer (required) from the dropdown list
- Select the Vehicle Type (required) from the dropdown list
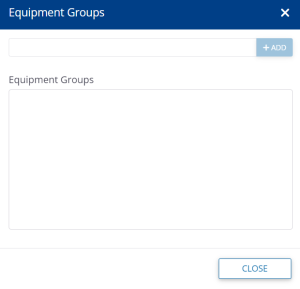
- Confirm the Equipment Group by: selecting Unassigned (default) from the list, or click the Manage Groups link to enter a custom group name to organize your fleet, click +Add, then click Close and select your new Equipment Group from the dropdown list
- Enter an hourly Unit Cost
- Click the link (top left) to Change Icon and select an alternate thumbnail image for your vehicle from the choices provided
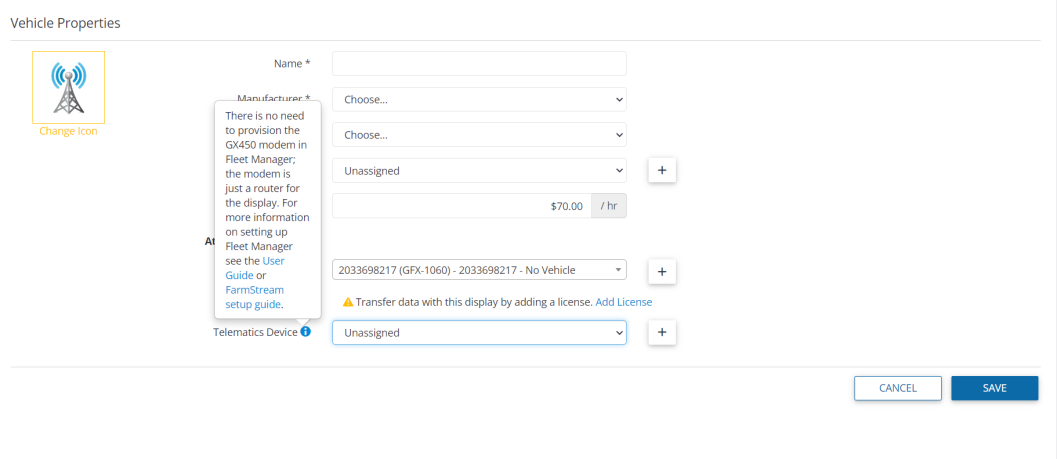
- Under Attached Devices on the Vehicle Properties form, the default is Unassigned (no connectivity). To add a device serial number* to share data wirelessly, you have two options when adding a device:
• Click the link to Add Display Device link to enter the Device Serial Number, click Get Device Type to validate the serial number entered, then click Add • Under Display Device, click the Add License button to Assign an available vehicle license. Once assigned and saved, vehicle licenses cannot be moved to another vehicle. If needed, additional vehicle licenses can be purchased through your account in the online Marketplace. • Click the link to Add Telematics Device (required only if you’re using the DCM-300 modem and your vehicle is not set up with a display configured for FarmStream**), then click the Add Display Device link to enter the Device Serial Number, click Get Device Type to validate the serial number, then click Add
- Click Save when done (or Cancel)
*Devices cannot be added if already assigned to an organization on Trimble Ag Software.
Get instant access to vehicle data in your third-party account(s) with Trimble Ag Software’s built in API connection. Our API (short for digital handshake) makes it easy for organization administrators to set up a wireless link with our partners, so that you have all of your farm’s precision data in one place. To learn more about data compatibility between Trimble Ag Software and other displays, file types and third-party accounts, click here.
Success tip: before linking vehicle data to your account, check that field names are the same in both the display and on Trimble Ag Software. This prevents the creation of duplicate fields and ensures data is associated with the right location on your farm.
- Log in to Trimble Ag Software online (learn more)
- Click the Data Transfer tab (top menu)
- Select Settings from the left navigation menu to modify the default options are checked (recommended) to.
- On the Syncing tab, click the checkboxes to modify the sync options from the recommended default (shown above) to Automatically create operators added on field displays, automatically create vehicles added on field displays, and automatically create fields added on field displays
- Click on the API Connections tab

- Click +Add Account
- Select an account from the list*: agrirouter, Raven Slingshot, AGCO Variodoc, JD Operations Center, Case IH, New Holland, Steyr (prior to connecting to Raven Slingshot, contact Raven to purchase an API key at a cost of approximately $100)
- A new web page will open with the login page for your third-party account, where you can enter your credentials and sign in to your third-party account
- Trimble Ag Software will display a message ""Linking to your account”
- When the API connection is complete, your third-party account will be listed on the API Connections tab and any associated vehicles and data can be viewed from your Trimble Ag Software account
- Contact our customer support team to see if APIs are available for other third-party accounts not listed here.
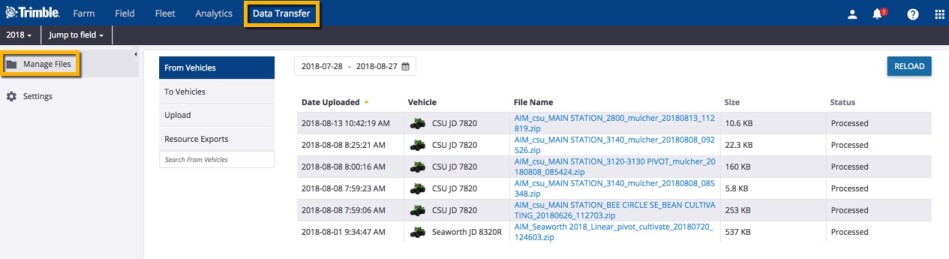
When you prefer to simply manage or share machine data files directly with your Trimble Ag Software online account - without using our built-in wireless vehicle display connections - it’s easy to to manually upload files and resources.
- Log in to Trimble Ag Software online (learn more)
- Click the Data Transfer tab (top menu)
- Select Manage Files from the left navigation menu
- Click Upload
- Drag and drop files or click "Upload Files" to pick from your computer
You can upload machine-collected data to your Trimble Ag Software online account from the following vehicle displays:
- Trimble
- CNH
- AGCO
- John Deere
- Ag Leader
You can also upload data to share with your advisor, including:
- Topo (topography)
- EM/EC (electromagnetic/electroconductive)
- Yield
- Soil locations Management zone boundaries
As well, you can deliver prescription maps and resource files to connected displays.
To learn more about data compatibility between Trimble Ag Software and other displays, file types and third-party accounts, click here.
With Trimble Ag Software’s fleet management tools, you can quickly deliver prescription maps and resource files to vehicle displays connected to your online account, including John Deere vehicles connected via API.
- Log in to Trimble Ag Software online (learn more)
- Click the Data Transfer tab (top menu)
- Select Manage Files from the left navigation menu
- Click on Resource Exports
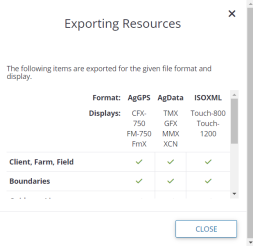
- Click the information icon in the top right of the screen to see which formats and displays are supported. Scroll to see all the listings.
- Choose from one of two options by clicking the buttons on the top right corner of the screen:
Create Resource File
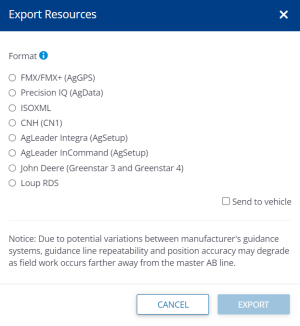
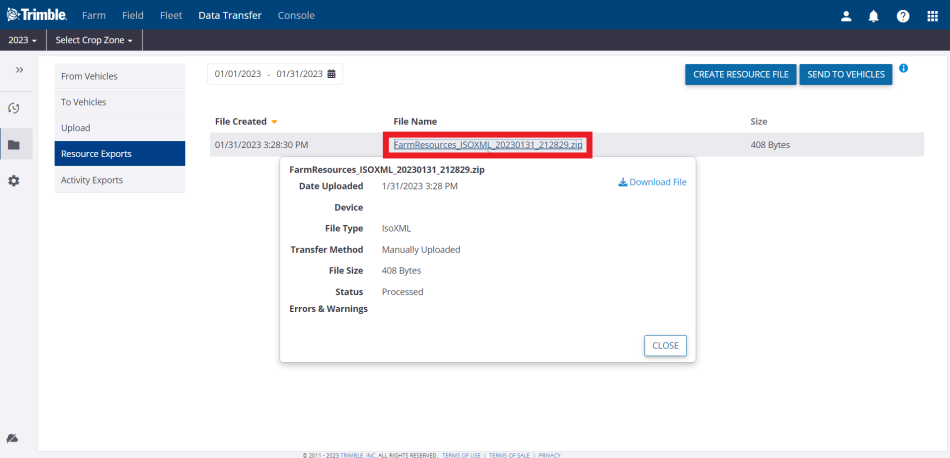
- Click to select a Format from the pop-up window to manually upload a zip file to your online account, with the option to select Send to Vehicle, then click Export (or Cancel)
- Once the file is created, click the File Name link to view details or click Download File to save a copy to your computer or USB stick
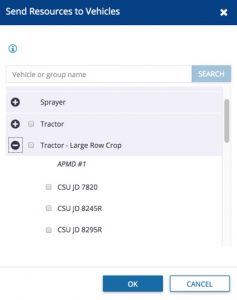
Send to Vehicles
- Search or select one or more vehicles or groups from the list of compatible displays connected to your account via serial number or via third-party API connection with the John Deere Operations Center
- Click OK to send the resource file to one or more vehicle displays (or Cancel)
Visit our Managing Fleet quick-start guide for more ways to use your vehicle data in Trimble Ag Software, including our data compatibility chart by display, file type and third-party accounts.
When you’re no longer using a vehicle on the farm, it’s easy to delete the vehicle from your fleet records on Trimble Ag Software. Any vehicles that are deleted are simply retired, in case you want to unretire vehicles for use on your account at a later date.
- Log in to Trimble Ag Software online (learn more)
- From the Farm tab (top menu), select Equipment
- Check the boxes on the left to select one more vehicles from the list
- Click on the trash can icon (top left) that is now visible
- At the prompt, click Retire (or Cancel) to confirm any changes
Once your vehicle displays are connected to Trimble Ag Software by serial number or through an API that shares data with your third-party account, your information is automatically pulled into the online account from your fleet activities. Our software uses spatial selection to look for matches between your data and our software, starting with the field name. If field names are different, Trimble Ag Software looks for a similar field boundary to assign jobs to the matching field.
At the farm level:
- View vehicle profiles on the online dashboard
- View vehicle location and working status on the online dashboard
- View vehicle tasks on the online dashboard
- Assign operator access and send operators to vehicles on the farm
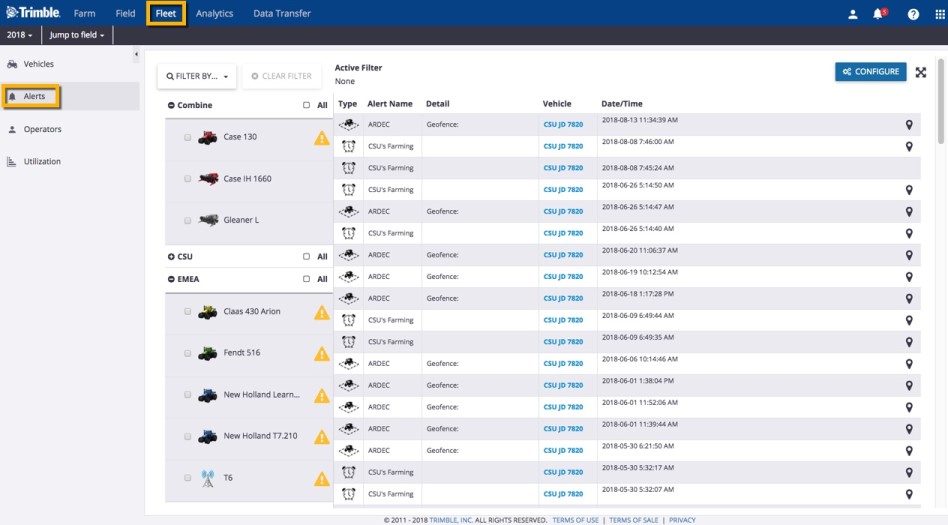
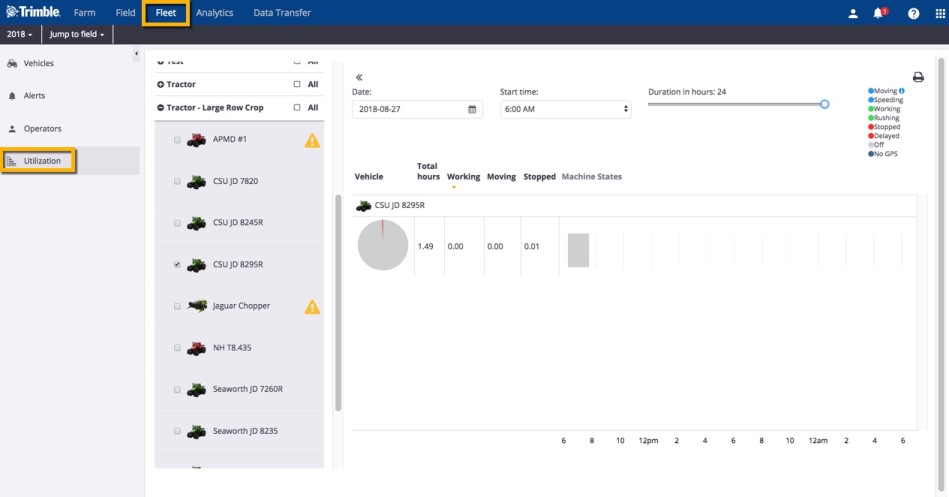
- Manage alerts for curfew, geofence, machine alert, ignition and rushing
- View fleet utilization levels by time period, status, and alerts
At the field level:
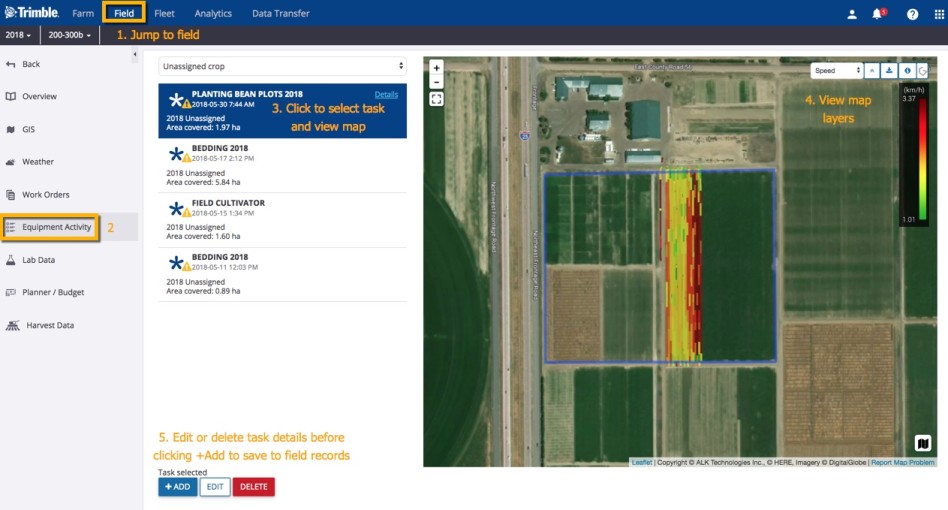
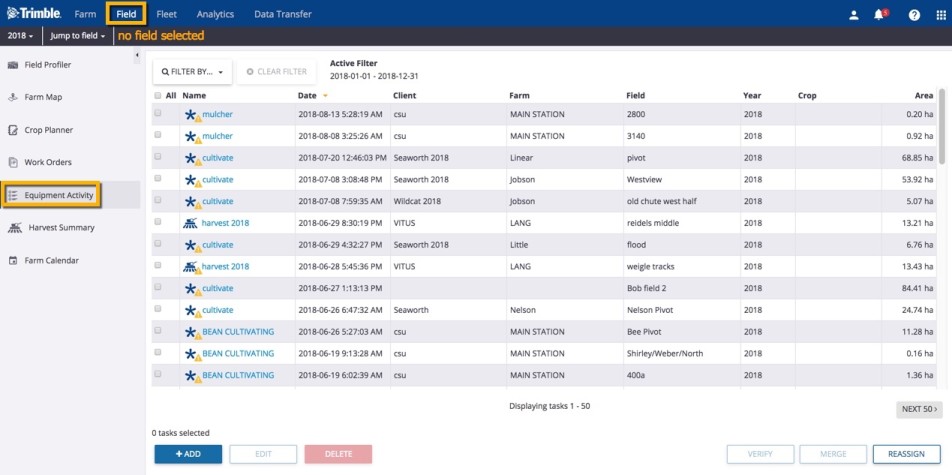
- View task coverage maps
- Verify equipment task data
- View locations for any vehicles at the field location
- View and manage AgGPS or AgData.zip (resource) files
- Export resource files from the online account to connected vehicle displays
Learn more about data compatibility with Trimble Ag Software, and check out the full Fleet Management User Guide for more vehicle options.
Once you’ve set up your vehicles and data connections on the online account, you can use the Trimble Ag Mobile app to view fleet working status, and find or navigate to vehicles with GPS coordinates and satellite map views. For best results, turn on location services in your mobile device's privacy settings, and activate Farm Stream on your vehicle display.
- Log in to the mobile app on iOS or Android or with the same Trimble ID used to access your online account (learn more)
- Tap the spinning arrows sync icon (top right) to sync your mobile app with the latest updates online
- From the mobile app’s home screen, select the preferred crop year (top left) when viewing the farm map
- Tap the Fleet tile

- Tap on the dropdown arrow to expand the fleet list by vehicle group (default is Unassigned if you haven’t added a group to the online account)

- Swipe up (as needed) to view the full list of vehicles by name, type, status (Working is shown in green) and last update (if no recent update, check the vehicle display to confirm Farm Stream is turned on)
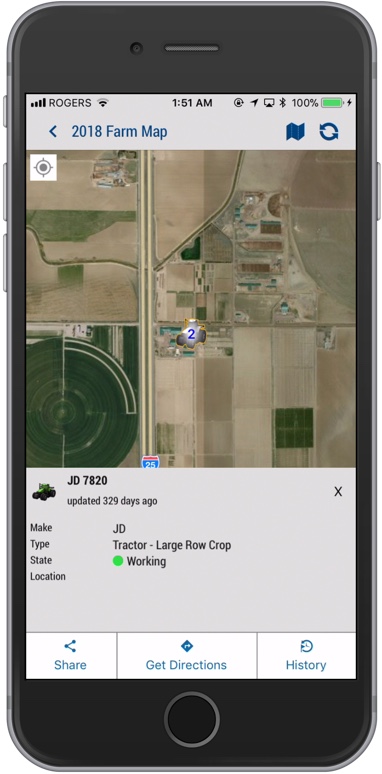
- Tap to select a vehicle from the list, which displays a satellite map view of the vehicle location and working state details
- Tap the compass icon to view your current location on the map (only use if you're close to the vehicle location)
- Tap the buttons on the bottom of the screen to select one of three options:
- Share - send map coordinates to anyone
- Tap to select a message app on your mobile device (such as email or text)
- Add the recipient and any other details
- Hit Send (or cancel the message by tapping the <back-arrow on the top left, then confirm Cancel or Discard at the prompt)
- You may also need to close the app to return to Trimble Ag Mobile
- Get Directions - navigate to the vehicle location
- Tap the Directions button
- Under the street view map, tap View Routing Apps
- Tap Route to launch one of your mobile apps from the list (such as Google Maps)
- Click Start to navigate to the location (or close the app to return to Trimble Ag Mobile)
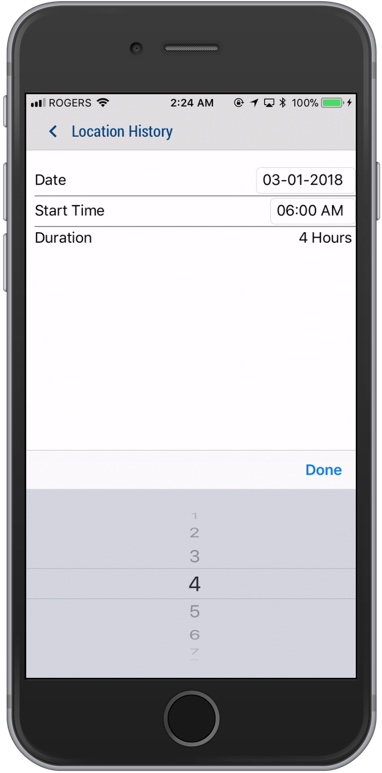
- History - view location history by date and time
- If no data, tap the pencil icon to view Location History
- Tap to edit options for Date, Start Time and Duration (between 1 to 8 hours), then click Done
- Tap the <back-arrow to return to the previous screen
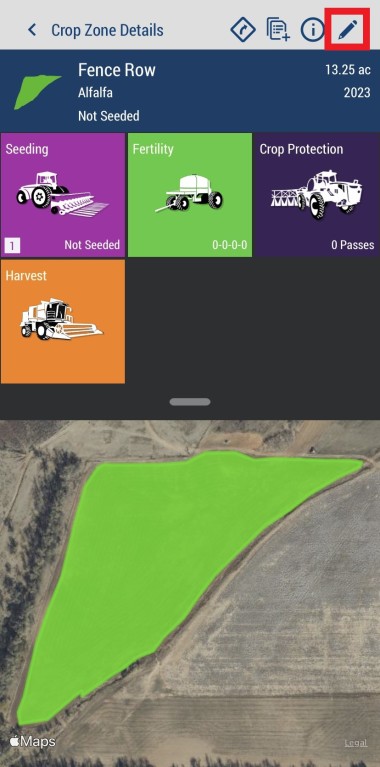
Once you’ve set up your vehicles and data connections on the online account, you can use the Trimble Ag Mobile app to do more than find and navigate to your fleet. You can also track vehicles and operators at the same time when recording field-level tasks on the mobile app.
- Log in to the Trimble Ag Mobile app on your mobile device (learn more)
- Click the year (top left) to select the preferred crop year
- Click on the Fields tile
- Select a field from the list (sorted by Farm)
- From the Field home screen, click on a tile for Seeding, Fertility or Crop Protection
- Click an item on the list to edit an existing field application record, or click the + icon (top right) to add a new record
- From the multi-tasker menu bar under the field name, click the vehicle icon

- Click the + icon (right of “Vehicles”) to add equipment (vehicles or implement)
- Click Vehicles
- Check the box to select vehicle(s) from the list, used for this field application event
- Click the disc icon (top right) to save your selection
- Click on the back arrow (top left) to return to the previous screen
- At the prompt, confirm your changes by clicking Save
Note: vehicle usage tracked with field tasks and associated hourly costs are recorded on the mobile app only and are not visible in the Field Manager or Analytics reports available in the online account.
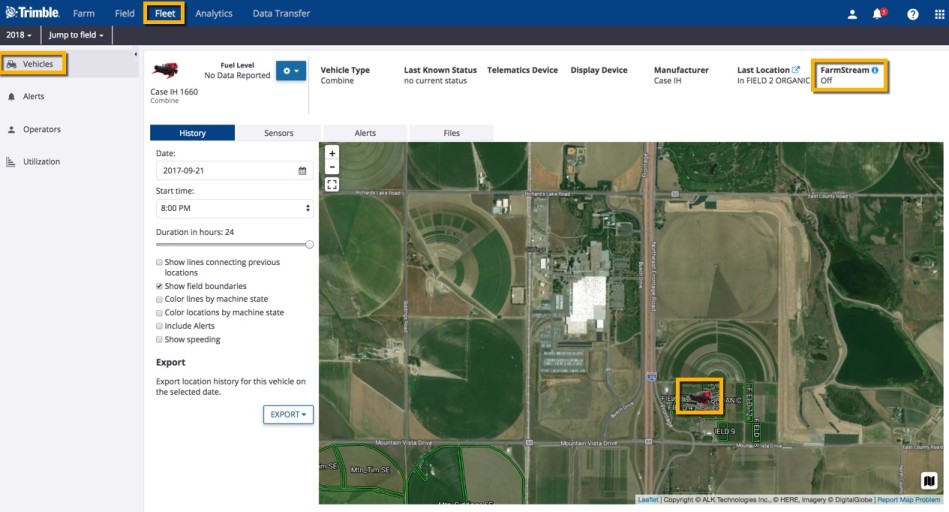
Once your vehicle is connected to your online account) in Trimble Ag Software, you can view real-time status and location on the satellite map, edit properties and export location history.
- Log in to your account online (learn more)
- Click on the the Fleet tab (top menu)
- Select Vehicles and click on a vehicle name from the Vehicle List
- From the vehicle profile view (shown below):
- use the satellite map to view by map type (Satellite or Road) and zoom in to the vehicle location
- click on the tabs to view History, Sensors, Alerts and Files
- check the status of FarmStream on the vehicle display, which controls whether data is being sent to Trimble Ag Software
- From the vehicle profile view above, click on the settings icon next to the vehicle name to select the following dropdown menu options:
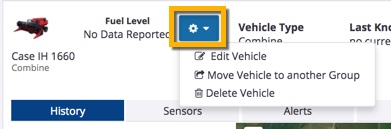
- Edit vehicle properties
- Move vehicle to another Group
- Delete vehicle
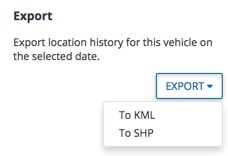
- Click on the History tab and scroll down to click the Export button to share location history for this vehicle on the selected date, by selecting either KML or SHP file format.
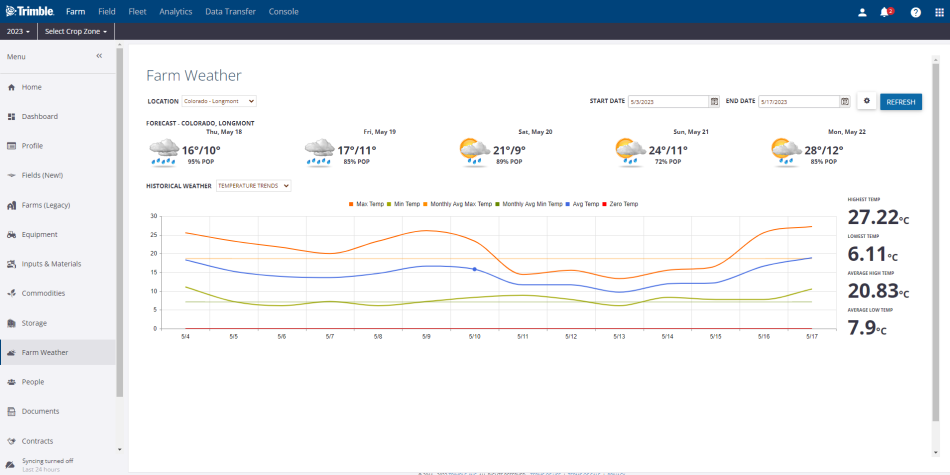
There are several ways to use weather within Trimble Ag Software. The First is the dashboard if you are using farmer pro. This weather is based on a location. This is an hourly forecast.
Another way to use weather is through crop zone weather. Select a crop zone at the top. Then select “Weather” on the left.

The last way to access weather is Farm weather listing for Farmer Pro users only. From the farm tab, select “Farm Weather” on the left.
While your local Trimble Authorized Reseller can provide you with robust, fully supported solutions for wireless data transfer powered by higher-end modems such as the DCM-300® or GX450® , there are lower-end solutions for those of us willing to put in a little extra effort. Keep in mind that this is not an officially supported configuration, but with a little work, you can connect a few very specific off-the-shelf components to allow your Trimble FmX® display to leverage a simple wireless hotspot from your smartphone.
Components:
USB to Ethernet - The success of this configuration is made possible by one a very specific USB-to-ethernet adapter: the TRENDnet USB 2.0 to 10/100 Ethernet Adapter with the TU2-ET100 Chipset (buy on Amazon). This will Connect to the USB port on your FmX, and you can connect the ethernet side to almost any other source of connectivity.
Ethernet to WiFi - While we have generally used the IOGEAR Universal Ethernet to Wi-Fi N Adapter (buy on Amazon) due to it’s very low price point, theoretically any ethernet-to-network adapter should work, as long as it appears to be source of access to the ethernet cable.
WiFi Hotspot - Lastly, turning on the WiFi hotspot feature on your smartphone (many carriers will charge extra for this functionality) will provide the final connection to the internet, so you can send and receive files. For less than $40 USD in parts, there is little to lose if you want to give it a try.
Getting set up:
- Purchase the components listed above
- Purchase a Trimble Ag Software Plan and Display Connections (formerly Vehicle Connections) license (each display will take a display connection and additional Display Connections can be purchased beyond the included plan)
- Log in to your online account and add your FmX serial number under Farm>Equipment>Devices (learn more)
- Set up a vehicle and assign the Device, and a Vehicle Connection to the Vehicle under Farm>Equipment>Vehicles
- Connect the TrendNet USB to Ethernet adapter to the back of your FmX
- Connect the Ethernet to your IOGEAR Ethernet to Wi-Fi N Adapter
- Note: you will have to follow the instructions provided with your adapter to connect it to your preferred WiFi hotspot ahead of time (this step is usually done using a computer or WPS)
- From your FmX display, turn on wireless data transfer by adding the Office Sync module in the Settings (the password to access the settings is 2009)
That’s it! Now you have wireless data transfer whenever you're in range of Wi-Fi coverage.
Need help? While this is not an officially supported hardware configuration, please contact our customer support team if you have any questions or issues with configuring Trimble Ag Software or your FmX. Every annual Trimble Ag Software Plan comes with access to our support network to help farmers.
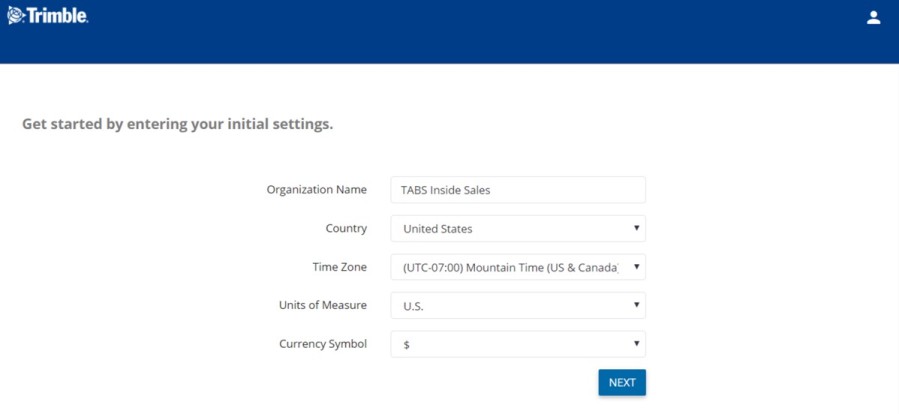
When you use your online account for the first time, you'll be prompted to fill in some basic information for your account organization, as shown below. Name your organization to match your business (for example, Smith Farms or 3R Farms). Your Organization Name is also known as your Purchasing Organization when managing licenses in your account. It's also helpful to know your Organization Name if you choose to add upgrades to your account (such as extra Display Connections) later through the online Marketplace or through your reseller.
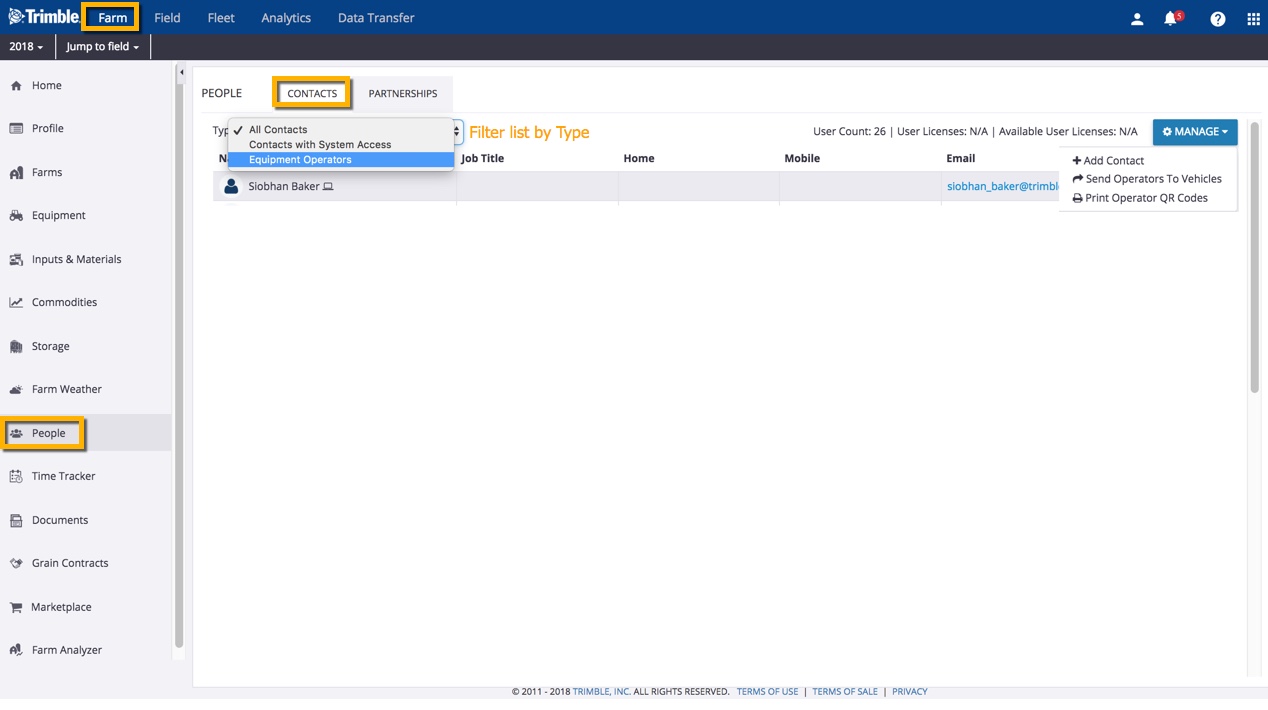
Use partnerships when you want an advisor or agronomist to have access to your Trimble Ag Software account, without taking up a licensed user seat on your account. Partners can see and edit data within your online and mobile account, and you can remove access at any time. For help with adding a licensed user instead, start by adding contacts, then review how to add system access.
Before adding a new partnership, check that you have the advisor’s email address as used in Trimble Ag Software.
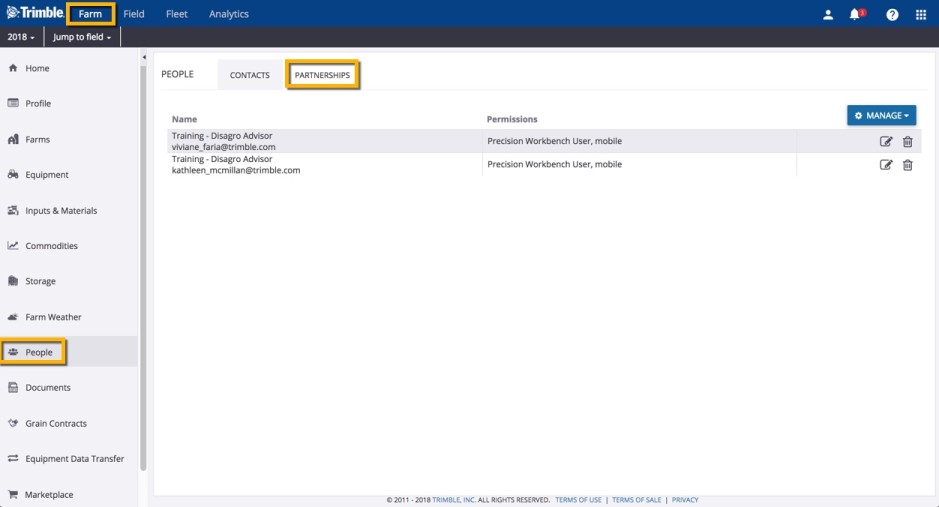
- Log in to your account online (learn more)
- Click on the Farm tab (top menu)
- Select People from the left navigation menu
- Click on the Partnerships tab
- Click Add Partner (or, if you already have a list of Partners, click Manage then select Add Partner)
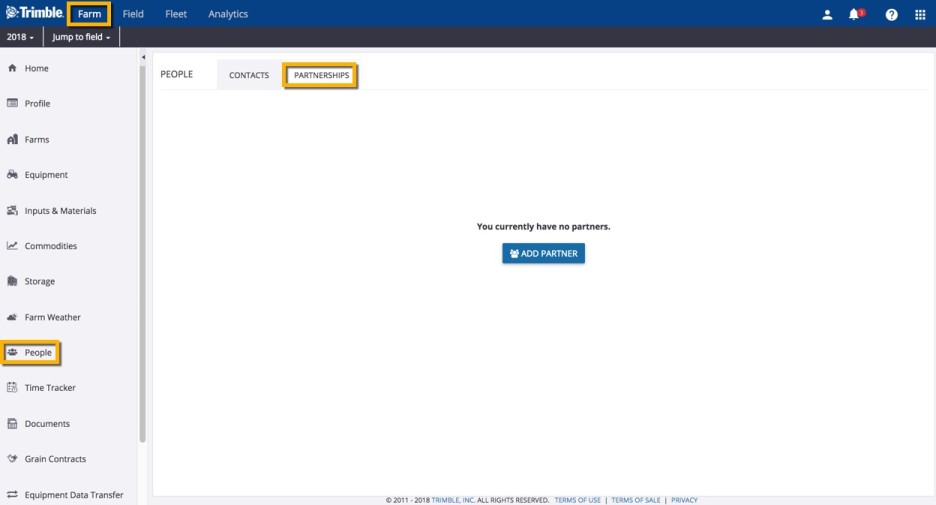
- On the Partnership details screen, enter the partner’s email address (required)
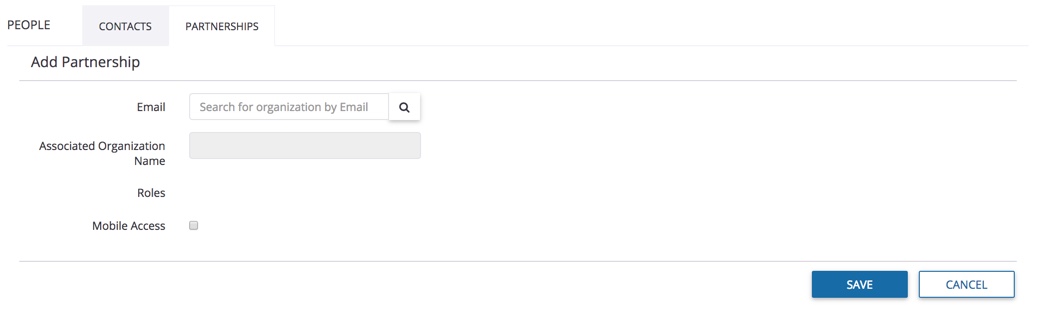
- Click the search icon to automatically display the matching organization name
- Click to select one or more Roles from the matching results, including: Precision Workbench User, Reseller, etc.
- Click the checkbox to turn Mobile Access on or off
- Click Save (or Cancel)
Once you’ve added a partnership to your Trimble Ag Software online or mobile account, it’s easy to edit or remove their access from your account.
- Log in to your account online (learn more)
- Click on the Farm tab (top menu)
- Select People from the left navigation menu
- Click on the Partnership tab to view active partners on your account
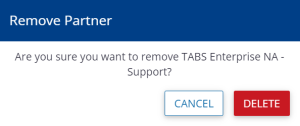
- Click the edit icon to change partner access, then click Save (or Cancel) or
- Click the delete icon to remove a partner and confirm by clicking Delete (or Cancel)
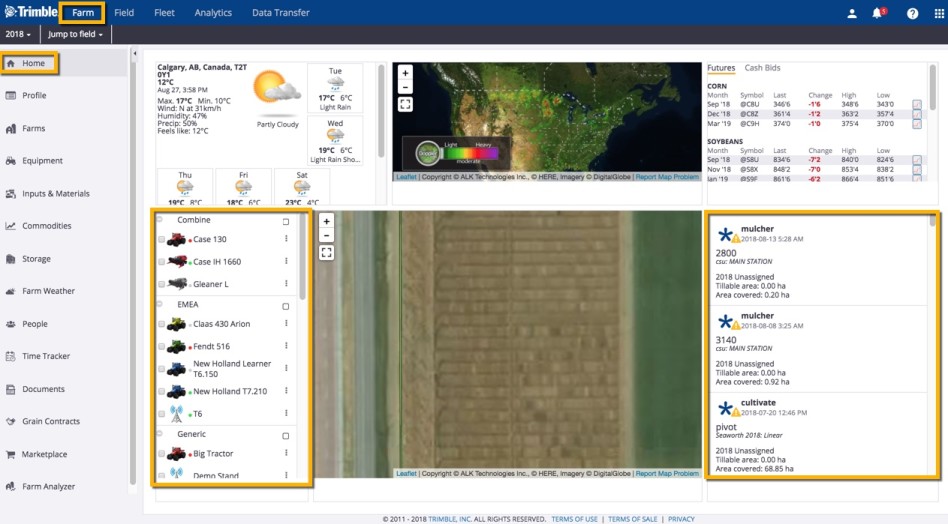
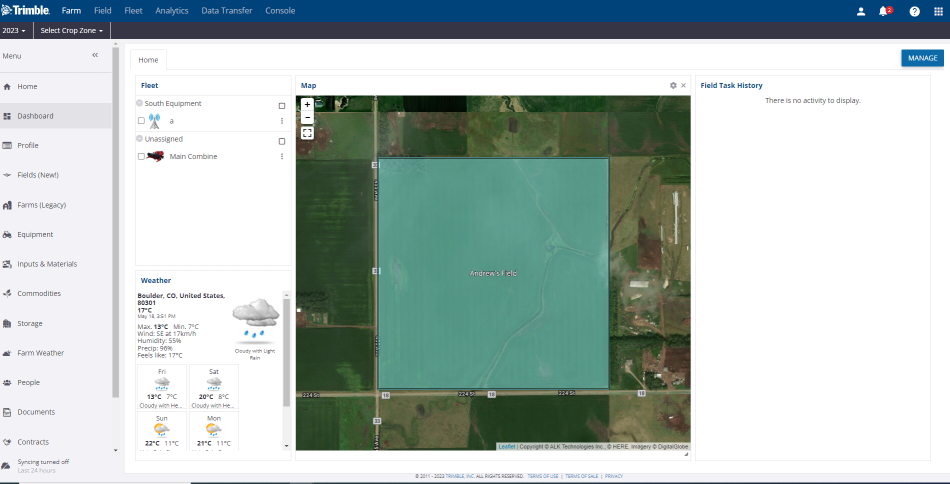
From your Trimble Ag Online home screen, your account dashboard shows widgets with real-time farm weather, maps, field events, commodities, fleet tracking and more. With the click of a mouse, each widget can be reset, resized, or moved around the grid layout.
- To resize or move a widget, click and drag the frame from the bottom right corner, then release to snap the frame to the gridlines shown in the background.
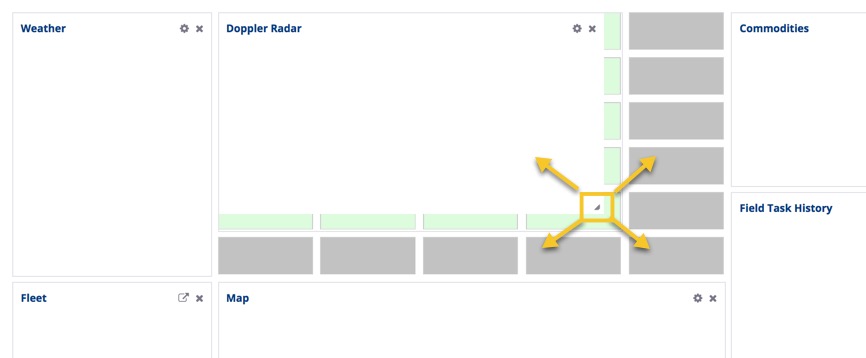
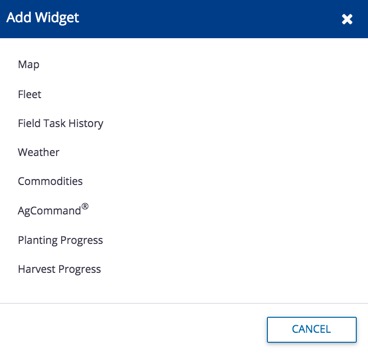
- To add a widget, make space on the grid by resizing an adjacent frame (as shown above), then click in the empty space to display and click Add Widget:
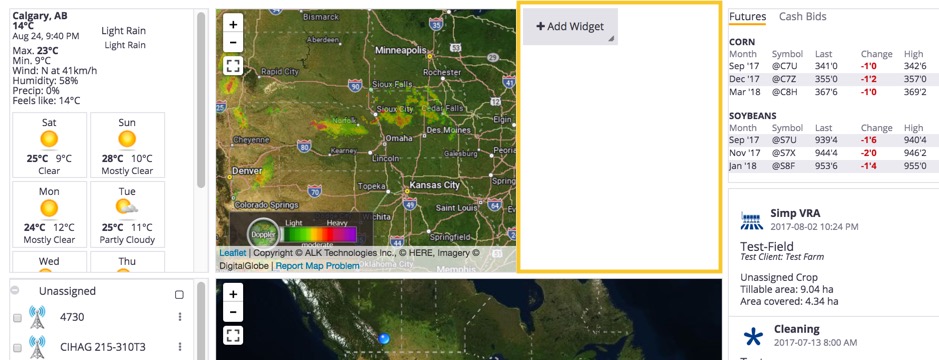
- Select from options including: Map, Fleet, Field Task History, Weather, Commodities, AgCommand®, Planting Progress and Harvest Progress.
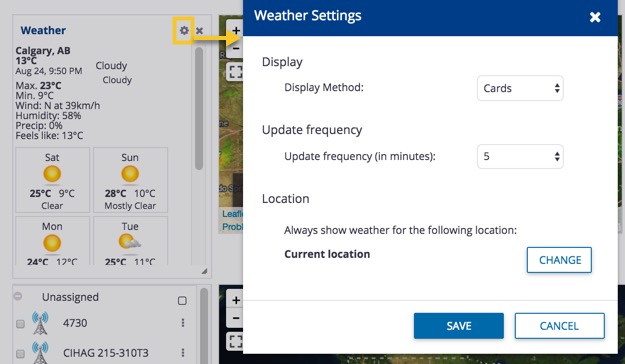
- To edit a widget's appearance or data, select the frame and click the gear icon to select and save a range of options unique to each widget.
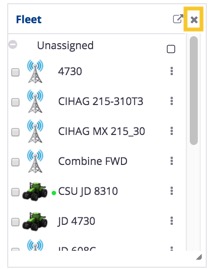
- To delete a widget from view, select the frame and click the X on the top right corner.
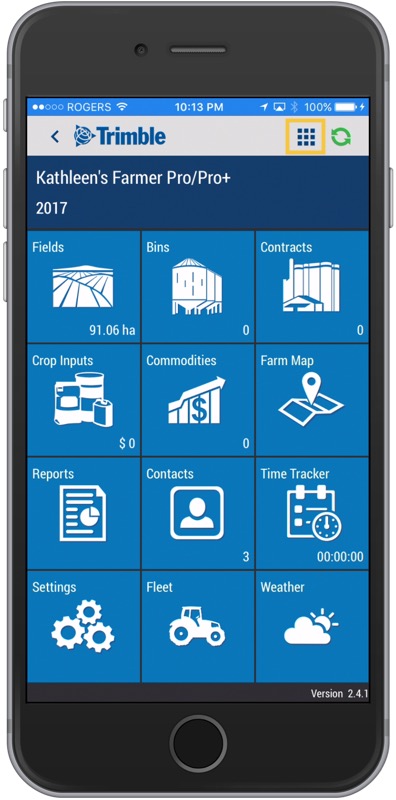
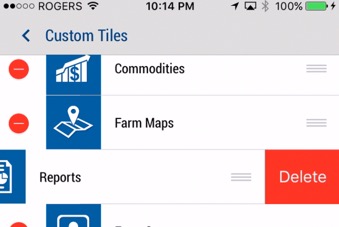
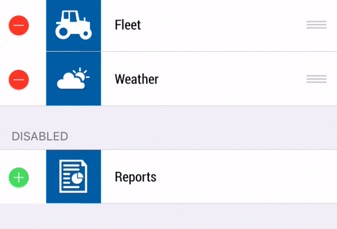
The Trimble Ag Mobile app home screen can be adjusted to show or hide tiles, to help you focus on the areas of your account that matter most to you. Once a tile is disabled then enabled again, it will appear in the top left corner of the home screen, adjusting the default layout of tiles on the mobile app.
- To change which tiles are visible, click on the tiles icon in the top right corner of the home screen.
- Click the red minus icon to change a tile from enabled to disabled from view, then click Delete.
- To enable viewing of a tile on the home screen, scroll down to the disabled list, click the green plus icon.
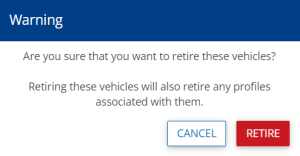
When you're starting to set up your Trimble Ag Software account, you can easily retire clients, farms or fields from your online account, with the option to unretire partial details for these items later. Do this in the early stages of setting up your account as, once items are retired, some important information such as operational data and expenses may not be available if the asset is unretired later.
- Log in to your account online (learn more)
- Click on the Farm tab (top menu)
- Select fields from the left navigation menu
- Select any tab for Clients, Farms or Fields
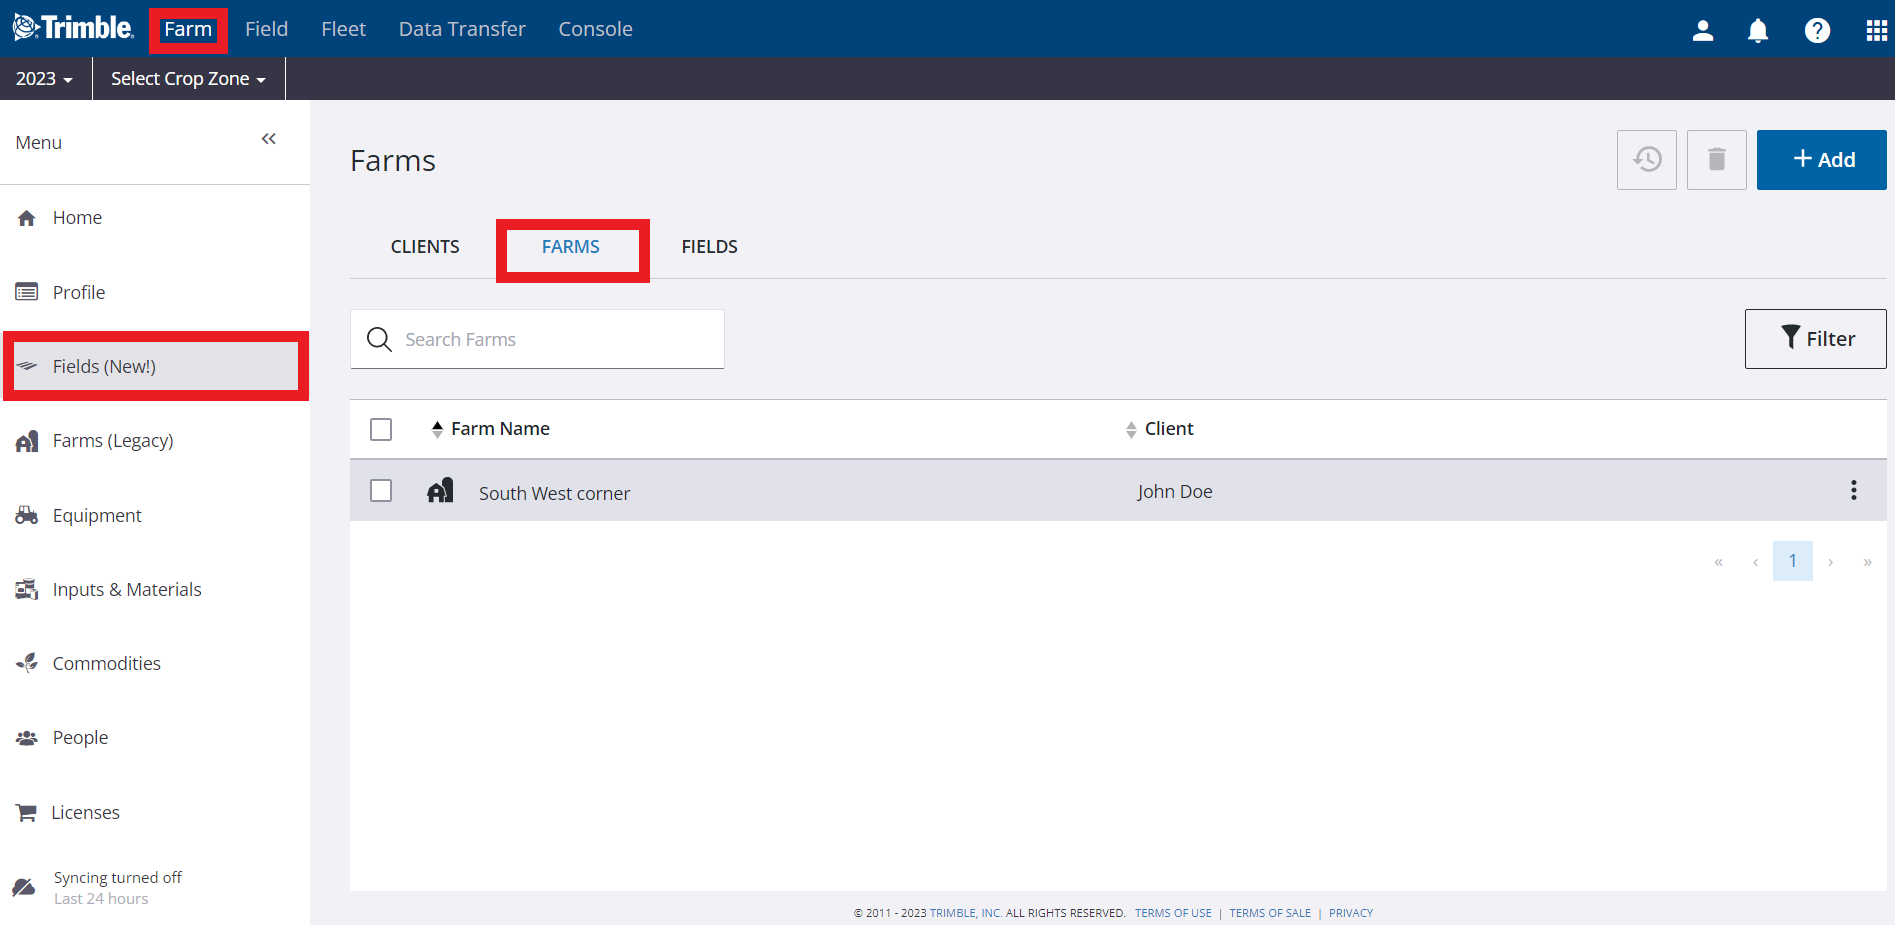
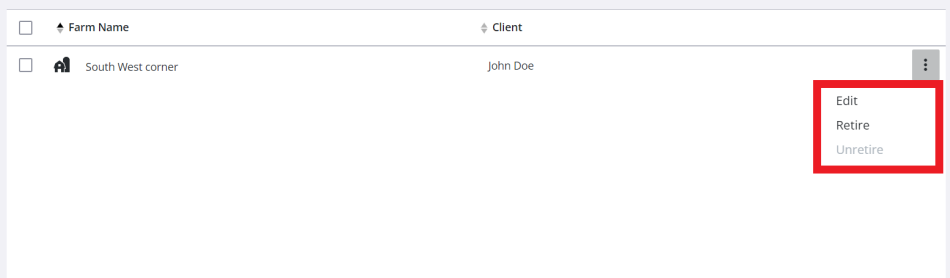
- Click the 3 dots on the right of the listing. You can edit, retire, or unretire if asset is already retired
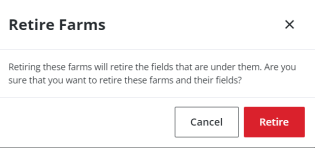
- Click the checkboxes to select one or more items on the list and click trashcan at top to be able to retire assets
- Review the warning and click Retire (or Cancel)
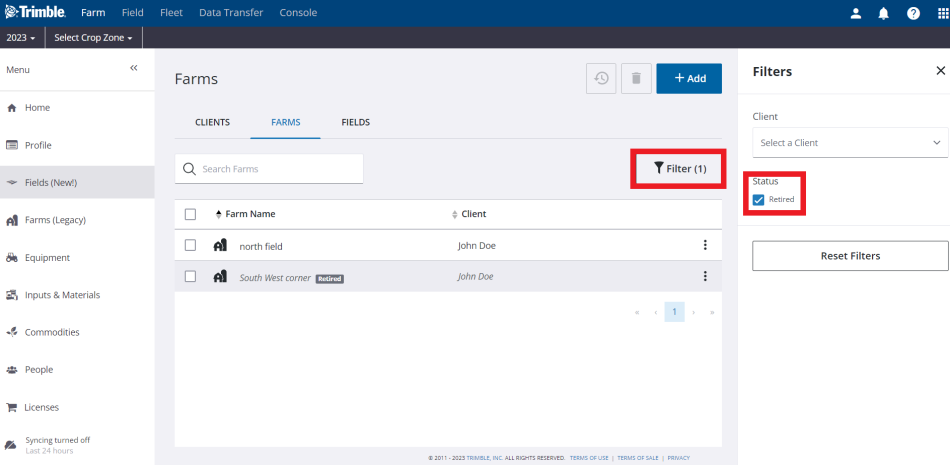
- To view retired (deleted) items, click the filter button, then check the retired filter under status
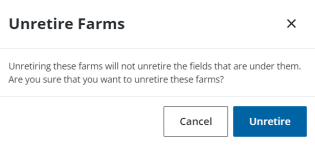
- Click the 3 dots on the right of the listing and select Unretire. Review the warning and click Un-retire (or Cancel)
Note: Fields deleted with the Manage button on Field Manager Overview may still be visible in the list of fields under the Farm menu, where they can be retired from view.
View and manage farm assets online to see what’s growing where and who you’re selling to, with summary and detail views.
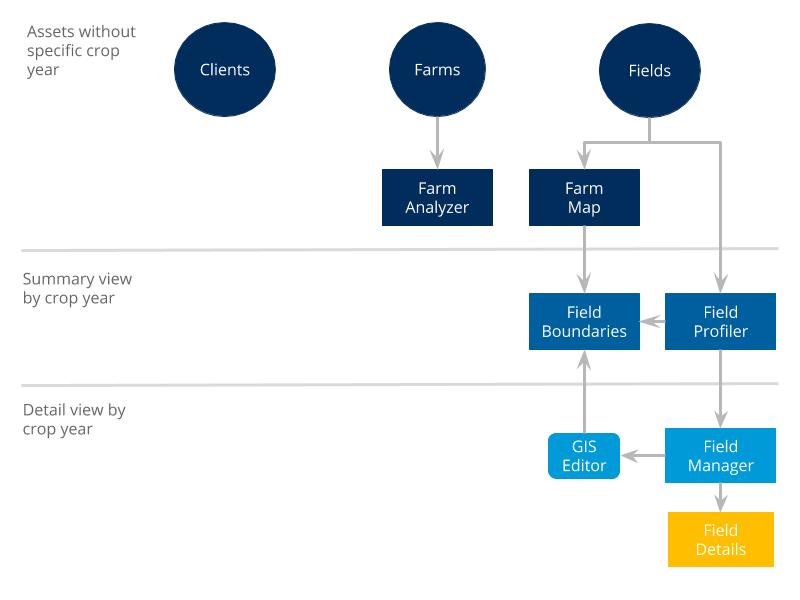
Farm Assets | Trimble Ag Software
Once farm assets are set up online in your Trimble Ag Software account, including clients, farms and fields, you can view and make certain changes to these records on the mobile app.
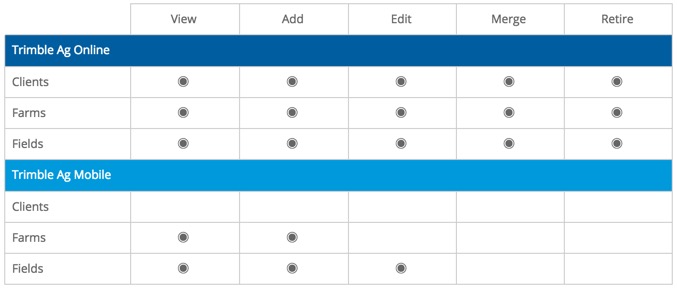
Update your list of client names online, to make it easy to group fields and farms on your Trimble Ag Software account. Most precision ag displays require the client name (also known as grower). Clients are not visible on the mobile app.
- Log in to your account online (learn more)
- Click on the Farm tab (top menu)
- Select Fields from the left navigation menu
- Click on the Clients tab
- Click Add in the top right corner(or click the 3 dots the edit next to the client name)
- In the pop-up window, enter or edit the Client Name (required)
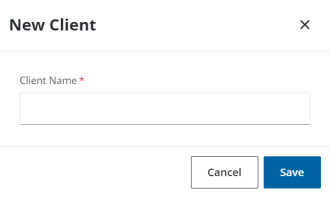
- Click Save (or Cancel)
Related: Use contracts to save detailed sales agreements, which can also be associated with storage bins and transactions during harvest. Contracts are not tied to your client list. Set up contracts online under the Farm menu, or on the mobile app from the Contracts tile.
Farms can be set up online with basic information, and can be associated with fields on your account during setup online or on the Trimble Ag Mobile app. Include a client (also known as grower on precision ag vehicle displays) to easily group fields and farms on your account.
- Log in to your account online (learn more)
- Click on the Farm tab (top menu)
- Select Fields from the left navigation menu
- Click on the Farms tab
- Click Add in the top right corner (or click the 3 dots then edit next to the farm name)
- In the pop-up window, enter or edit the Farm Name (required)
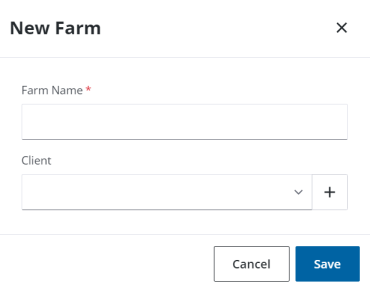
- Select the Client name from the dropdown list or click the quick-add plus + sign to add a new client name
- Note: adding a client name to each farm makes it easy to match both as a paired set to fields in your account; client names are not related to contracts that track projected sales revenue for your farm
- Click Save (or Cancel)
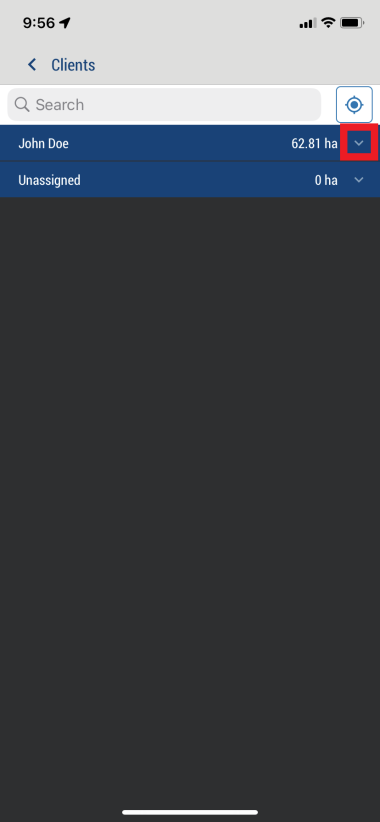
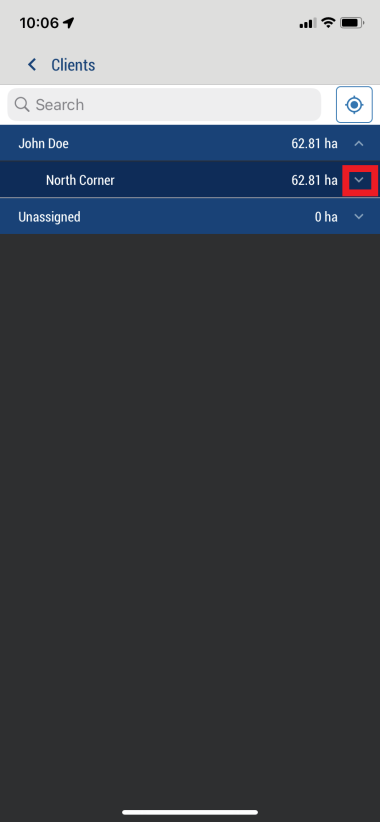
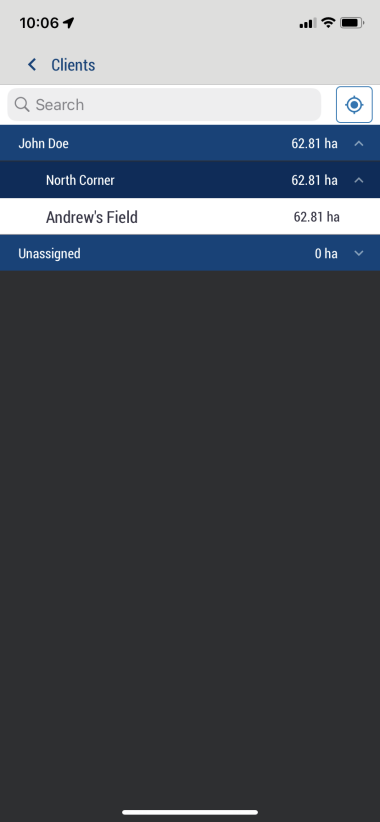
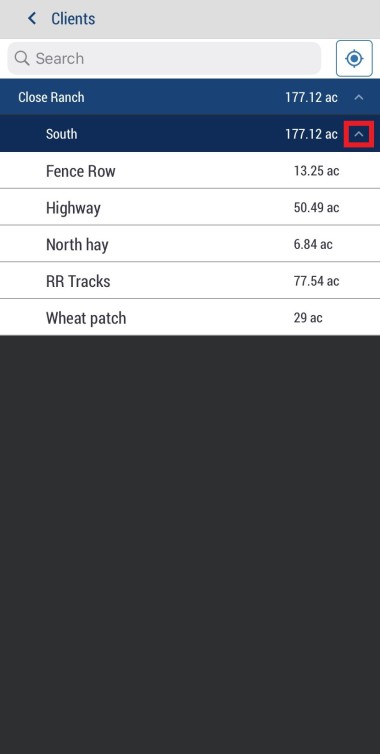
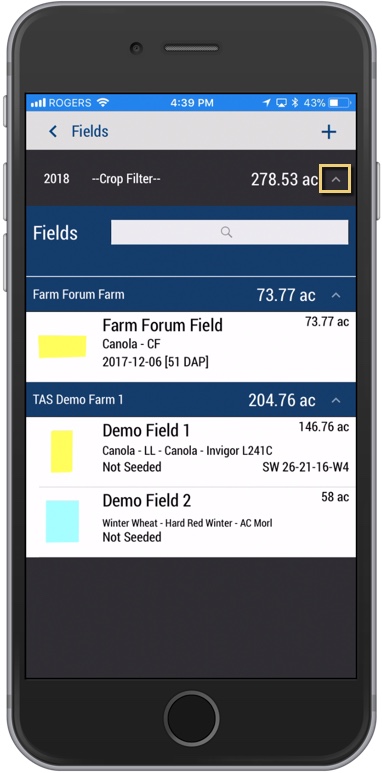
Quickly view clients, Farms, and Fields on the mobile app in any location.
- Log in to the mobile app with the same Trimble ID used to access your online account
- From the mobile app home screen, select the preferred crop year (top left)
- From the mobile app home screen, click on the Fields tile
- Here are your clients listed.
- Tap the down arrow on a client.
- Here are your farm listings for the client selected.
- Tap the down arrow on the farm listing.
- Here are the Fields that are listed for the Farm selected.
- Tap the Field to view the field.
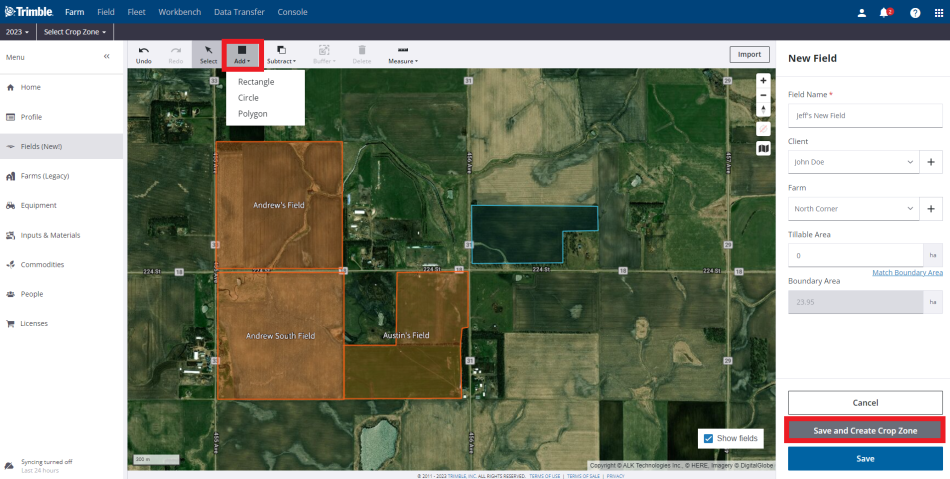
Add fields to your online account with as much or as little information as you need, with the option to draw or import boundaries to auto-calculate areas for boundaries.
- Log in to your account online
- Select the preferred crop year (top left)
- From the Farm tab, select Fields
- Select Fields to view Fields
- Tap +Add
- You have the option to Create New or Import a field. For this demonstration, we will select Create New

- Here is where you are able to draw your new field. Select Add at the top and choose how you would like to draw your field.
- Add Field Name.
- Add Client, Farm, and Tillable Area if applicable.
- You are able to Save just as a field, or save as a field and crop zone. If you choose field only, the process is done. For this demonstration, select Save and Create Crop Zone.
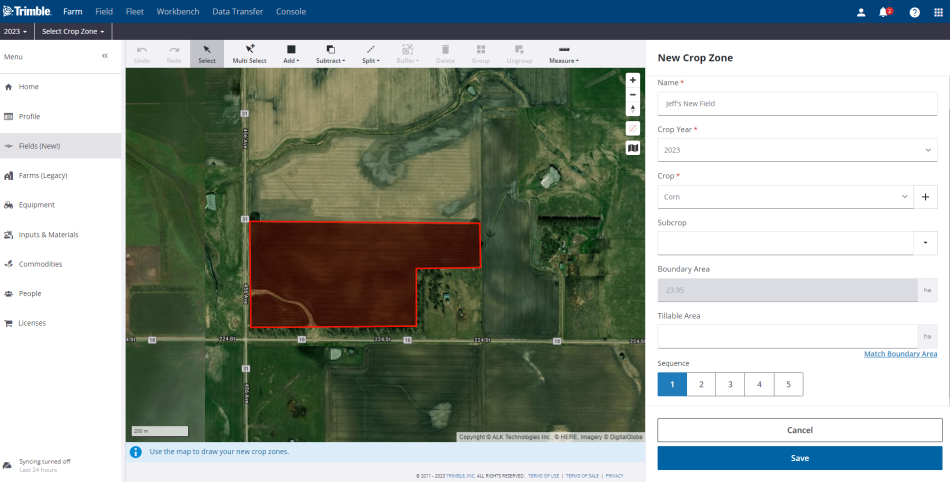
- Now you will now enter settings for your crop zone. You are also able to edit crop zone area from the edit bar at the top.
- Choose the sequence for this crop zone. This is the sequence of different crops that will be planted on this field.
- Click Save when done.
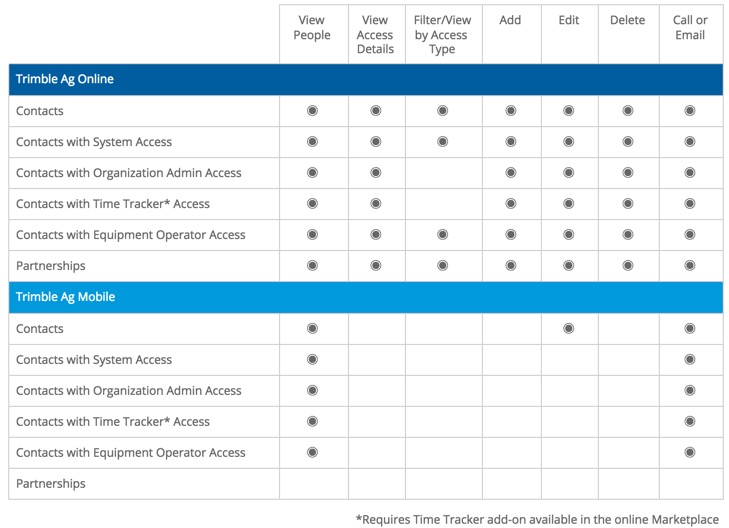
Once contacts, organization administrators and partnerships are set up on your account, you can see and control the level of access each of these has to your information online and on the mobile app. You can control which features are visible to users by managing system and mobile access for each contact, as well as choosing which modules to activate for your entire account in the online Marketplace.
User Access Options by Platform | Trimble Ag Online and Trimble Ag Mobile
With the mobile app’s automatic map coordinates, plus many of the same features that are available online, you can easily add fields and associated farms on your Trimble Ag Software account using your phone or tablet, with or without cellular or wi-fi coverage. To associate a client name with a farm created on the mobile app, update the Field Profile details online when you’re back in the office.
- Log in to the mobile app with the same Trimble ID used to access your online account (learn more)
- From the mobile app's home screen, select the preferred crop year (top left)
- Tap the Fields tile
- Tap the plus icon on the top right corner of the screen to add a new field
- On the New Field editor screen, tap to enter or select details outlined below:
- Name - (required) tap to enter the new field name
- Acres - (required) tap to enter a number (may be shown as hectares, depending on your settings)
- Note: this number will auto-update once a boundary shape is added to the field details (learn more)
- Farm - tap to select from the list of farms on your account, or tap Create Farm to add a new farm to the list (or tap Dismiss)
- Crop - (required) tap to search or select from All, My Materials or Purchased crops available (or tap the back arrow to return to the previous screen)
- Description - if shown, tap Select a Crop Description (also known as Subcrop) to view options for the selected crop (if blank, the system has no corresponding description; continue to the next item)
- Variety - if shown, tap Select a Crop Variety to view options for the selected crop description (if blank, the system has no corresponding variety; continue to the next item)
- Target Yield - tap the default 0 lb/ac, 0 % Moist measurements shown to display the Target Yield editor screen, then enter a number and tap a unit of measure to scroll and select options for both yield and moisture rate, then tap Save (or Dismiss)
- Tap the plus icon next to Legal Land Description (also known as reference points used by land surveys and land title records);

- On the Legal Land Description editor screen, tap to enter or select details outlined below (note: regional options are displayed based on the Province or State and Country selected in your account Profile online):
- Seeded Acres (also known as Tillable Area) - tap to enter the number (may be shown as hectares, depending on your settings) to show the seeded/tillable area as different from the boundary area (for example, when a field has less planting space due to ongoing issues such as flooding, etc.)
- Cultivated Acres - tap to enter the number (may be shown as hectares, depending on your settings) if different from Seeded/Tillable Area or Boundary Area
- Description - tap add any notes such as text that defines the legal boundaries of your property
- Land system references - tap to enter any legal land coordinates (note: regional options are displayed based on the Province or State and Country selected in your account Profile online)
- LAT and LONG - automatically update the latitude and longitude coordinates by moving the map under the white X, or tap the white compass icon on the top left corner of the map to move to show your current location
- Note: latitude and longitude coordinates are tracked for record-keeping purposes only; boundaries are required if you want to use your mobile device’s built-in GPS to navigate to a field location, or zoom into fields on the maps
- Tap the disc icon (top right) to save changes
- If Seeded Acres were entered, you may also be prompted with options to update the area for the field:

- Select Yes to overwrite the field acres to match the Seeded Acres, which also updates the Field Manager Overview online
- Select No to keep the Seeded Acres as a separate measurement, visible only when viewing records under the Legal Land Description on the mobile app
- Sync changes with the online account when you're within cellular or wi-fi range, by returning to the home screen and tapping the green sync icon (top right)

With the mobile app's automatic map coordinates, plus the same features that are available online, you can easily edit fields on your Trimble Ag Software account using your phone or tablet, with or without cellular or wi-fi coverage.
- Log in to the mobile app with the same Trimble ID used to access your online account (learn more)
- From the mobile app's home screen, select the preferred crop year(top left)
- Tap on the Fields tile
- Tap the arrow on the black row to expand the farms list, then scroll and tap to select a field
- Tap on the field listing, then tap the field again
- Tap the pencil icon to edit the field
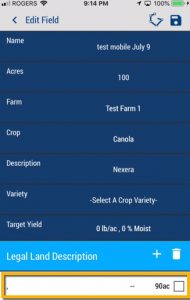
- Tap Name to edit the field name
- Tap Hectares to edit a number (may be shown as acres, depending on your settings
- Tap Farm to select from the list of farms on your account, or add a new farm to the list
- Tap Crop to search or select from Purchased, Frequent or All crops available
- Tap Description to search or select options available for the selected crop
- Tap Variety to search or select options available for the selected crop
- Tap Target Yield to edit the quantity per area, tapping on the unit of measure shown to scroll and select a different measurement from the list, edit the moisture percentage, then click Save (or Dismiss)
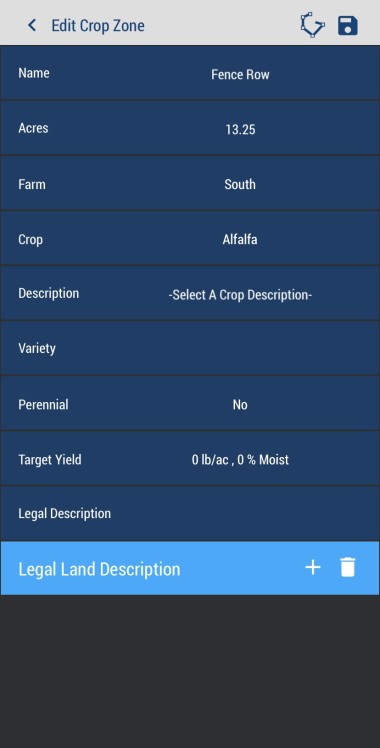
- Tap to edit the Legal Land Description (a series of numbers listed on land title records, representing section, township, range and meridian), or tap the checkbox to select and delete the entry, then tap the + icon to add a new entry
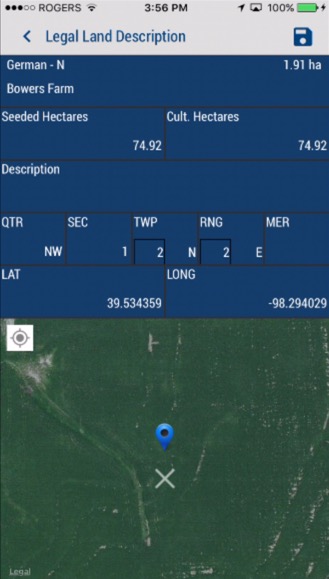
- Tap Seeded Hectares to edit the number (may be shown as acres, depending on your settings)
- Tap Cultivated Hectares to edit the number (may be shown as acres, depending on your settings)
- Tap Description to edit or add any notes
- Tap QTR to select from the list of Quarters (or click Dismiss)
- Tap SEC to select from the list of Section numbers (or click Dismiss)
- Tap TWP to add or edit the Township
- Tap RNG to add or edit the Range
- Tap MER to select from the list of Meridians (or click Dismiss)
- Automatically update the LAT and LONG (latitude and longitude) coordinates by moving the map under the white X, or tap the white compass icon on the top left corner of the map to move to show your current location
- Tap the disc icon (top right) to save changes
- Sync changes with the online account when you're within cellular or wi-fi range, by returning to the home screen and tapping the green sync icon (top right)

Use Field ProfilerTM to manage field boundaries by crop year in Trimble Ag Software, with options to add and assign fields, draw and color-code your boundaries, import and export boundary shape files and Google Earth map files, import boundaries from the prior or following crop year, and import or export benchmarks. Our software uses spatial selection to look for matches between your data and our software, starting with the field name. If field names are different, Trimble Ag Software looks for similar field boundaries to match data for both fields.
- Log in to your account online (learn more)
- Select the preferred crop year (top left)
- Click on the Field tab (top menu)
- Select Field Profiler from the left navigation menu
- View the list of fields for the specified crop year, with options to search, filter or print the views selected
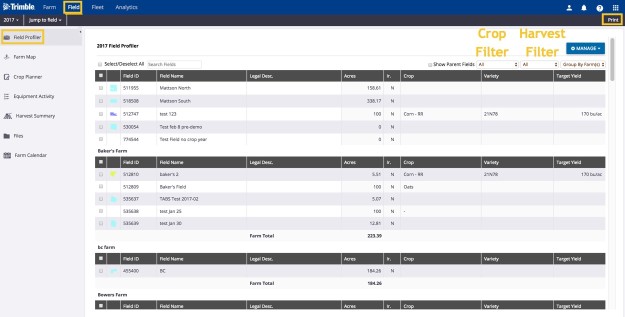
- Click Manage to view options
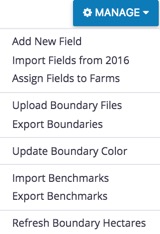
- Select Add New Field to add an asset to that crop year (opens the same dialogue found under Farm>Farms>Field>Add Field)
- Select Assign Fields to Farms with the click of a button to organize farm assets (learn more)
- Select Import Fields from 2016 to automatically create a copy of field profiles from another crop year, as a clean slate for the next season’s field tasks and events (learn more)
- Select Upload Boundary Files to upload shape files (requires all four file types: .dbf, .prj, .shp and .shx):
Verify the results and confirm if the record is a new field, or select a field name from the list:
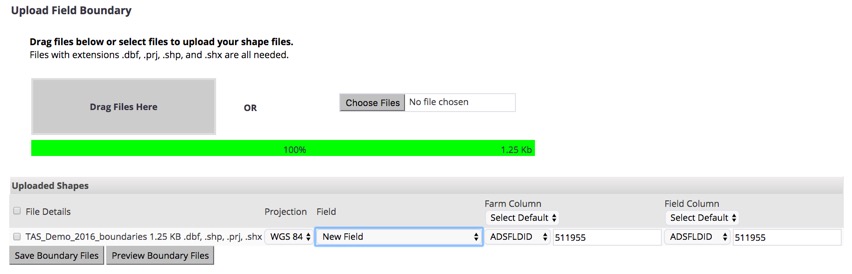
Select a farm column name and field column name from the list:

- Click Preview Boundary Files to view the results
- Click Save Boundary Files to complete the upload
- Select Export Boundaries for selected field(s) to download boundary map shape files:
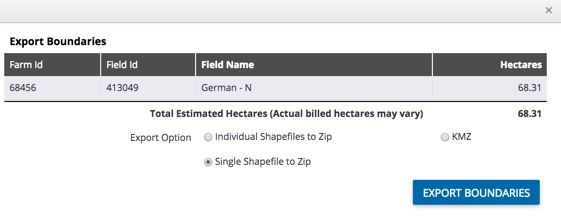
- Click to select one of three options:
- Individual Shape files to Zip - separate shape files for each field
- Single Shape files to Zip - one shape file with all boundaries
- KMZ - Google Earth/Google Map files
- Click Export Boundaries (or click X to close the window without saving changes) to download files to your computer
- Select Update Boundary Color to apply custom colours to one or more selected field boundaries (learn more)
- Select Import Benchmarks to upload KML or KMZ (Google Earth) or GPX files with map pin locations used for field scouting or other crop management identifiers:
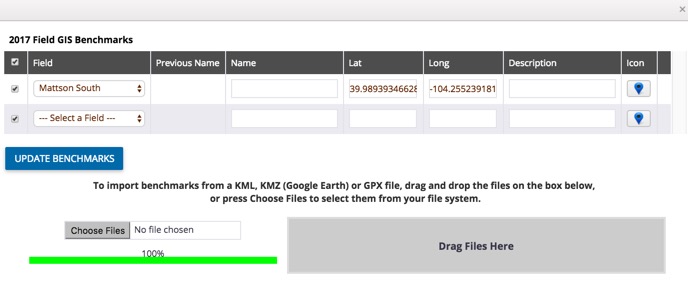
- Customize the name, latitude and longitude coordinates or description
- Click Icon to select a new shape or colour for the pin
- Click Update Benchmarks
- Select Export Benchmarks for selected field(s) to download KML (Google Earth) files to your computer, with map pin locations used for field scouting or other crop management identifiers
- Select Refresh Boundary Acres to update the size of boundaries when ordering PowerZones (contact our sales team to learn more). Note: this option may show hectares, depending on your account settings.
In addition to managing fields and boundary data, use the Field ProfilerTM to preview, draw, delete and change boundary colours in Trimble Ag Software. Web drawing tools allow you to zoom in to your farm location on satellite maps to create point-and-click shape files. Easily edit, redraw and add inner boundaries, while the software auto-calculates the size of drawn boundaries for your fields.
- Log in to your account online (learn more)
- Select the preferred crop year (top left)
- Click on the Field tab (top menu)
- Select Field Profiler
- View the list of fields for the specified crop year, with options to search, filter or print the views selected
- Hover your cursor over the field boundary thumbnail image (if shown)
![]()
- Click on the new icons visible for a field (if applicable) to:
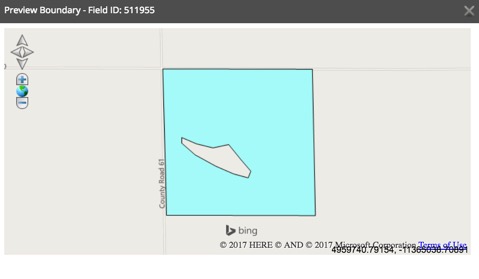
Preview Boundary:
- View and zoom in/out over a 2D map pop-up of your field boundary
- Click the X to close the preview window
Draw Boundary:
- Zoom in/out on the map editor pop-up to locate your field
- Click Draw Boundary
- Click to drop points on the map to create a boundary
- Double-click on the last point to finish drawing the boundary
- Click Save Boundary
- Preview the boundary shape and area size, or use drawing tools at the top of the map to Edit Boundary, Draw Inner Boundary, Redraw Boundary, or use Measurement Tools (line or polygon) to draw landmarks such as fences or ponds and calculate distance and area
- Click Close Window
Delete Boundary:
- Click OK to confirm at warning to remove boundary (or Cancel)
- Boundaries deleted from the Field Profiler will still be visible under the Farm menu, where they can also be retired from view.
Change Color of boundaries:
- Click on a color in the palette grid to view the sample color, or enter an alpha-numeric Hex color code
- Click Apply (or Cancel)
- Tip: To update boundary colors on multiple fields at once:
- Click the check boxes to select one or more fields
- Click on the Manage button
- Select Update Boundary Color
- Use the palette grid (as shown above) to select or enter a color code
- Click Apply (or Cancel)
In addition to managing fields and boundary data, use the Field ProfilerTM to import fields between crop years on your Trimble Ag Software account. Save time by automatically creating a copy of one ore more field profiles as a clean slate for the next season's field tasks and events.
- Log in to your account online (learn more)
- Select the preferred crop year (top left), such as the year you're importing from
- Click on the Field tab (top menu)
- Select Field Profiler
- The list of fields is displayed for the specified crop year, with options to search, filter or print the records selected
- Click Manage
- Select Import Fields from 2017 (menu shows the prior crop year)
- View the list of fields available for import from the previous crop year if needed, select a different crop year on the top left corner of the screen to refresh the list
- Filter the list to Group by Farm(s), if needed
- Click the checkboxes to select a field or group of fields, or Select All
- Scroll down and click a button to to apply the option to the selected fields:
- Import Checked Fields

- View All
- Import From (displays the next crop year)
- Import Nutrient Zones (if available)
- Import From: enter a specific year instead of the prior crop year displayed above, then click Go
- The Field Profiler for the new crop year is displayed, including any imported fields
In addition to managing field boundaries, use the Field ProfilerTM to assign fields to farms on your Trimble Ag Software Account. Save time by organizing farm resources with the click of a button.
- Log in to your account online (learn more)
- Select the preferred crop year (top left)
- Click on the Field tab (top menu)
- Select Field Profiler from the left navigation menu
- View the list of fields for the specified crop year, with options to search, filter or print the views selected
- Click the checkboxes in the first column to select a field or group of fields, or Select All
- Click Manage
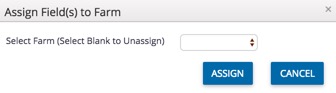
- Select Assign Fields to Farms
- Click the dropdown list to select a farm from your account (or select Blank):
- Click Assign (or Cancel)
Related: you can also assign fields to farms on your account and more, in Field Details
Turn one field into two or more fields with the click of a button in Trimble Ag Software. Use this tool in the early process of setting up your fields online, before adding boundaries, applying products to fields, importing as-applied coverage maps and other tasks that affect field expenses.
- Log in to your account online (learn more)
- Select the preferred crop year (top left)
- Click Select Crop Zone and select a crop zone
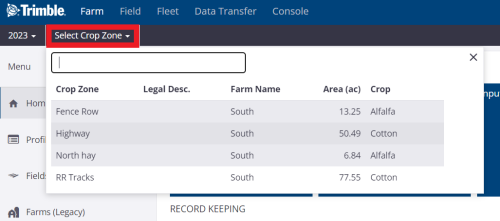
- if two fields with the same name are shown, choose the field with a crop listed
- if you don’t see your field on the list (shows the first 20 fields), go to the Field menu and select Field Profiler, then click on the name of the field to open the Field Manager
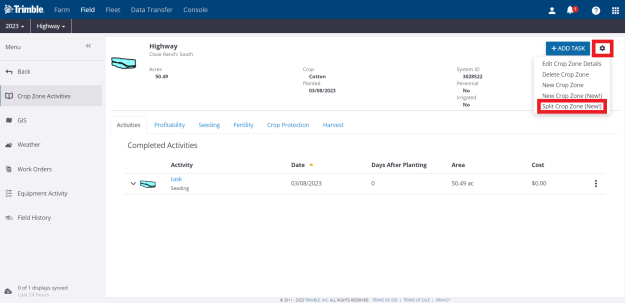
- From the Crop Zone screen, click the the settings button
- Select Split Crop Zone
- Edit Field details by Adding Name to Crop Zone, select crop or add crop, enter tillable area
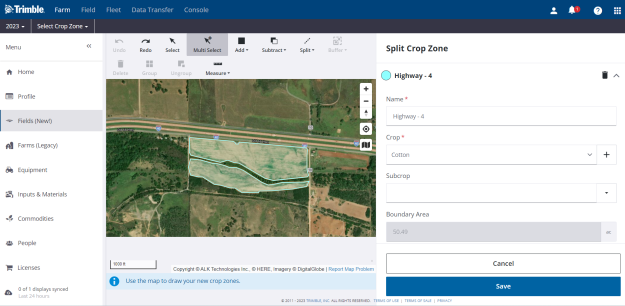
- Edit the field boundaries, if needed, in the map that launches. You can add, subtract, or split the field.
- Click Save when complete
Add a new crop sequence to an existing field to track events and expenses for multiple harvests during the same crop year in Trimble Ag Software. View multiple crop sequences for the same field when the using the quick start menu, Jump to field, in the online account.
- Log in to your account online (learn more)
- Select the preferred crop year (top left)
- Click Jump to field and select the field name
- if two fields with the same name are shown, choose the field with a crop listed
- if you don’t see your field on the list (shows the first 20 fields), go to the Field menu and select Field Profiler, then click on the name of the field to open the Field Manager
- From the Field Manager screen, click the Manage button
- Select New Crop
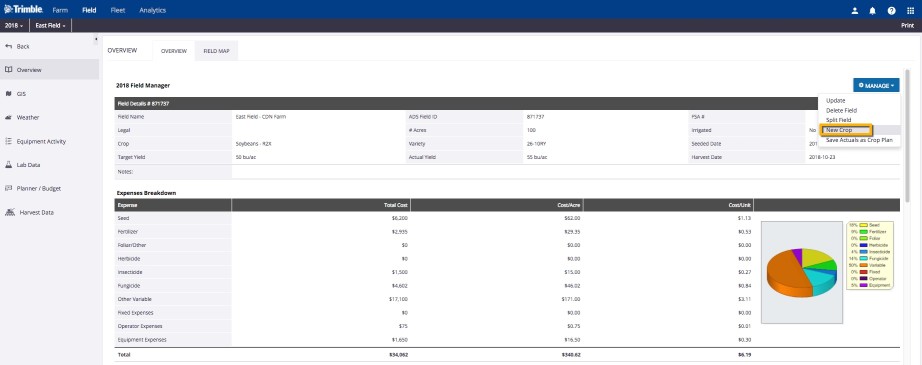
- Enter a new name and confirm the number of new acres for the next crop sequence
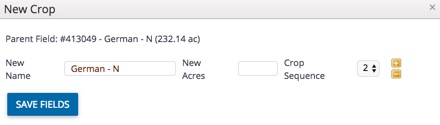
- Click the + icon to split the parent field into more than two crop sequence fields (or click the - icon to remove an extra split)
- Click Save Fields (or click the X to close the window without making changes)
- The Field Profiler screen is displayed
- Select the new field (or Jump to Field) to return to the Field Manager screen
- Click the Manage button
- Select Update
- From the field profile details, click the Crop tab to select the new crop sequence from the dropdown list
In addition to setting up basic information for your fields online, it's easy to import field boundary data. Our software uses spatial selection to look for matches between your data and our software, starting with the field name. If field names are different, Trimble Ag Software looks for similar field boundaries to find a match.
- Log in to your account online (learn more)
- Select the preferred crop year (top left) if a crop will be listed for the field
- Click on the Farm tab (top menu)
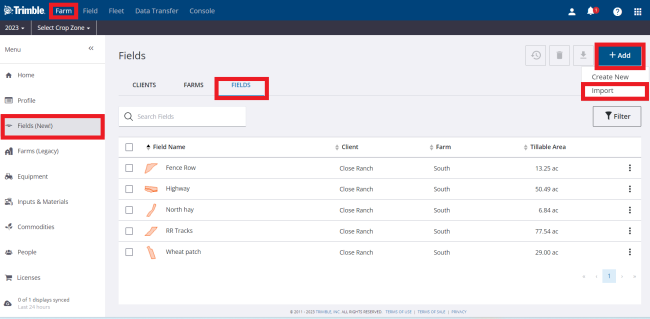
- Select Field from the left navigation menu
- Click on the Fields tab
- Click +Add and select import
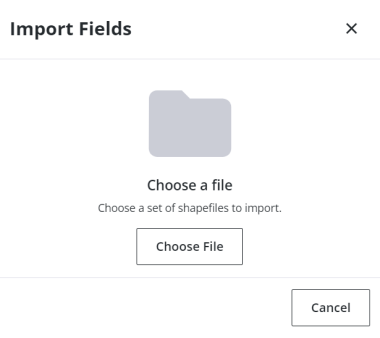
- Chose a set of shapefiles to import
- Click Import
Use a wide range of drawing tools available online in Trimble Ag Software, with the GIS editor. Create point-and-click shape files that auto-calculate the boundary area, including polygons, lines as well as circles for fields managed by center-pivot irrigation, with the option to save separate crop and field boundaries. Units of measure shown in the boundary area can be adjusted in your account settings.
Tip: when adding or updating a field from the Field Profiler, the boundary drawing options are the same when starting from Step 9 below.
- Log in to your account online (learn more)
- Select the preferred crop year (top left)
- Click Select Crop Zone and select the field name
- if two fields with the same name are shown, choose the field with a crop listed
- if you don’t see your field on the list (shows the first 20 fields), go to the Field tab and select Field Profiler, then click on the name of the field to open the Field Manager
- as an alternative, you can go directly to the GIS editor screen by going to the Farm menu and select Farms, then click on the Fields tab and click the edit icon next to a field name
Note: the direct-to-GIS method may not work if you see and select fields that were already deleted from the Manage button on the Field Manager screen but were not yet retired as assets on the Farm menu
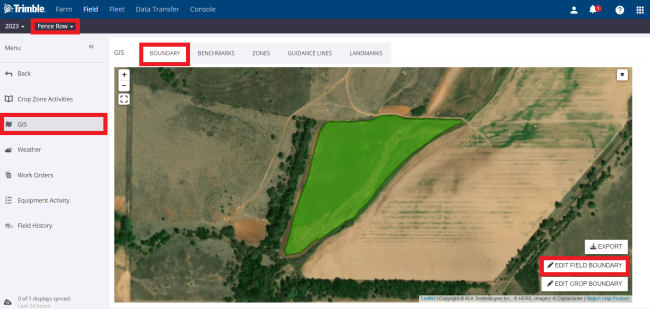
- From the Crop Zone screen, select GIS from the left navigation menu
- From the Boundary tab, click Edit Field Boundary (bottom right)
- Zoom in to the preferred location on the satellite map using the plus + and minus - icons (bottom right), or click and drag to move the map in any direction
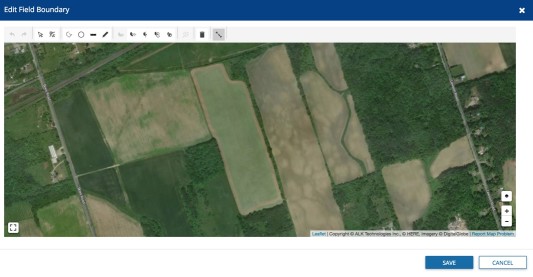
- Hover over the drawing tools at the top of the map to see options available, depending on the state of the drawing
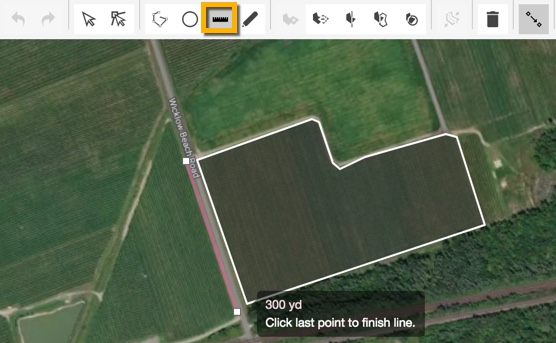
- Click on the Draw Polygon icon

- Click to drop points on the map along the outer edges of the field boundary as guided by the on-screen prompts, following the shape as closely as possible to minimize editing later
- At any time, click Delete last point or Cancel, as needed

- Click the first point to close the shape (note: the tool will automatically display overlapping points, which will create errors in the boundary shape file, preventing the invalid shape from being saved)
- Click Save (or Cancel)
- Click to select the boundary shape and continue editing, if needed
- Click the Subtract by Polygon icon to remove non-tillable areas from the boundary

- Click to drop points on the map to outline the shape to be removed
- Click on the last point to close and remove the shape from your boundary
- Continue editing the boundary shape, or click the trash icon to delete the boundary
- Click Save (or Cancel)
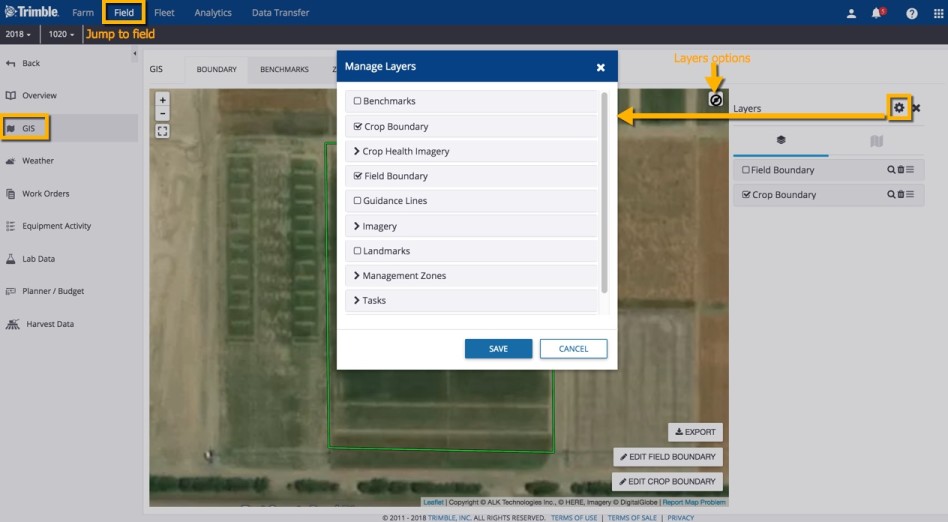
- To add a Crop Boundary that is different from the Field Boundary, click Edit Crop Boundary
- Click the checkbox next to crop boundary matches field boundary to turn this default option off (when not selected, allows for separate tracking of overall field perimeter versus smaller tillable or seeded area that excludes land formations, buildings, etc.)
- Click Save (or Cancel)
- Click Edit Crop Boundary again to display the boundary map along with map editing toolbar
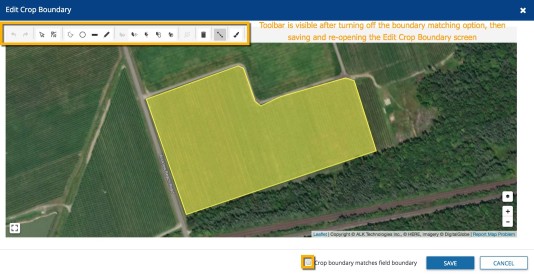
- Change the Crop Boundary color by selecting the Paintbrush icon in the toolbar, then click to select a color from the palette, or enter the Hex color ID, and click OK (or Cancel)
More GIS Boundary Drawing Tools
- Hover over the icons to explore more drawing options with on-screen tips, including:
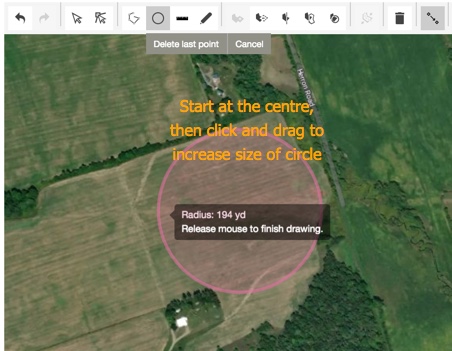
- Circle boundaries for centre-pivot irrigation - start by clicking on the center of the field, click and drag in any direction to increase the circle radius, then release to close the shape
- Measure distance with the line tool, to add map references for items like fences or roads
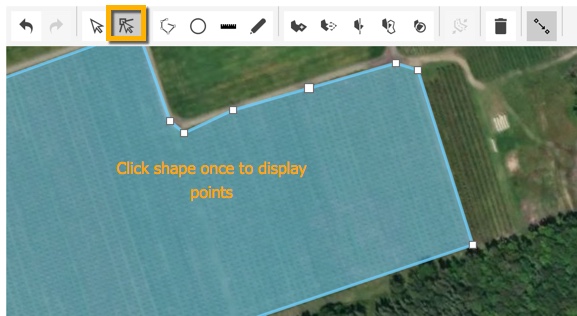
- Edit a polygon vertex (point where edges meet) to resolve errors in the boundary shape file caused by overlapping points
- Start by clicking once on the shape to display boundary points
- To add a new vertex (point), hover along the shape edge in between points, then click to complete the action
- To move or delete a vertex (point), click on an existing point to display the options, then drag or click to complete the action
- Delete a boundary____text in bold by clicking the shape so that it is displayed as a solid color
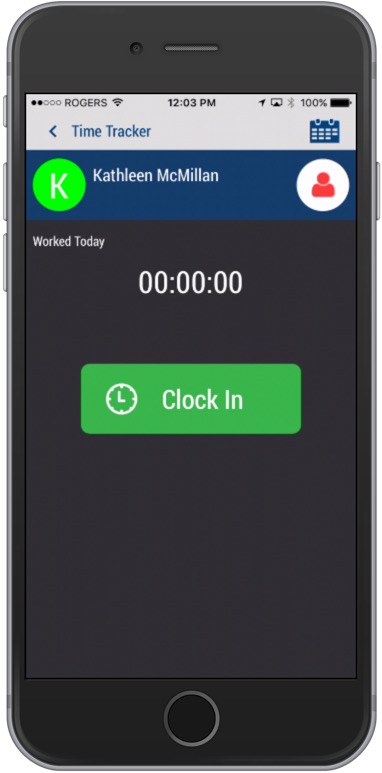
With any iOS or Android mobile device, farm workers can clock in and out of shifts with Ag Time Tracker™, even when outside cellular or wi-fi coverage. Once workers are set up as contacts with time tracker access in your Trimble Ag Software account, the mobile app does the rest of the work for you. Just turn on location services in your mobile device’s privacy settings. No other software installations or setup required.
- Log in to the mobile app with the same Trimble ID used to access the online account (learn more)
- Tap the Time Tracker tile
![]()
- The worker's name is shown at the top of the screen, as recorded in the account contacts
- Tap the Clock In button to start recording time worked
- Navigate back to the home screen to continue using other features on the mobile app, if needed
- To stop the clock during unpaid breaks, tap the Time Tracker tile, then tap the Take a Break button
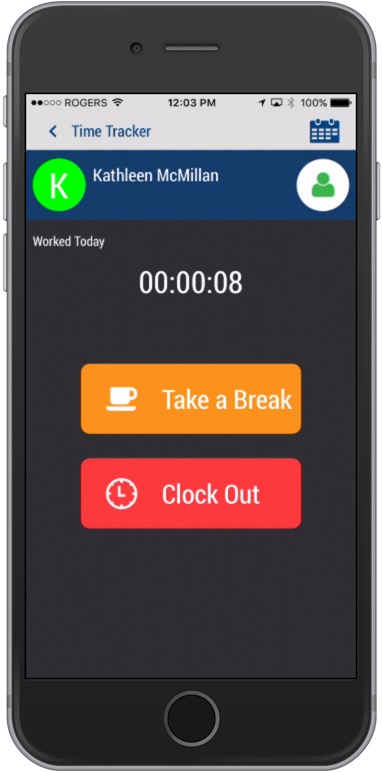
- Tap the Clock In button to return to work, or Clock Out to end a shift
- Sync changes with the online account when you’re within cellular or wi-fi range, by returning to the home screen and tapping the green sync icon (top right)

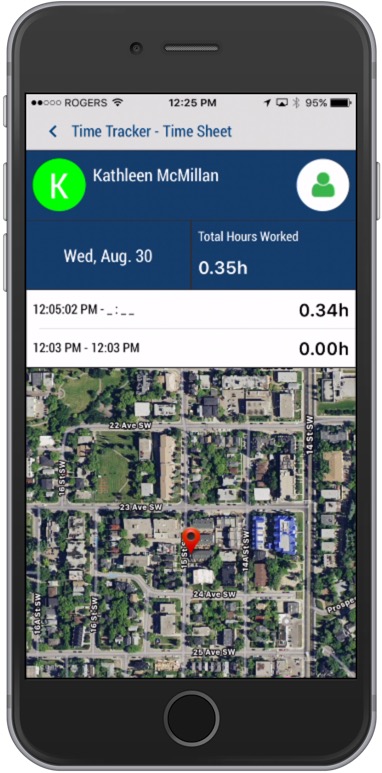
Along with managing their own clock-in/out records, workers can view, edit or delete their own time sheets Ag Time TrackerTM, using their mobile phone. The organization administrator can easily add or remove time tracker access for workers, to control access to your Trimble Ag Software account.
- Log in to the mobile app with the same Trimble ID used to access the online account (learn more)
- Tap on the Time Tracker tile
![]()
- View the Time Sheet summary by clicking the calendar icon at the top of the screen
- Expand and collapse time sheets for each month by tapping the arrow at the end of the blue row
- Tap any date record (white row) to view date and time stamp details with map locations for each (visible if location services are turned on in the worker’s mobile device privacy settings)
![]()
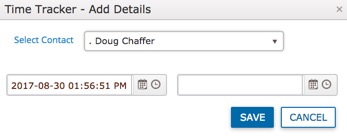
- Tap any record (white row) above the map to view the Time Sheet - Edit screen
- Tap to select a different Start/End Date and/or Start/End Time, to auto-calculate the Total Hours Worked
- Tap to select one of three options:
- Save - update the account with changes to the selected clock-in/out record, and return to the Time Sheet details screen
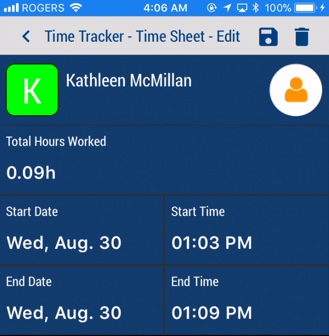
- Delete - permanently remove the clock-in/out record (click
- Yes or No at the warning to complete this step) <back-arrow - return to the previous screen without saving changes
- Sync changes with the online account when you're within cellular or wi-fi range, by returning to the home screen and tapping the green sync icon (top right)
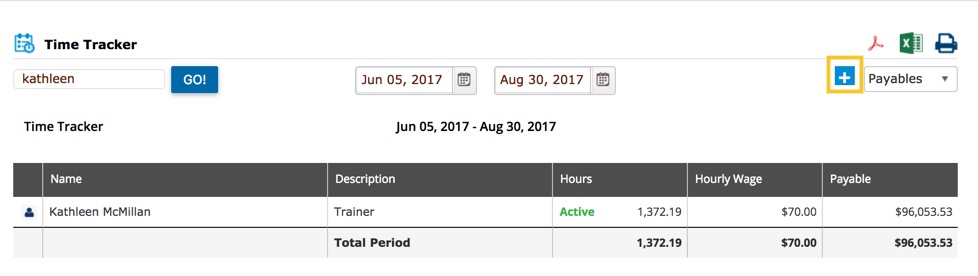
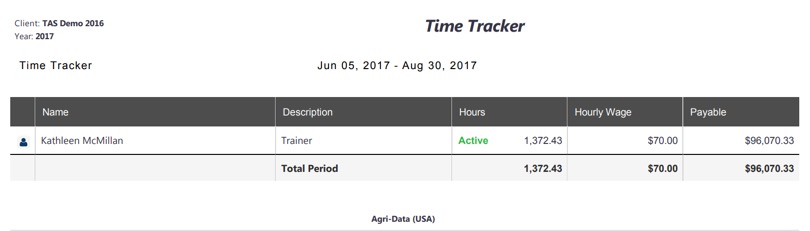
With the Ag Time Tracker™ add-on available for purchase in the online marketplace, farm supervisors or organization administrators can run instant reports for time sheets and payables for all Ag Time Tracker activities across your Trimble Ag Software account. See summaries of key information including job titles, status and hourly wages saved in each contact's profile on your online account. Export or save reports by custom search criteria or date ranges for easy sharing with your accountant.
- Log in to your account online (learn more)
- Refresh your browser to ensure you're seeing the most up-to-date information synced from remote workers (note: workers also need to sync their mobile app with the online account once they're within cell or wi-fi range)
- Click on the Farm tab (top menu)
- Select Time Tracker from the left navigation menu
- Tap the calendar icons to select the period start and end date
- Select the type of report from the dropdown menu at the far right
![]()
- Timesheets - name, description (title), hours, status and total hours for the period
- Payables - same as above plus hourly wage and total payable
- Search by name or any report value in the top left
- Click GO!
- Add more details by clicking the blue + icon on the top right corner of the screen
- Select a contact name from the dropdown list, then click the calendar icons to select period start and end dates
- Click Save (or Cancel) to show additional results for selected contacts, valid if contacts have both Ag Time Tracker access and hours worked in that period
- Download reports for on-screen results by clicking the report icons (PDF, CSV spreadsheet or printable view in browser) in the top right corner
Sample Report for Ag Time Tracker | Trimble Ag Online
When you're on the go, use the mobile app's simple point-and-click tools to drive or draw boundaries and automatically update boundary area in your Trimble Ag Software account. View or zoom into your location on satellite maps while your phone's GPS automatically updates latitude and longitude coordinates for your field. By adding boundaries to your fields, you'll be able to access more map information for weather, Crop Health Imagery, as-applied coverage maps and vehicle locations across your farm.
- Log in to the mobile app with the same Trimble ID used to access your online account (learn more)
- From the mobile app's home screen, select the preferred crop year (top left)
- Tap the Fields tile
- Tap the arrow to expand the farms list, then scroll and tap to select a field
- Tap the pencil icon (top right) to edit Field Details
- Tap the boundary icon (top right) on the Edit Field screen
- Tap DRAW
- Tap Start
- Slide the map under the white X to pinpoint a location
- Tap + Add Point to drop the first boundary point
- Continue sliding the map under the X and adding points (or tap the undo arrow to undo)
- Close the shape by adding the last point on top of the first point
- Continue editing the boundary to Add or Subtract area (land formations, buildings, etc.), if needed, then click Done
- Tap the disc icon (top right) to save changes (or click the trash icon to delete)
- Tap Yes (or No) at the prompt to Update Area
- View the updated area on the Edit Field screen (may be shown as acres or hectares, depending on your settings)
- Tap the disc icon (top right) to save changes
- Sync changes with the online account when you're within cellular or wi-fi range, by returning to the home screen and tapping the green sync icon (top right)
If you've already set up a field in your farm assets without a crop year, it's easy to add a crop year so that you can view and manage field details in Field Profiler within Trimble Ag Software.
- Log in to your account online (learn more)
- Click on the Field tab
- Select Farm Map from the left navigation menu
- Click the dropdown arrow to expand the list of Other Fields
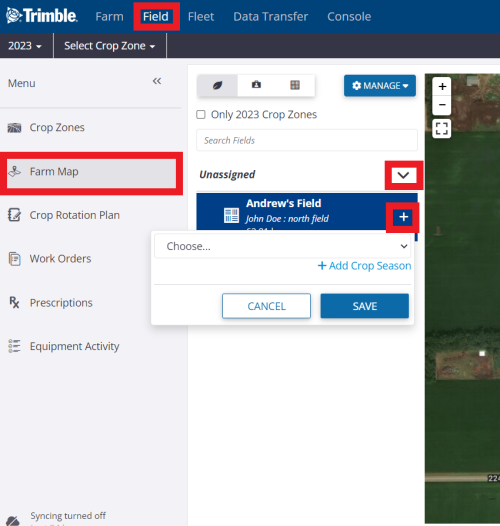
- Click the + icon to view the option
- Select a crop season (year) from the list or click +Add Crop Season to create a new crop year on your account
- Click Save (or Cancel)
- You can now view or manage this field by crop year using the Field Profiler
It's quick and easy to add the basic details for each crop that you're growing on your farm, outside of any specific crop year. Once your crops are entered online, they can be used in commodity tile forecasts by crop year, online or on the mobile app. Your crops can also be edited or deleted online, and will also show up as your default crop list when setting up new fields online (features not available on the mobile app).
- Log in to your account online (learn more)
- Click the Farm tab (top menu)
- Select Commodities (left navigation pane)
- Click the Crops tab
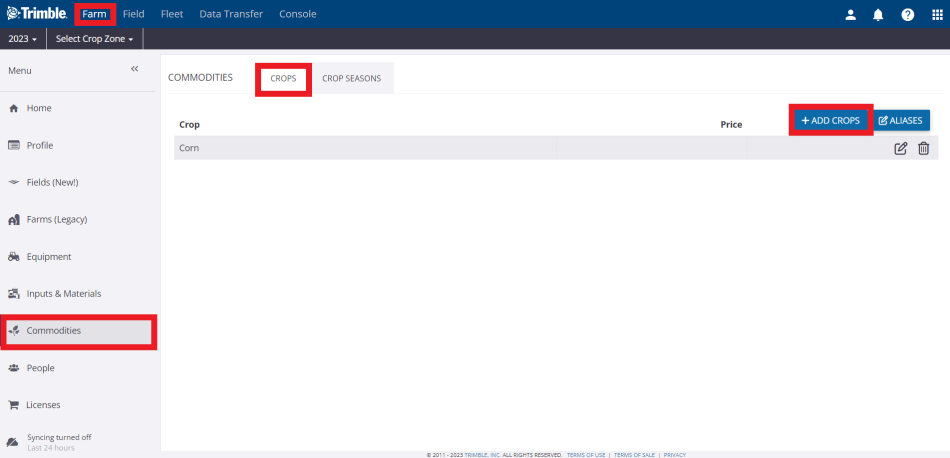
- Click the +Add Crops button
- Scroll down the master list and click to select from the list of crops available in your region
- Click Save (or Cancel)
- From the list of crops, click the pencil icon to edit any crop and enter an optional estimated selling price
- Click the disc icon to save changes (or click to undo)
To remove a default crop from your account, simply delete it from commodities tracked for your farm. Fields already created with this crop are not affected; however, when adding or editing fields online, this crop will no longer be displayed in the list of default crop options.
- Log in to your account online (learn more)
- Click the Farm Tab (top menu)
- Select Commodities (left navigation pane)
- Click the Crop tab
- Click the delete icon
- Click Delete to confirm your change (or Cancel)
Please see the Crop Rotation Plan Video for more information.
Using an existing field set up in your Trimble Ag Software account, you can quickly generate a series of field plans to compare the cost of different crop management strategies. Compare side-by-side budgets with basic or complex operational details, to gauge the cost per unit of production and benefits of each scenario. Save time by converting a plan to actuals, to use as your plan of record in the Field Manager when tracking field-level events and expenses throughout the crop season.
- Log in to your account online (learn more)
- Select the preferred crop year (top left)
- Click Jump to field and select the field name
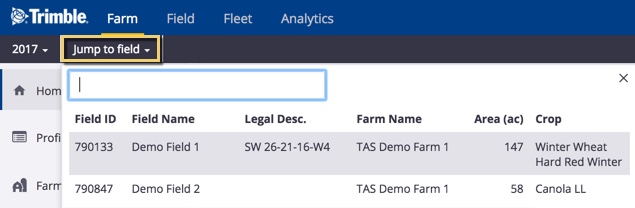
Not seeing it? Type the first few letters to search by name, or go to the Field menu to select the field name from the Field Profiler list
- if two fields with the same name are shown, choose the field with a crop listed
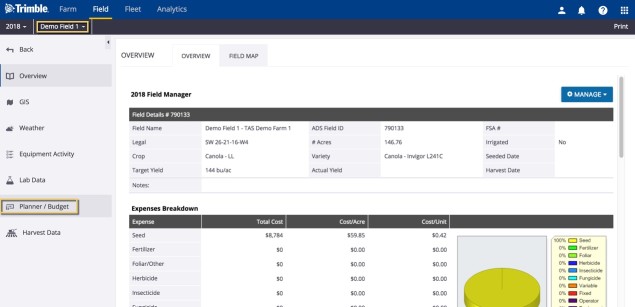
- From the Field Manager screen, select Planner / Budget (left navigation menu)
- On the Field Planner screen, add or select options to define a new plan
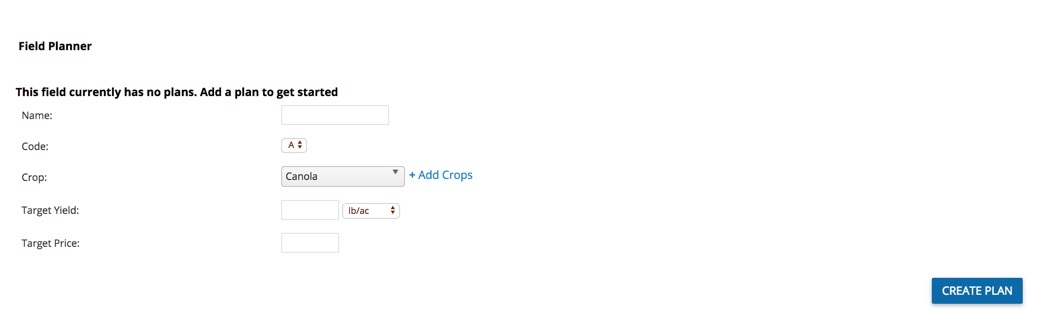
- Enter a Name for your field plan (example: Good, Better and Best)
- Select a Code from the dropdown list to help keep your plans organized
- Adjust the default Crop, if needed, by selecting a different crop from the list (or click +Add Crops) to add to your crops
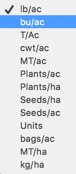
- Enter a Target Yield amount and click to adjust the unit of measure
- Enter a Target Price for the yield
- Click Create Plan to save changes (or navigate away from this screen to cancel)
- Review the new Field Planner and scroll down to enter relevant fixed and variable expenses for this plan
- Seed - click the add record icon to display or edit the default crop type costs for any planned seed applications, then select one or more fields and click Add Application (or Close Window)
- Fertilizer Application - click the add record icon to add any any planned fertilizer applications, then select one or more fields and click Add Application (or Close Window)
- To record a fertilizer mix, click the Quick Blender (lighting bolt) icon to make selections from the pop-up window shown below, then click GO
- Product Application - click the add record icon to add any any planned applications, then select one or more fields and click Add Application (or Close Window); once a plan is converted to actual, this is where you can view or edit tasks read-in from vehicle displays or third-party accounts in the Field Manager Overview tab
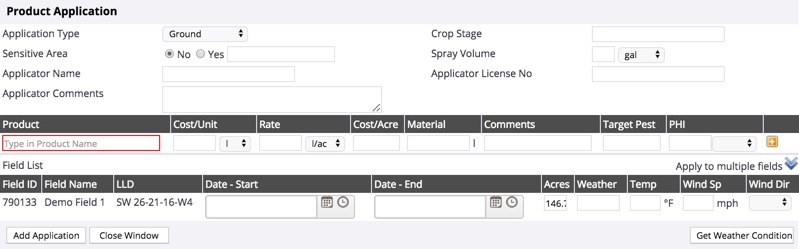
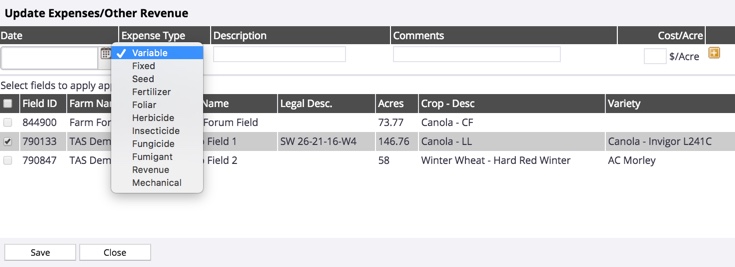
- Other Expenses - click the add record icon to add any any other expense types (such as tractor repairs or lease costs), then select one or more fields and click Save (or Close)
- Scroll to the top of the screen and click the Manage Button
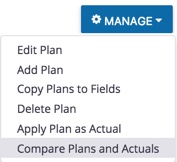
- Then select Compare Plans and Actuals
- Select any two plans or actuals from the lists at the top of the screen to view or print the Field Comparison report to see the total cost of operating between actuals (in our example, the Field Manager actuals are on left, and the new scenario, Good – A plan, is on the right)

- Click Back (top left) to return to the previous screen
- To add more scenarios, click the Manage button and select Add Plan

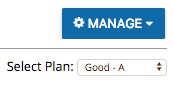
- Toggle between plans by choosing from the Select Plan list, beneath the Manage button
- To begin working with your preferred plan as the plan of record, click Manage and select Apply Plan as Actual (replaces existing Field Manager plan of record, including any actual applications or expenses already recorded for the crop year)
- From the left navigation menu, select Overview to return to the Field Manager (actuals) screen
No matter where you are, we make it simple to contact our customer support team for help with any of your Trimble Ag Software questions. Connect with us when you're in the field, on the go or at the office, by in-app help, email, live chat or phone.
In-App Help
Click the help icon when you're logged into Trimble Ag Online to email support with the option to upload files. From the Trimble Ag Mobile app, tap the Settings tile and scroll down to click Email Diagnostic Info to send a message that includes your account details. If requested by our support team, use the mobile app option to automatically Upload Detailed Logs.
Not logged into your account? Send us an email message anytime.
Live Chat
Click the help icon when you're logged into Trimble Ag Online to start a chat with a live agent. Our instant message system automatically opens in your web browser, with no setup required on your end.
Phone
Speak with our global support team in your region, or leave a voice message to reserve your spot in line for a call back.
Create a new field scout report with Trimble Ag Mobile to quickly record observations on your mobile device when you're out in the field. Select from predefined crop health factors, add photos and comments, then sync updates with your online account once you're back within cell or wi-fi range. Save your report anytime to edit later, keep on file or share with contacts, operators or partners with access to your account, or email reports to other advisors.
- Log in to the mobile app with the same Trimble ID used to access your online account (learn more)
- From the mobile app’s home screen, select the preferred crop year (top left)
- Tap the Fields tile
- Tap the arrow on the black row to expand the farms list, then scroll and tap to select a field
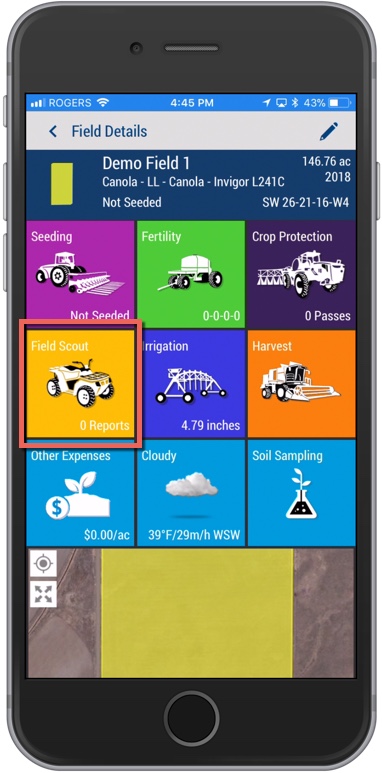
- On the Field Details screen, tap the Field Scout tile
- On the Field Scout summary screen, tap the __plus + __icon to add a scouting record
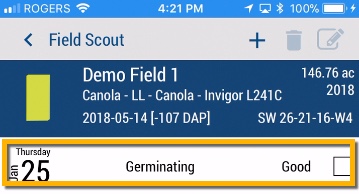
- On the Field Scout detail screen, tap to select or enter observations, as needed
- Crop Stage (required) - tap to select from the list (swipe up for more options)
- Crop Condition (required) - tap to select a rating from the list
- Plant - tap to view the Plant Observations screen and enter text or tap to select options; when finished, tap Done (or Dismiss)
- Soil - tap to view any Soil sample reports saved for this scouting report, or tap the plus icon to add soil sample reports
- On the Soil sample report screen, tap to enter text or select options (note: no entries are required to save the default report as shown below)
- Soil Sample Method - tap to enter text
- Soil Temperature - tap to enter a number, then tap the unit of measure to select Fahrenheit or Celsius
- Soil Moisture - tap to change from the default (Inadequate) and select from the list (Adequate or Excessive)
- Sample Location - tap to enter text
- Lat/Long - touch the screen to slide the map under the white X to automatically update latitude and longitude coordinates, or tap to enter text
- Soil/Moisture Comments - tap to enter text
- Swipe up to view the field map and tap an icon to add, edit or view the following map features:
- path or polygon with automatic coordinates (learn more)
- + benchmark with automatic coordinates (learn more)
- layers (learn more)
- map type (learn more)
- Click the disc icon to save the Soil sample report
- View the list of Soil sample reports for this field scout report, with the following options (or click the < back arrow to return to the Field Details screen):
- + add a new report
- Delete one more reports (select by tapping the checkbox first)
Roots
tap to view the Root Observations screen and enter text or tap to select options; when finished, tap Done (or Dismiss)
Key Dates
(skip) will auto-populate or remain blank if not applicable, as key dates are not available for all crops
Weeds
tap to view the master list to search or select from All, Frequent, Recent or History items (swipe up for more options), then tap a checkbox to select an item and click Done
View the list of Associated Weeds for this field scout report, with the following options (or click the < back arrow to return to the Field Details screen):
- Tap the checkbox to select an optional Low rating
- Delete one more weeds (select by tapping the checkbox first)
- + add a new weed
Insects
tap to view the master list to search or select from All, Frequent or Recent items (swipe up for more options), then tap a checkbox to select an item and click Done
View the list of Associated Insects for this field scout report, with the following options (or click the < back arrow to return to the Field Details screen):
- Tap the checkbox to select an optional Low rating
- Delete one more insects (select by tapping the checkbox first)
- + add a new insect
Diseases
tap to view the master list to search or select from All, Frequent or Recent items (swipe up for more options), then tap a checkbox to select an item and click Done
View the list of Associated Diseases for this field scout report, with the following options (or click the < back arrow to return to the Field Details screen):
- Tap the checkbox to select an optional Low rating
- delete one more diseases (select by tapping the checkbox first)
- add a new disease
Nematodes
(skip) not available for all regions; contact our customer support team to have this added to your account
Product Recs
tap to view the Product App Recommendation screen (learn more)
Photos
Tap the camera icon to launch your mobile device's camera
Tap OK (or Don't Allow) to allow Trimble Ag Mobile to access your photos to record field scouting images
Tap to select one of two photo options:
Take Photo - launches your device's camera so that you can take a new photo (displays all shots as portrait/vertical)
- Preview the new photo and tap Retake or Use Photo (note: when selecting Use Photo, the camera launches again; tap Cancel to close the camera)
- Tap the back arrow on the Image screen to return to the Field Scout detail screen
- View the image saved to the Field Scout report under Photos
- Tap to open the close-up Image View or delete the image (tap the back arrow to return to the previous screen)
Select a Photo - launches your device's photo library
- Tap one or more photos on the Image selection screen, then tap the disc icon to save selection
- Tap the back arrow on the Image screen to return to the Field Scout detail screen
- View thumbnail images saved to the Field Scout report under Photos
- Tap to open the close-up Image View or delete the image (tap the back arrow to return to the previous screen)
Comments - tap to enter optional text
- Swipe up to display the field boundary map at the bottom of the screen
Tap an icon to add, edit or view the following map features:
- path or polygon with automatic coordinates (learn more)
- + benchmark with automatic coordinates (learn more)
- layers (learn more)
- map type (learn more)
- Click the disc icon to save changes
- Sync changes with the online account when you're within cellular or wi-fi range, by returning to the home screen and tapping the green sync icon (top right)

After you've saved a Trimble Ag Software field scout report on the mobile app or online, you can view and edit reports at any time on your mobile device.
- Log in to the mobile app with the same Trimble ID used to access your online account (learn more)
- From the mobile app’s home screen, select the preferred crop year (top left)
- Tap the Fields tile
- Tap the arrow on the black row to expand the farms list, then scroll and tap to select a field
- On the Field Details screen, tap the Field Scout tile
- On the Field Scout summary screen, tap a record to view the report
- Edit report details, as needed (learn more)
- Tap the disc to save changes
- Return to the home screen and tap the sync button (top right) to sync changes to/from your online account
Tip: the sync button will be green when updates are available
After you've saved a Trimble Ag Software field scout report on the mobile app or online, you can delete the report at any time on your mobile device.
- Log in to the mobile app with the same Trimble ID used to access your online account (learn more)
- From the mobile app’s home screen, select the preferred crop year (top left)
- Tap the Fields tile
- Tap the arrow on the black row to expand the farms list, then scroll and tap to select a field
- On the Field Details screen, tap the Field Scout tile
- On the Field Scout summary screen, tap a record to view the report details (optional)
- Tap the back arrow at the top of the screen to return to the previous screen
- On the Field Scout summary screen, tap to add a checkmark to select a record
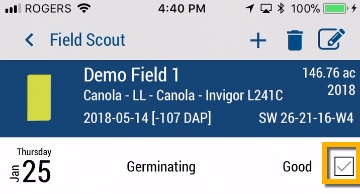
- Tap the delete icon, which is now visible
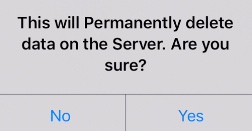
- Tap Yes (or No) at the prompt to acknowledge this record will be permanently deleted from the server
- Return to the home screen and tap the sync button (top right) to sync changes to/from your online account
Tip: the sync button will be green when updates are available
"
After you've saved a Trimble Ag Software field scout report on the mobile app or online, you can share reports by email from your mobile device. Recipients can view report details and photos, even without access to your account. For best results, always sync any mobile changes with the online account (return to the home screen and tap the sync button on the top right) before hitting send.
- Log in to the mobile app with the same Trimble ID used to access your online account (learn more)
- From the mobile app’s home screen, select the preferred crop year (top left)
- Tap the Fields tile
- Tap the arrow on the black row to expand the farms list, then scroll and tap to select a field
- On the Field Details screen, tap the Field Scout tile
- On the Field Scout summary screen, choose one of two options:
- Preview and Send - Tap a record to view the report details (optional), then tap the pencil icon
- Send - tap to add a checkmark to select a record, then tap the pencil icon, which is now visible
- Your mobile device's default email app will launch (check your device Mail settings)
- Add more information to the message such as directions to field and benchmark coordinates (optional), being careful not to change the link to the report
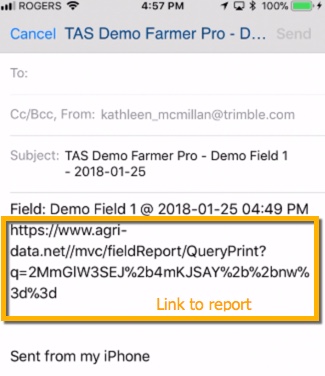
- Click Send (or Cancel)
- The recipient can click on the link in the message to view the field scout report with photos (excludes map and map coordinates) that launches in their mobile device's web browser
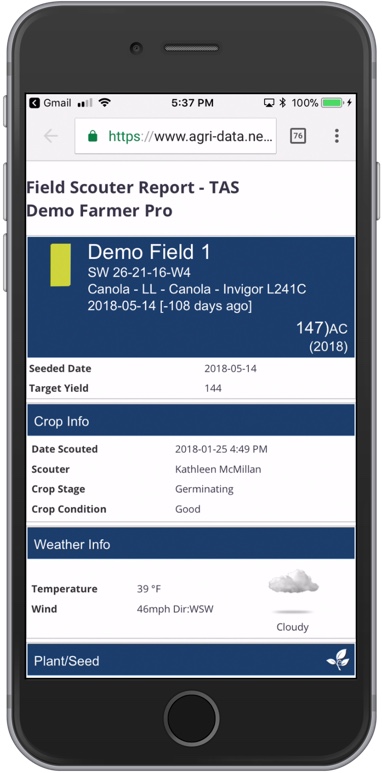
More options:
You can also email field scout reports from the Reports tile on the mobile app home screen
Tap to select Field Scouting Reports
Filter the reports (optional) by tapping the Start Date and End Date to select a date range
Continue from step 6 above
Use Trimble Ag Mobile to easily drop map points (also known as benchmarks) with custom names to keep track of field scouting, crop health, property issues and more. With precise coordinates automatically generated for each point, you can use your mobile device's built-in GPS to view the distance to navigate to each point from your current location. Use these map features on any field) on the mobile app, starting from the home screen's Field tile or Farm tile.
- Log in to the mobile app with the same Trimble ID used to access your online account (learn more)
- From the mobile app’s home screen, select the preferred crop year (top left)
- Tap the Fields tile

- Tap the full-screen icon to expand the map view
- Tap the compass icon to show your current location (only use if you're close to the field boundary)
- Tap the benchmark icon
- Enter text to add a Name and Description
- Touch the screen to slide the map under the white X to position the benchmark point, and automatically update the latitude and longitude coordinates

- Tap the blue point icon to select a different benchmark icon shape or color from the list
- Tap the check mark to save the benchmark point (or X to cancel) and update distance from your current location
- Tap the point to view the Name
- Tap the information icon to edit or delete the point
- Tap the check mark to save changes (or X to cancel)
- Sync changes with the online account when you're within cellular or wi-fi range, by returning to the home screen and tapping the green sync icon (top right)
Use Trimble Ag Mobile to easily drop map points to create a path or polygon with a custom name to keep track of field scouting, crop health, property issues and more. With precise coordinates automatically generated for each shape, you can use your mobile device's built-in GPS to view the distance to navigate to the shape from your current location. Use these map features on any field on the mobile app, starting from the home screen's Field tile or Farm tile.
- Log in to the mobile app with the same Trimble ID used to access your online account (learn more)
- From the mobile app’s home screen, select the preferred crop year (top left)
- Tap the Fields tile

- Tap the full-screen icon to expand the map view
- Tap the compass icon to show your current location (only use if you're close to the field boundary)
- Tap the + icon in the bottom left
- Enter text to Add Name, tap to check the Type (path or polygon) and tap OK (or Cancel)

- You can either drive to create a polygon or draw by adding points (bottom right corner)
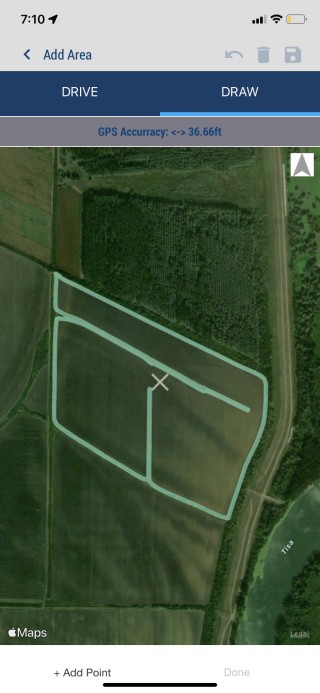
- Draw the polygon
- Tap the shape to view the name
- Tap the shape to view the name
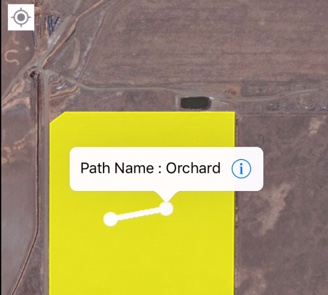
- Tap the information icon to select (or Cancel) from a range of options to edit or delete the path, type, name, colour or point
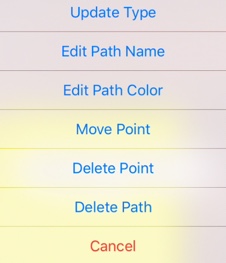
- Tap OK (or Cancel)
- Return to the home screen and tap the sync button (top right) to sync changes to/from your online account
Tip: the sync button will be green when updates are available
Switch map layers to get more insight into your field boundaries on Trimble Ag Mobile, including alternate boundary views, paths for crops or obstructions, coverage maps and Crop Health Imagery. Use these map features on any field on the mobile app, starting from the home screen's Field tile or Farm tile.
- Log in to the mobile app with the same Trimble ID used to access your online account (learn more)
- From the mobile app’s home screen, select the preferred crop year (top left)
- Tap the Fields tile

- Select the field to view
- Slide the Crop Zone details up to view the map in full screen
- Tap the layers icon to choose from the following options:
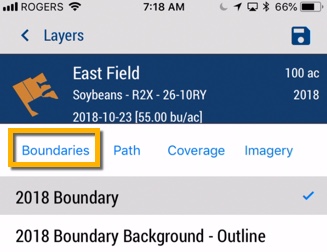
- Boundaries - tap to switch between the standard (solid) or Background - Outline view
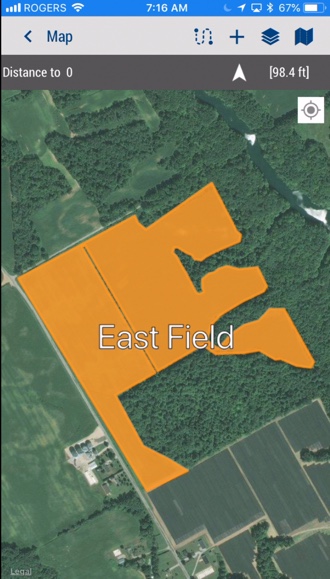
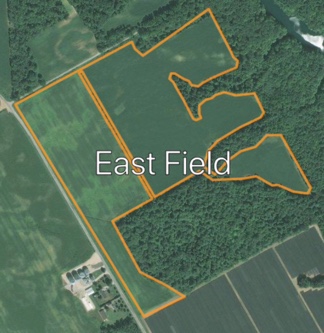
- Tap the disc icon to save selection and view
- Path tap the checkboxes to select one or more paths saved on this field
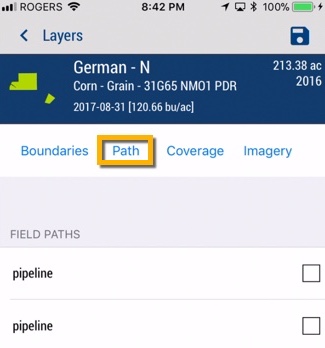
- Tap the disc icon to save selection and view changes
- Coverage - tap to select a coverage map from data imported from vehicle displays
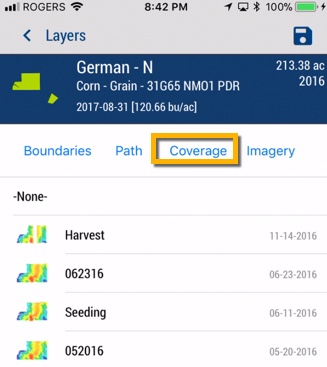
- Tap the disc icon to save selection and view changes
- Tap the map legend icon to tap and view
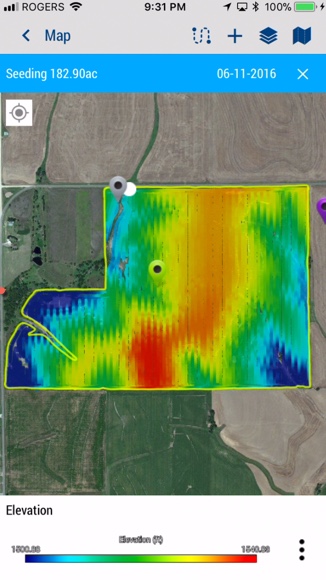
- other Coverage Options (or tap Dismiss)
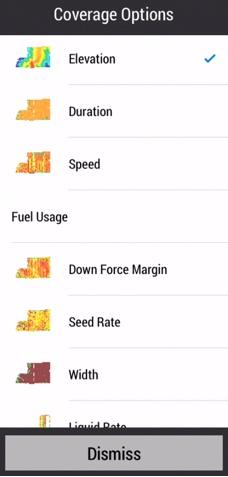
- Imagery - tap to select Crop Health Imagery layers by date
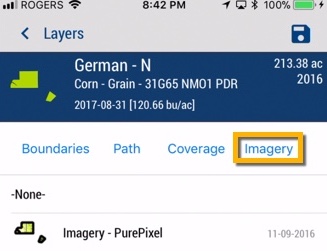
- Tap the disc icon to save selection and view changes
- Tap the map legend icon to tap and view
![]()
- other Imagery Options (or tap Dismiss)
![]()
Plan the next step in your crop management plan with product recommendations on Trimble Ag Mobile. As part of the field scout report, you or your advisors with access to your account can use the mobile app to define and share the purpose, timing, rate and more for product applications, including automatic PHI (pre-harvest interval) and REI (re-entry interval) alerts to manage the health and safety of your operators and customers.
- Log in to the mobile app with the same Trimble ID used to access your online account (learn more)
- From the mobile app’s home screen, select the preferred crop year (top left)
- Tap the Fields tile
- Tap the arrow on the black row to expand the farms list, then scroll and tap to select a field
- On the Field Details screen, tap the Field Scout tile
- On the Field Scout summary screen, tap a record to view the report (or tap the plus icon to add a new report)
- On the Field Scout detail screen, tap to select Product Recs
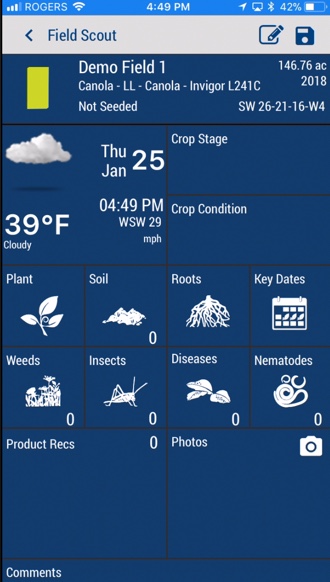
- On the Product App Recommendation screen, tap to enter or select from the options shown
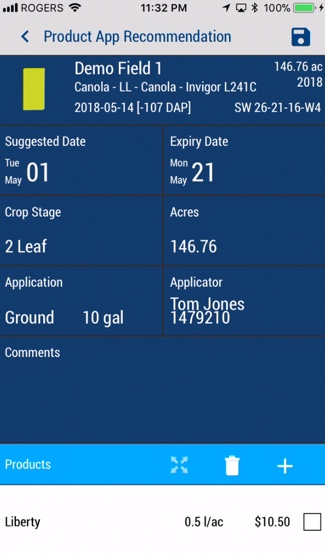
- Suggested Date - tap to select a start date for optimal window of application
- Expiry Date - tap to select the date that product must be applied on or before
- Crop Stage - tap to select from the master list (note: any changes here will be reflected on the Field Scout report; if planning a product recommendation months in the future, consider starting from a new, future-dated Field Scout report to align crop stages on both reports)
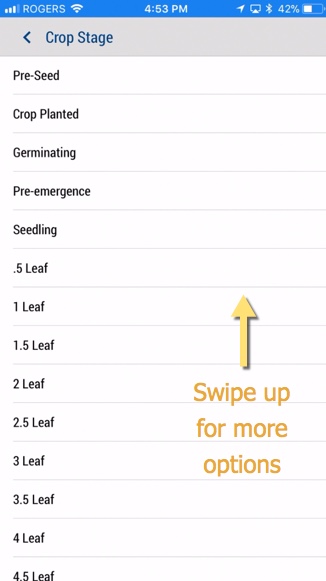
- Acres - tap to enter a number of acres for the application (may display hectares, depending on your settings)
- Application - tap to select App Type type from the list, then enter a Spray Volume and tap to select the unit of measure from the list; click Done (or Dismiss)
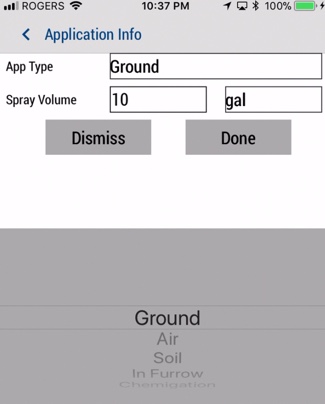
- Applicator - tap to enter the Applicator name and License number, then tap Done (or Dismiss)
- Comments - tap to enter text notes (optional)
- Products - tap to select from options
- Tank Mix - display and tap to select an item (if available in your account)
- Delete - tap the checkbox to remove one or more Products from the recommendation
- Pesticide Application Search - tap to search or select from All, Recent, My Materials or Purchased products
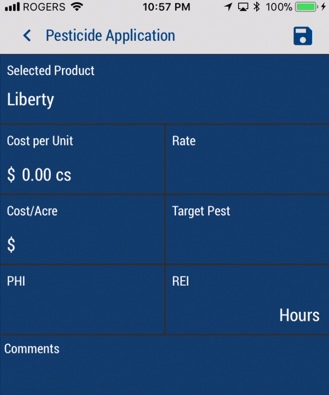
- On the Pesticide Application detail screen, enter or select the options
- Selected Product - keep (or tap to select a different product from the list)
- Cost per Unit - tap to enter the cost and select the unit of measure, then tap Done (or Dismiss)
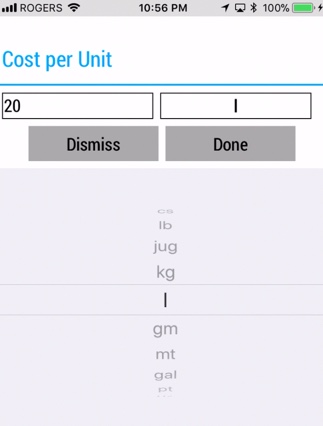
- Rate - tap enter the application volume and select the unit of measure, then tap Done (or Dismiss)
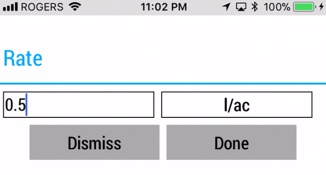
- Target Pest - tap to enter text (for example: Weeds), then tap Done (or Dismiss)
- PHI - displays a pre-harvest interval for some products, to automatically alert mobile app users on your account of fields that can no longer be treated due to upcoming harvest; if nothing is displayed, enter text as required from the manufacturer's label
- REI - displays a re-entry interval for some products, to automatically alert mobile app users on your account of fields that are temporarily unsafe to enter without protective clothing or equipment; if nothing is displayed, enter text as required from the manufacturer's label
- Tap the disc icon to save changes, which may display the following notice (applicable if units of measure used in this application do not match those in the purchased inventory on your account)
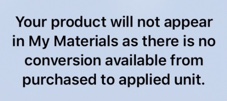
- View or edit the completed Product App Recommendation
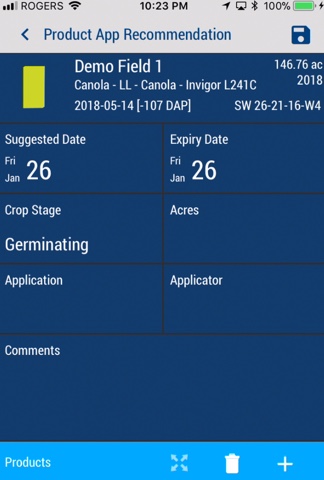
- Tap the disc icon to save changes and return to the Field Scout detail view
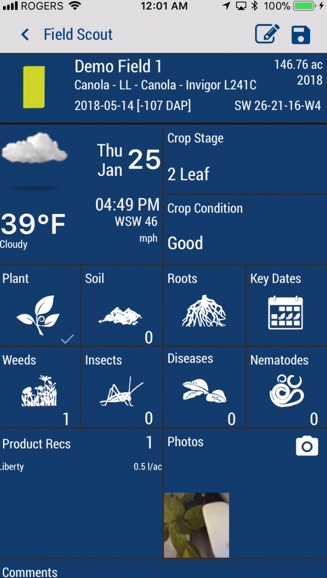
- Tap the disc icon again to update the Field Scout with the new Product Recommendations
- Sync changes with the online account when you're within cellular or wi-fi range, by returning to the home screen and tapping the green sync icon (top right)
More options:
- Email - tap the pencil icon on the Field Scout report to email the Field Scout report including Product Recommendations
- Delete - tap Product Recs on the Field Scout report to manually clear entries and delete Products from the Product App Recommendation screen, then tap the disc icon to save changes
When you need help with using Trimble Ag Software, live support is just a click away. Use our online and mobile in-app help options to send an email message to our global support team in your region, which automatically includes system diagnostics for your account.
Two Options for In-App Help
- Click the help icon when you're logged into Trimble Ag Online to email support with the option to upload files
- From the Trimble Ag Mobile app, tap the Settings tile and scroll down to click Email Diagnostic Info to send a message that includes your account details. Use the mobile app option to automatically Upload Detailed Logs, if requested by our support team.
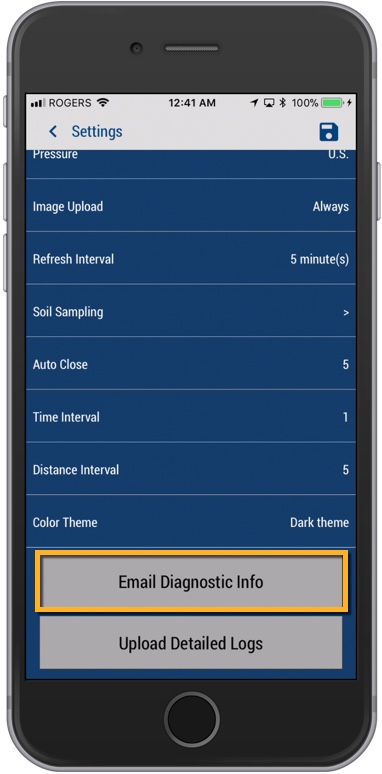
Visit our website's support page for more resources and ways to connect with us.
Use Trimble Ag Online to keep detailed records of storage bins used by your farm, including capacity, location, construction, access and more. Once bins are set up online, transactions can be logged online or on the mobile app to automatically update capacity and inventory for each bin. As a physical asset tied to your farm, storage bins are not associated with a specific crop year, but they can be assigned to certain field names to help you manage crop traceability requirements, if needed.
- Log in to your account online (learn more)
- Click Farm (top menu)
- Select Storage (left navigation menu)
- On the Bin Profiler tab, click Manage
- Select Add New Bin
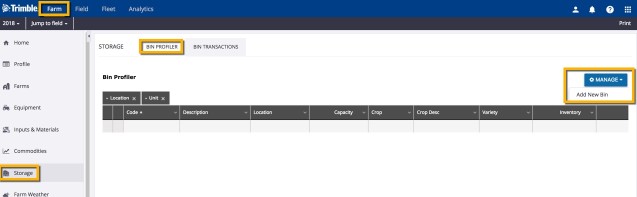
- On the Bin Details screen, select options in each dropdown list or enter information as needed
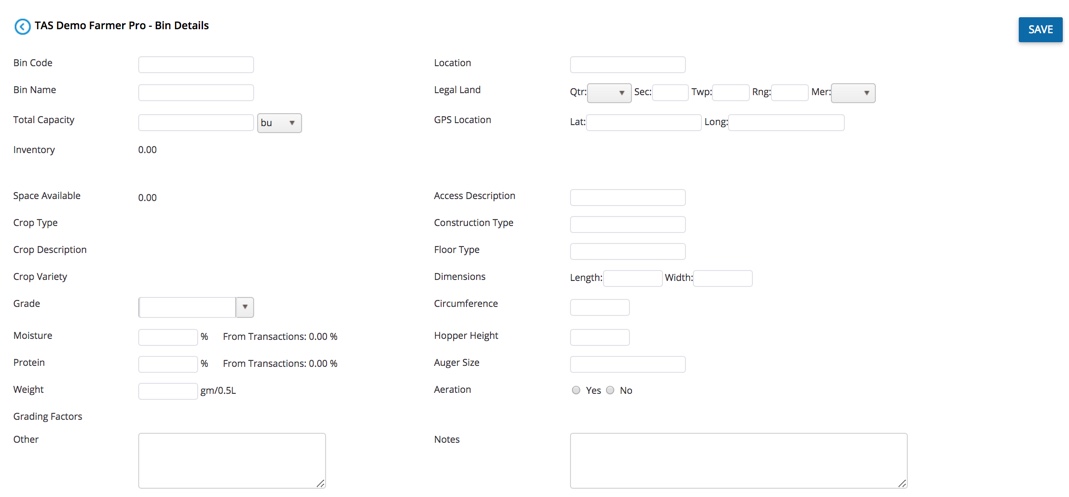
Bin Code
(required) assign a unique code for use on your farm
Bin Name
(required) enter a name for your storage bin (for example, include the field name if crop traceability is a requirement for your business)
Total Capacity
(required) enter a number and click the dropdown list to select a unit of measure
- bu - bushel
- MT - metric ton
- T - ton
- kg - kilogram
- lb - pound
Location
enter text to describe the location (for example, South Farm)
Legal Land
a series of numbers listed on land title records, representing quarter, section, township, range and meridian
GPS Location
enter the Latitude and longitude coordinates
Inventory and Space Available
these numbers auto-calculate based on Total Capacity, as storage bin transactions are recorded online or on the mobile app
Crop Type, Crop Description and Crop Variety
this information auto-populates as storage bin transactions are recorded online or on the mobile app
Grade
select or enter a description
Moisture
enter the maximum allowable moisture content for optimal storage of your crop
Protein
enter the desired level of protein (also displays cumulative percentage as storage bin transactions are recorded online or the mobile app)
Weight
enter the test weight as a measure of density (grams per 0.5 litre), assessed after dockage is removed, required to make grades for certain grains
Grading Factors Other
enter notes as needed
Access Description
enter a text description (for example, road type, ramp, etc.)
Construction Type
enter a description (for example, steel and wood, all steel, etc.)
Floor Type
enter a description (for example, concrete pad, wood, etc.)
Dimensions
enter a value for the Length and Width
Circumference
enter a number to measure the distance around the outside of the storage bin, as needed
Hopper Height
enter a number for hopper height, as needed
Auger Size
enter a number for the size of your auger, as needed
Aeration
click to select Yes or No to indicate if the storage bin is aerated
Notes
enter additional notes, as needed
- Click Save (or click the back arrow icon at the top of the screen to cancel changes and return to the previous screen)
Edit basic storage bin profiles with Trimble Ag Mobile when you're on the go. Later, edit or delete full bin profiles online, if needed.
- Log in to the mobile app with the same Trimble ID used to access your online account (learn more)
- From the mobile app's home screen, select the preferred crop year (top left) which is not required to manage bins, but helps if you want to add transactions later
- Tap the Bins tile
- On the Farm Bins summary screen, tap any record in the list to view details
- On the Bin Details summary screen, the status automatically displays the total capacity, inventory and space available, with percentage filled displayed in a graph for quick reference
- Tap the pencil icon to make changes
- On the Edit Bin screen, tap to select or enter basic details (more details can be added online)
Bin Code
(required) assign a unique code for use on your farm
Bin Name
(required) enter a name for your storage bin (for example, include the field name if crop traceability is a requirement for your business)
Location
enter text to describe the location (for example, South Farm)
Legal Land
a series of numbers listed on land title records, representing quarter, section, township, range and meridian
Tap to enter Latitude and longitude coordinates
Total Capacity
(required) enter a number and tap to select a unit of measure
- bu - bushel
- MT - metric ton
- lbs - pounds
- T - ton
- kg - kilogram
- Tap the disc icon (top right) to save changes
- Sync changes with the online account when you're within cellular or wi-fi range, by returning to the home screen and tapping the green sync icon (top right)
More options:
Reset inventory - on the Bin Details screen, tap the reset icon to empty the bin from this date, then click Yes (or No) at the prompt
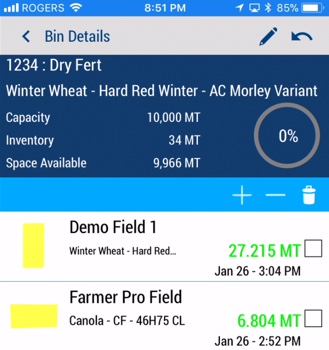
Once you've set up farm storage bins in Trimble Ag Software with the online account or mobile app, you can use the Bin Profiler online to view all of your farm bins. Automatically adjust inventory in each bin by adding or removing inventory, resetting inventory to zero, or viewing and adjusting transaction history details.
- Log in to your account online (learn more)
- Select the preferred crop year (top left)
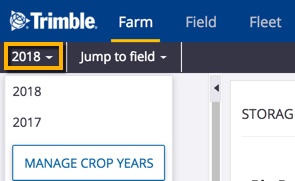
- Click Farm (top menu)
- Select Storage (left navigation menu)
- Select the Bin Profiler tab
- Click on a record (learn more about filtering views here) and hover over the icons at the end of the row to choose one of four options to launch the Transaction Manager :
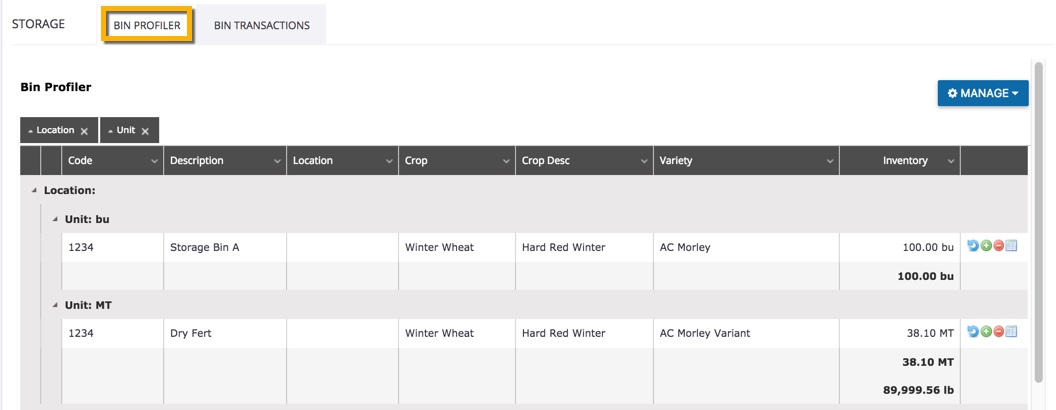
Reset Bin Inventory
click the calendar and clock icons to adjust the date and time to reset the bin inventory to zero, then click Submit (or click X to cancel)
Add Bin Inventory
on the Transaction Manager pop-up, select options in each dropdown list or enter information to add inventory to a bin
From
click the dropdown lists to select a location (Field, Bin or Other), and the associated field on your account
To
click the dropdown list to select the bin name from those saved to your account
Date
click the calendar and clock icons to select the date and time the transaction was received at the bin
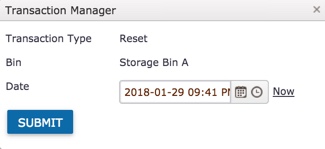
Volume
enter a quantity for the shipment volume, then click the dropdown list to select a unit of measure
- bu - bushels
- MT - metric tons
- lbs - pounds
- T - tons
- kg - kilograms

Crop Type
click the dropdown list to select from crops saved on your account (or click Add Crops to save a new crop to your account)
Crop Description
click the dropdown list to select from a description associated with your crops
Crop Variety
click the dropdown list to select a variety associated with your crops
Grade
select or enter a description
Protein
enter the level of protein in this shipment
Moisture
enter the moisture content in this shipment
Weight
enter the test weight as a measure of density (grams per 0.5 litre), assessed after dockage is removed, required to make grades for certain grains
Other
add more details on the quality or condition of the shipment
Ticket
enter a delivery ticket number, if available
Truck
enter the truck number, if available
Notes
add comments on the shipment
Click Submit (or click X on the top right of the pop-up window to cancel)
Remove Bin Inventory
delete inventory from a bin on your account using the same Transaction Manager illustrated above, with one extra detail:
- Net Volume - volume remaining after any reductions
View Transactions
launch the Transaction Manager for a specific storage bin to view or print the summary, or edit individual transactions:
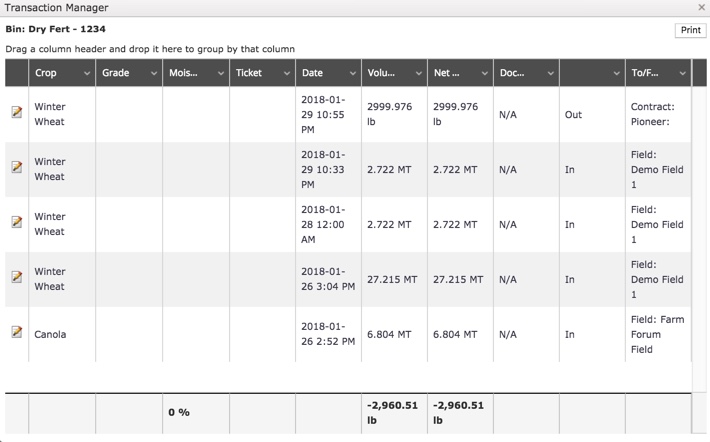
- Click the edit icon above to view or edit the transaction details below, then click Submit or Delete Transaction (or click X to close the window)
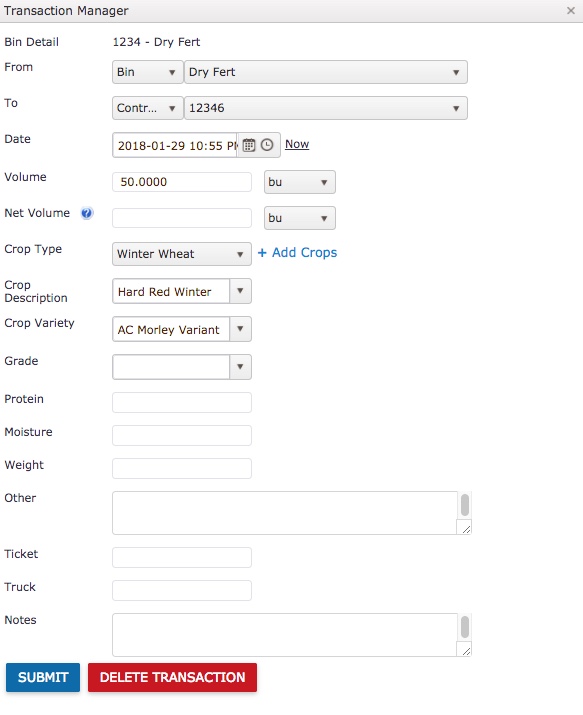
Tailor your summary report views on Trimble Ag Software to make it easy to find and print storage bin records fast.
- Log in to your account online (learn more)
- Click Farm (top menu)
- Select Storage (left navigation menu)
- Click the Bin Profiler or Bin Transactions tab to view the summary screen
- Adjust how records are sorted in the table view:
- Click and drag a column header to the top of the page to group the list (or click X to remove after dragging)

- Click on any column dropdown list to:
- Sort results in ascending or descending order
- Show or hide columns
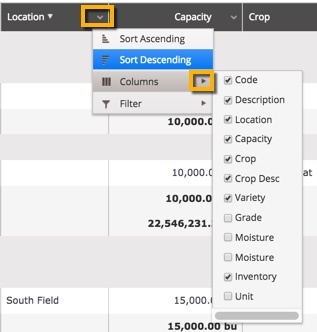
- Filter to show specific results
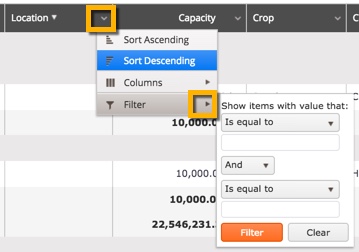
- To reset the table view to default layout, refresh your browser (or for the Bin Transactions tab only, click Manage and select Reset Table View)
- Print storage bin records as a hardcopy or PDF to save or share with advisors:
- Default table view - click Print (top right corner) to launch a printable view of the default table layout (will not show changes to column filters)
- Custom view - use your browser to print your screen after customizing columns and filters
With Trimble Ag Software, each storage bin transaction recorded online or on the mobile account is rolled up into the Bin Transactions summary for your farm. See all records from any crop year and tailor your online report to show as much or as little information as you need, with options to edit or import CSV data or adjust batch records to add harvest data or update destinations.
- Log in to your account online (learn more)
- Click Farm (top menu)
- Select Storage (left navigation menu)
- Select the Bin Transactions tab
- Click Manage to select from one of four options (listed below)
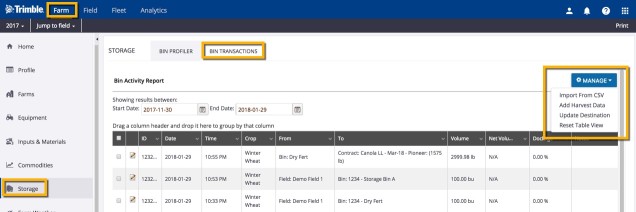
Import from CSV
import your inventory data from another system (such as AgrimaticsTM Libra) or from Excel in CSV (comma-separated values) format
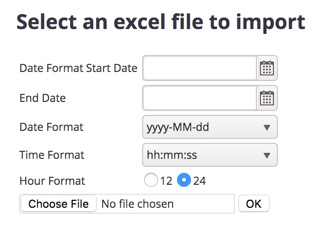
- Click the calendar icons to select a Start Date and End Date for your CSV records
- Select the Date Format and Time Format from the dropdown lists to match records in your CSV file
- Click to choose 12 hour format (for example, 2:01 PM) or 24 hour format (for example, 14:01:00)
- Click Choose File to select a document from your desktop
- Click OK (or use your browser's back arrow to cancel and return to the previous screen)
Add Harvest Data
automatically copy one or more bin transactions to the Harvest Summarizer for the relevant crop year
- Select one or more bin transactions by clicking the checkbox
- At the confirmation, click OK
- View new harvest records
- Click Field (top menu) then select Harvest Summary (left navigation menu)
- New harvest records are identified on the Harvest Summarizer by the following: Harvest Date = today's date, Total Yield = transaction Volume, Comments = From Bin Transactions
- Edit and Save changes, as needed
- Refresh browser if switching to view a different crop year
Update Destination
make a batch adjustment to the delivery destination for multiple bin transactions
- Select one or more bin transactions by clicking the checkbox (take note of which records have been selected, as the list will not highlight updated records)

- Click the dropdown to adjust the type (Bin, Contract, Other)
- Click the dropdown list to select the bin name
- Click Save (or click X to close the window)
- Click the edit icon to view or edit each bin transaction that was selected and modified
- Make further changes as needed (learn more) and click Submit or Delete Transaction (or click X to close the window)
Reset Table View
return to the default bin transactions summary view after adjusting columns and filters (learn more)
Once storage bins for your farm have been set up online or on the mobile app in Trimble Ag Software, any contacts with access to your account can use the mobile app to record bin transactions in real-time, and automatically update the inventory and storage capacity of your bins. Additional tracking options are only available on the mobile app including: Operator, Harvester, Crew #, Container Type, Number of Totes and Number of Beds.
- Log in to the mobile app with the same Trimble ID used to access your online account (learn more)
- From the mobile app's home screen, select the preferred crop year (top left)
- Tap the Bins tile
- On the Farm Bins summary screen, tap to open a bin from the list
- On the Bin Details summary screen, the status automatically displays the total capacity, inventory and space available, with percentage filled displayed in a graph for quick reference
- Tap the plus+ or minus- minus icon to record a change in inventory
- On the Bin Transaction detail screen, tap to select or enter details (swipe up to see all options)
Date and time - tap to select a new date and time for the transaction
Origin - tap the field icon to select an option (field, bin, other)
Destination - ignore (selected storage bin cannot be changed on this screen)
Quantity Gross - tap to enter a number and to select a unit of measure
- bu - bushel
- MT - metric ton
- lbs - pounds
- T - ton
- kg - kilogram
Protein - enter the level of protein in this shipment
Moisture - enter the moisture content in this shipment
Ticket - enter a delivery ticket number, if available
Truck - enter the truck number, if available
Crop - auto-populates based on the crop assigned to the field
Description - auto-populates based on the crop assigned to the field
Variety - auto-populates based on the crop assigned to the field
Operator - tap a checkbox to select a contact with system access to your account, then tap the disc icon to save changes
Harvester - tap a checkbox to select a vehicle assigned to your account (if no vehicles are assigned, this screen is blank)
Crew # - tap to enter a number, if needed
Container Type
Number of Totes - tap to enter the number of harvest totes (boxes)
Number of Beds - tap to enter the number of beds harvested
Comments - tap to enter notes, if needed
- Tap the disc icon to save changes
- Sync changes with the online account when you're within cellular or wi-fi range, by returning to the home screen and tapping the green sync icon (top right)
More options:
Delete transaction - on the Bin Details summary screen, select one or more records by tapping the checkbox, then tap the delete icon (caution: this action is final, with no warning on-screen)
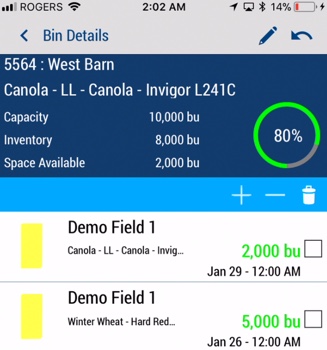
Keep track of farm materials online to see application rates and costs, including safety details for your products. Materials are not organized by crop year, but are visible when selecting products for tasks in the field from your online account or on the mobile app. Refer to your Material cost and default rate when doing the math on product application expenses. For help with adding more health and safety details to products used on your farm, contact our customer support team. When you're done here, check out Purchases, to manage inventory and expenses by crop year.
- Log in to your account online (learn more)
- Click the Farm tab (top menu)
- Select Inputs & Materials (left navigation pane)
- Click Materials tab to view summary of products by category (Chemical, Fertilizer, Lime, Tank Mix, Seed and Water)
- On the Materials summary view, manage records as follows:
- Click the add button for each category to add material profiles
- Click the edit icon to update profiles saved to your list
- Click one or more checkboxes to select materials to delete (retire) or merge
- Click the checkbox (top right) show Show Retired* materials (option displayed only if records have been retired)
- When adding or editing a material profile:
- Enter all required fields shown with an asterisk* in the order listed, to display relevant options in other areas of the material profile
- Grey shaded fields will auto-populate with search results and/or entries in required fields
- Seed properties require a crop to be set up (learn more)
- For Chemical and Seed properties, start with the product Search button to select a record from the system matches, which also auto-populates information on the properties screen (if no match is found, click the link to request a new product be added to the list)
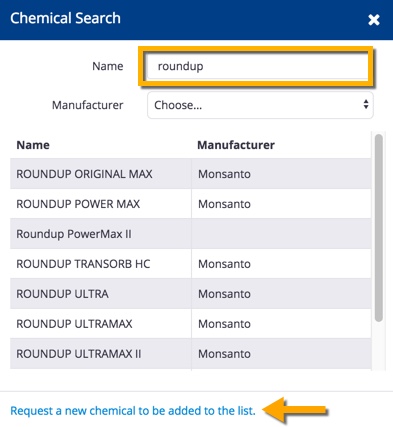
- Add or edit Chemical Properties (start by clicking Chemical Search) as shown below, then click Save (or Cancel); for products that req
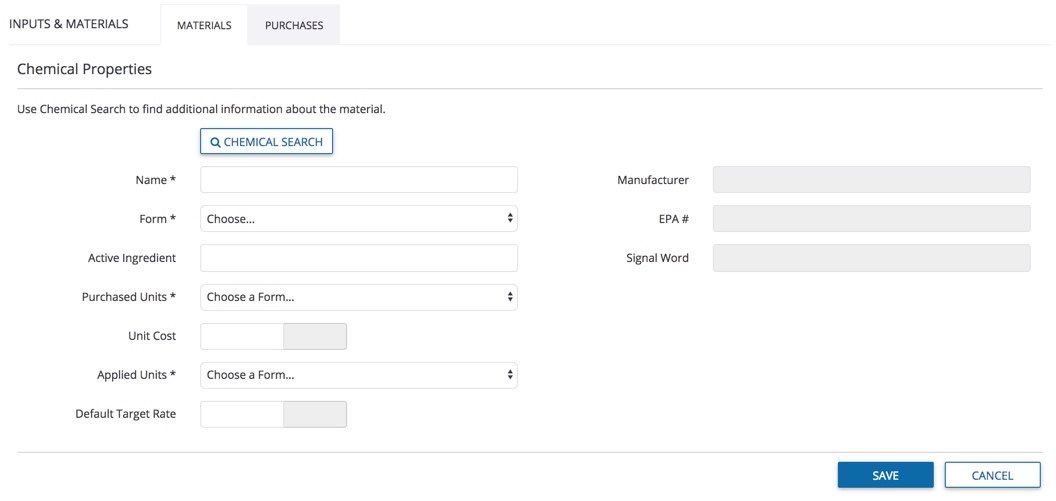
Chemical Property definitions:
- EPA # - enter the registration number assigned by the Environmental Protection Agency in the USA (or auto-populate by selecting result from Chemical Search)
- Signal Word - enter acute short-term toxicity level (or auto-populate by selecting result from Chemical Search): Danger, Warning or Caution
- Add or edit Fertilizer Properties (start by clicking Fertilizer Search) as shown below, then click Save (or Cancel)
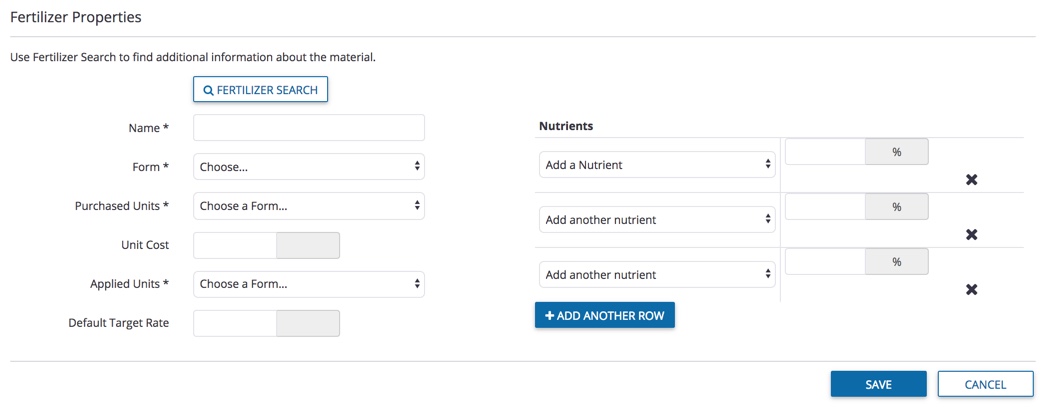
- Add or edit Lime Properties as shown below, then click Save (or Cancel)
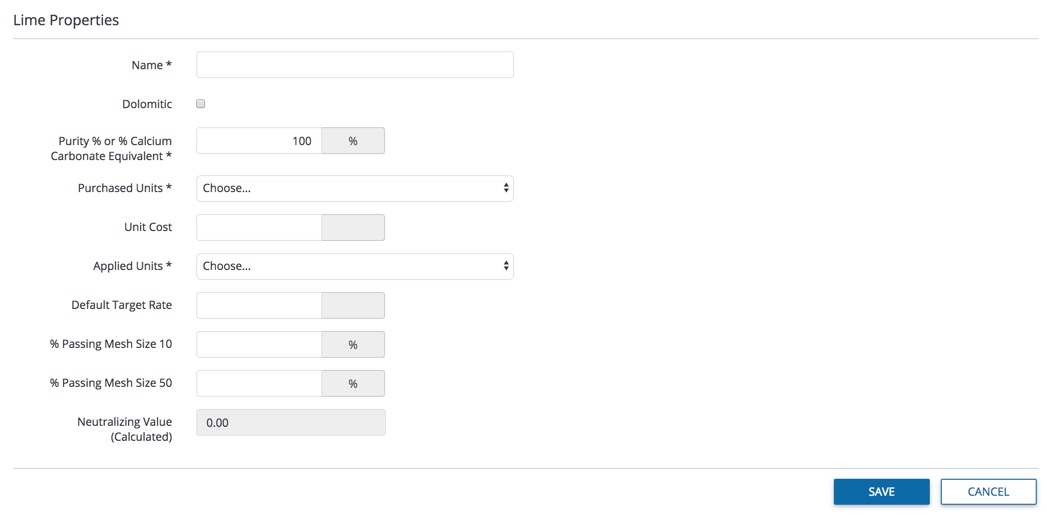
- Add or edit Tank Mix Properties as shown below, then click Save (or Cancel)
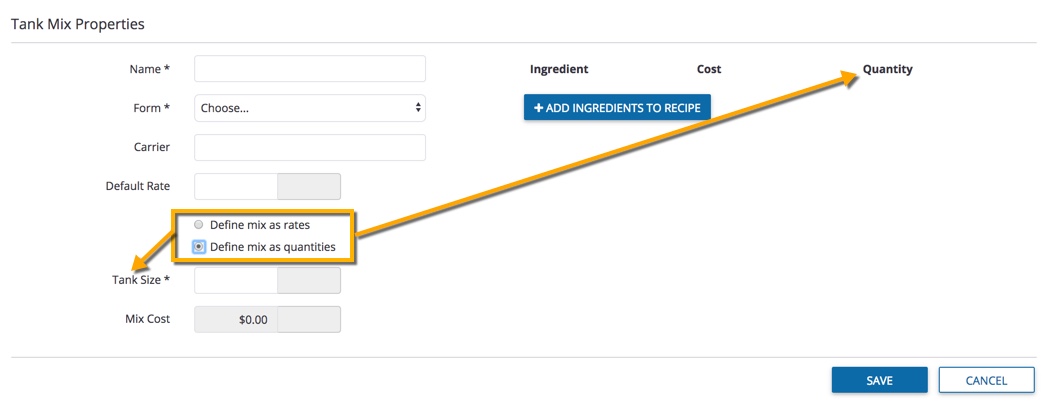
- Click +Add Ingredients to Recipe to select from items saved in your Materials list (click or to expand or collapse list, then click OK or Cancel)
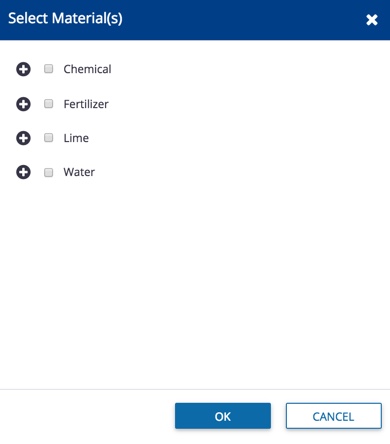
- Add or edit Seed Properties as shown below (start by clicking Seed Search), then click Save (or Cancel)
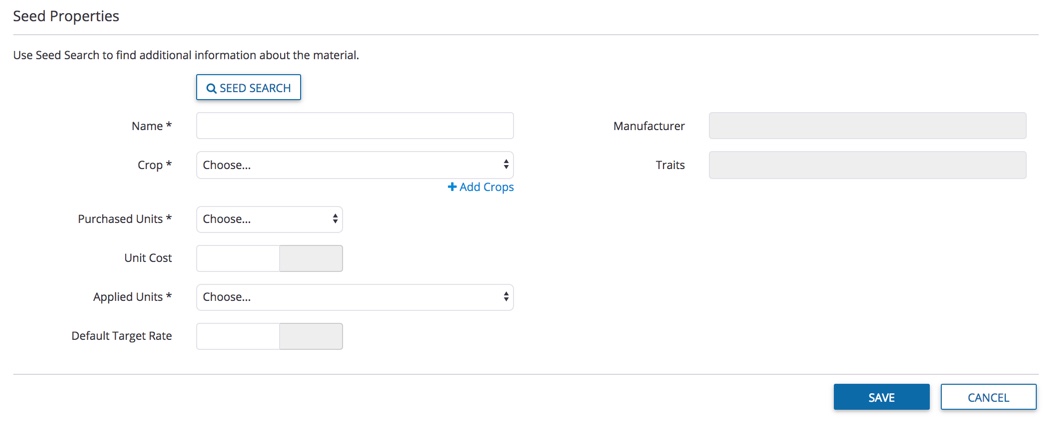
Seed Properties definitions:
Crop (required field) - select from crops added to your account (or click +Add Crops to select a new crop for your farm)
- Add or edit Water Properties as shown below, then click Save (or Cancel)
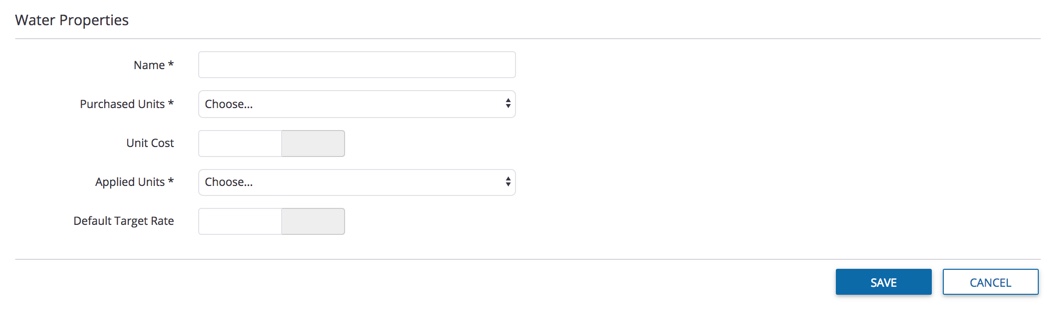
Each time that you track a purchase online or on the mobile app, Trimble Ag Software automatically calculates your total inventory and expenses by crop year, with the option to transfer balances to the following crop year. When you enter a purchase, the product is automatically listed in your Materials tab online, where you can continue filling in the materials profile to capture application rates and product safety details,as needed.
- Log in to your account online (learn more)
- Select the preferred crop year (top left)
- Click the Farm tab (top menu)
- Select Inputs & Materials (left navigation pane)
- Click Purchases tab
- On the Crop Input Purchases screen, click Summary to view analytics to compare spend and volume of purchases for the last two crop years by type, vendor and manufacturer; hover over charts to view actual costs
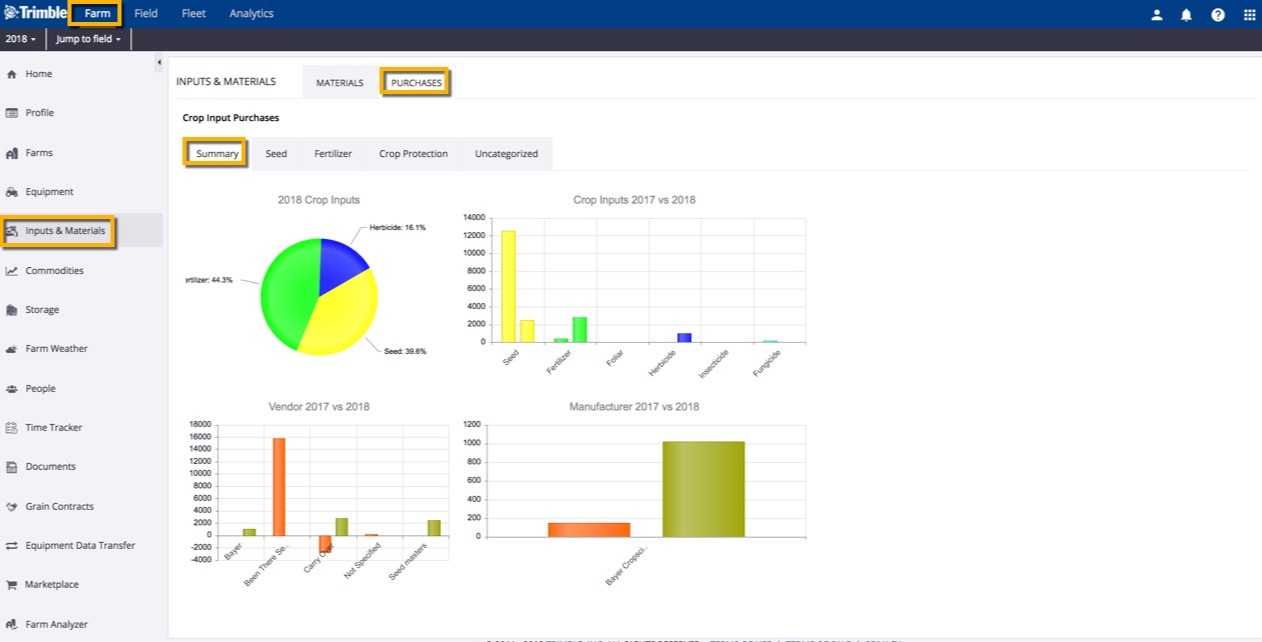
- On the Seed, Fertilizer and Crop Protection summary views, manage records as follows:
- Click Add Purchase button to add a new records
- Click a record to view additional purchases within that category, then click a record to view or edit Input Details or display the option to Delete Selected records (note: edit option not available if Balance is negative)
- Click a link in the Applied column to view all fields with that product application during the current crop year
- Click the checkboxes to select one or more records (Fertilizer and Crop Protection only) and click Update Application Pricing to apply changes already made to one of the records; click OK at the prompt (or Cancel)
- Click the checkboxes to select one or more records and click Carry Over Balance to move remaining inventory and costs to the following year (requires a crop year to be set up)
- When adding or editing records on the Input Details screen, enter or select options show below:
- Type - start here by selecting an option from the dropdown list:
- Fertilizer
- Seed
- Crop Protection
- Uncategorized (generally used when importing data, to allow for sorting)
- Category - only visible when Type is Seed, to display options for crops already added to your account
- Products - select from the list which corresponds to the Type selected, and matches crops added to your account (for Seed), or system fertilizer and crop protection options approved for use in your region
- Update Material Unit Cost - click the checkbox at the bottom of the window to turn off default to update costs on the Materials tab
- Add Purchase - saves new record (or click Close)
- Update Purchase - saves changes to record (or click Close)
- Save As New Purchase - creates copy of existing record to save time on data-entry when adding new records
Check the status of purchased inventory on your farm with Trimble Ag Mobile, when recording products applied to the field with the mobile app. Crop inputs are managed by crop year. Share real-time updates with your online account, where crop inputs (also known as Purchases online) can also carry over balances to next year.
- Log in to the mobile app with the same Trimble ID used to access your online account (learn more)
- From the mobile app’s home screen, select the preferred crop year (top left)
- Tap the green sync icon (top right) to sync your mobile app with the latest updates online
- Tap the Crop Inputs tile
- Tap to select a Crop Input type (choose from Seeding, Fertilizer or Crop Protection)
- View the current purchased inventory list by product name on the Crop Inputs list screen
- Amount - purchased quantity
- Applied - number of units applied
- Balance - inventory amount
- Avg rate - average rate of application based on tasks with this product application
- $ amount - total cost of the purchased inventory
- Tap the plus+ icon to add a new Crop Inputs record, entering or selecting from options below
- Type (required) - auto-populates based on selection in Crop Inputs type
- Category (required) - tap to select from the list:
- All - master list of products available in your region
- My Materials - products used during any crop year, without associated inventory (learn more)
- Purchased - purchased inventory
- Product (required) - may auto-populate, depending on type and information saved in Materials or Purchases; if blank, tap to enter text
- Date (required) - tap to select a different purchase date
- Quantity (required) - tap to enter a number of units purchased
- Product Size (required) - tap to enter the unit size
- Product Price - tap to enter the unit price
- Taxes - tap to enter taxes applied
- Total Invoiced - automatically calculates total cost, based on quantity, price and taxes entered
- Vendor - tap to enter the company name
- Invoice # - tap to enter the receipt number
- Notes - tap to enter comments
- Tap the disc icon to save changes
- Tap the green sync icon (top right) to sync your mobile app with the latest updates online
![]()
More options:
- Tap a record on the Crop Inputs list to display purchase records by date
- Crop Inputs are displayed by purchase date
- View or edit - tap a record to view the Crop Inputs details, make changes (optional), then tap the disc icon to save changes
- Save as new - tap checkbox to select one or more records, then tap the plus+ icon to create a new record for the same type and product
- Delete - tap the checkbox to select one or more records, then tap the trash icon to delete a record (caution: this action is final, with no warning on-screen)
Use your mobile device to record a seed application on your field. Contacts with access to your account can see real-time updates online or on the mobile app in Trimble Ag Software.
- Log in to the mobile app with the same Trimble ID used to access your online account (learn more)
- From the mobile app’s home screen, select the preferred crop year (top left)
- Tap the Fields tile
- Tap the arrow on the black row to expand the farms list, then scroll and tap to select a field
- Tap the Seeding tile
- On the Field Applications summary screen, tap the plus+ icon to add a new record (tap to edit an existing record listed by date at the bottom)
- On the Seeding details screen, tap to enter or select from options below (swipe up to see all rows)
- Date - tap to view Task Time, then tap to select Start and Stop dates, as well as times to automatically calculate Total Time for tasks (tap back arrow at top of screen when done)
- Total Area - tap to edit default size (matches boundary area)
- Weather - tap the light blue bar to display the Weather Customizer screen, and tap the sync icon to get the latest weather, or tap any field to edit or select new options (tap check mark icon to save changes)
- Cost/Acre - (skip) automatically calculates based on entries in Rate and Cost Per Unit
- Crop (required) - automatically displays crop assigned to this field, or tap to search or select as new option from the list:
- All - master list of products available in your region
- My Materials - products used during any crop year, without associated inventory (learn more)
- Purchased - purchased inventory (learn more)
- Description - automatically displays result for crop assigned to this field, or tap to select a new option from the list
- Variety - automatically displays result for crop assigned to this field, or tap to select a new option from the list
- Rate - tap to display the Rate and Unit screen, to enter a number and select a unit of measure from the list
- Tip: if you've saved this product to Materials online, enter that Default Rate
- Cost per Unit - automatically displays cost if product was entered in Purchases online or Crop Inputs on the mobile app
- Tip: check that the unit of measure matches the application rate; if you've saved this product to Materials online, enter that Cost
- Seeded As - tap to select options from the list (defaults to Underseeded/Refuge if field is already seeded)
- Seeded Onto - tap to select options from the list (Summerfallow and Stubble)
- Advanced - tap the dropdown arrow to display more rows, then tap to enter or select from options below (swipe up to see all rows)
- Tap the disc icon (top right) to save changes
- Sync changes with the online account when you're within cellular or wi-fi range, by returning to the home screen and tapping the green sync icon (top right)
When you’re on the go, use the mobile app to add irrigation and rain events in Trimble Ag Software.
- Log in to the mobile app with the same Trimble ID used to access your online account (learn more)
- From the mobile app’s home screen, select the preferred crop year (top left)
- Tap the Fields tile
- Tap the arrow on the black row to expand the farms list, then scroll and tap to select a field
- Tap the Irrigation tile
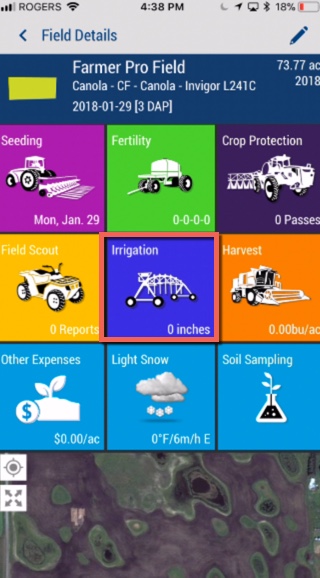
- On the Irrigation screen, tap the plus icon (top right) to add a new event
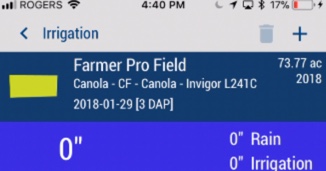
- On the Irrigation Details screen, tap to enter or select from options below
- Date - tap to select a new date, if needed
- Detail - tap to select options (Rain or Irrigation)
- Source - automatically populates if Irrigation is selected in Detail
- Amount (required) - tap enter the volume and tap on the default unit (inches) to select other options from the list
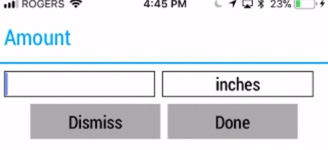
- Comments - tap to enter text for additional information about this event
- Tap the disc icon (top right) to save changes
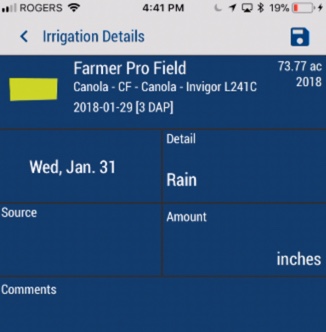
- Sync changes with the online account when you're within cellular or wi-fi range, by returning to the home screen and tapping the green sync icon (top right)
Watch our video tutorial on creating a corn maze in your field, using Trimble Ag Desktop (formerly Farm Works) software and Farm Works Mobile. We'll take you through how to use any drawing or illustration and calibrate the image for geo-referencing as a map layer. This simple process can be used to create virtually any design. Finish the process in the field with a Trimble GPS or hand-held display, to guide a mower or ground crew in cutting precise patterns. No more counting rows manually!
Estimated time to complete this project: 15-45 minutes Season: Planting Time to watch: 16 minutes
Watch Video: Building a Corn Maze
Ready to get started?
Here's what you'll need:
- Trimble Ag Desktop software (formerly Farm Works) included with any Farmer plan (Just getting started? Download our Starter Manual.)
- Annual Software Maintenance Plan for access to the latest desktop software updates and help from our technical support team
- Farm Works Mobile software to support the 3D view of the cuts required in the field on a Trimble hand-held tablet (note: the Trimble Ag Mobile App included with the Farmer Pro or Pro+ plan is not the same, and supports boundary logs only; learn more in the guide)
- Trimble outdoor hand-held tablet computer (Kenai or Juno T41) with higher quality GPS (or external antenna)
- Image of your drawing (TIFF, JPG or PNG format, with 300 dpi resolution for complex, detailed drawings, or 72 dpi for basic drawings)
Contact your local reseller for help with buying or setting up any Trimble vehicle display or hand-held device.
Related: Learn more about how to use Trimble Ag Software’s other fleet management tools so that you can see, use and share more precision data with your vehicle displays, and from third-party accounts.
What customers are saying:
"I like that I can see the cost per unit for each field and rank them. The higher-cost fields get more attention first. The higher-cost items within each field also get looked at while planning for next season. I don’t have to check every figure, which I don’t have time for anyway.""
Ready to get started?
Estimated time to complete this project: 15-60 minutes
Season: Before planting and ongoing
From the online account, each user can set personal preferences for time zone, unit systems and more. Language settings and translation for the online account are managed by each user's web browser. Trimble Ag Online is fully compatible with the latest Google Chrome browser and is available in 11 languages other than English, including: French, German, Italian, Spanish, Portuguese, Polish, Czech, Ukrainian, Bulgarian, Russian, and Romanian.
- Log in to your online account (learn more)
- Click the Person icon (top right)
- Click My Settings
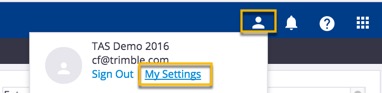
- Select your local Time Zone from the dropdown list
- Select your account's Purchaser Org from the dropdown list
- Select your preference for viewing Last Location by field name entries or by reverse geocoding (latitude/longitude coordinates) entries:

- Select your preferred Unit System as Metric or U.S. (also known as Imperial):

- Check the box (optional) to Customize Unit Systems for various measurements:
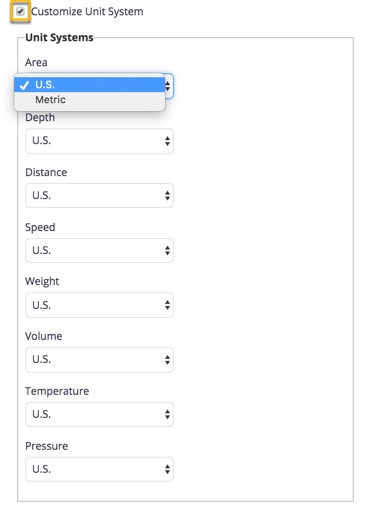
- Click Save when done.
Did you know? Units of measure can also be set on the mobile app and synced to the online account (learn more).
Trimble Ag Mobile displays units of measure that are determined by the location settings on each user's mobile device. It's easy for each account user to customize units of measure directly in the mobile app settings, and sync changes back to the online account.
As well, language settings and translation for the mobile app are managed by each user's mobile device under settings for language and region (check with your device manufacturer to learn more about how to adjust settings on your phone or tablet). Trimble Ag Mobile is available in 11 languages other than English, including: French, German, Italian, Spanish, Portuguese, Polish, Czech, Ukrainian, Bulgarian, Russian, and Romanian.. To see the full range of languages as new translations are added, download the latest version of the app.
- Log in to the mobile app with the same Trimble ID used to access your online account (learn more)
- From the mobile app's home screen, click on the Settings tile
- Tap any row to edit the preferred unit of measurement:
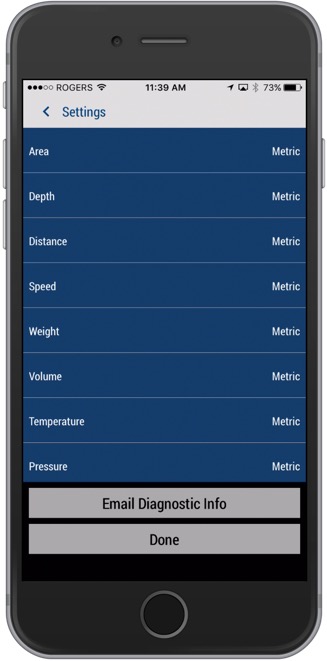
- Tap to select the new unit of measure (Metric or U.S., also known as Imperial):

- Click Done to save changes
- Tap the back arrow < to return to the previous screen
- Tap the sync button (top right) to sync changes to/from your online account:
Tip: the sync button will be green when updates are available
- To view changes in your online account (with the same Trimble ID), simply refresh your web browser and check My Settings
The online Marketplace within your account is your one-stop-shop for all of your Trimble Ag Software needs. From here, you can view licenses and renewals, see any annual maintenance plans, and purchase add-ons for use online, on the desktop, or on the mobile app.
- Log in to your online account (learn more)
- From the Profile icon (top right), scroll down and select the Purchaser Organization
- From the Farm tab, select Licenses
- Click Current Licenses to see all licenses assigned to this organization
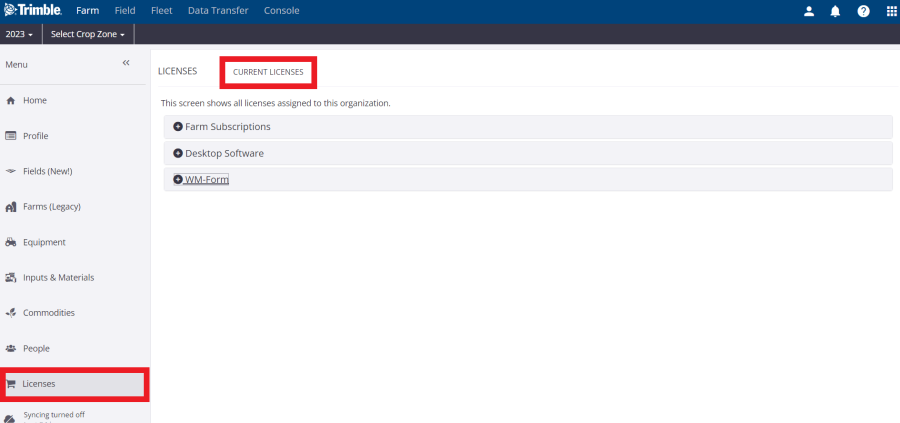
- Click the plus sign to expand and view licenses in each group
Manage all of your farm contacts in one place with the Trimble Ag Software online, for easy access from your mobile device when you want to call or email people on your team.
- Log in to your account online (learn more)
- Click on the Farm tab (top menu)
- Select People
- From the Contacts tab, click the Manage button (top right)
- Select Add Contact
- Fill in any fields (as needed) to add name, title, email address, various phone or fax numbers:
- Click Update Photo (optional) to upload an image from your computer
- Click Save to finish adding a contact with default access (no system or equipment operator access on your account)
Manage permission levels for all of your farm contacts with Trimble Ag Software's online tools that let you decide who will have system access as a licensed user on your account, while giving you control over who can view your account data online or on the mobile app. Once contacts are set up online with system access, you can also use the mobile app to attach operators when recording field tasks.
- Log in to your account online (learn more)
- Click on the Farm tab (top menu)
- Select People
- From the Contacts tab, edit an existing contact by clicking the three dots and select edit (or Add Contact)
- Click System Access
- Check the box Can Access System to display the default settings below
- Check the option to send an access notification message by email
- Edit Access Level (as needed) from View Only to Full Access
- Edit Financial Access (as needed) from Hide Details to Full Access
- Edit Mobile Security (as needed) from Full Access to restricted access by clicking +Add Permission:
- Select a Resource from the list
- Select a Year or All Years from the list
- Select Permission (Edit or View only) from the list
- Click the check mark to finish (or click undo to cancel changes to mobile security)
- Repeat (as needed) to add mobile access to additional resources for this contact

- Click Save (or Cancel) to return to All Contacts
- Filter contacts by Type to view and manage all Contacts with System Access
Visit the online Market place to purchase additional user licenses for your account, or contact our sales team to learn more about plans that meet your needs.
Assign equipment operator access to your farm contacts with Trimble Ag Software's online tools that let you decide who will have login access to vehicle field displays, with options to group or inactivate equipment operators on your account. In addition to easy access from your mobile device when you want to call or email the people on your team, once contacts are set up online with equipment operator access, you can also use the mobile app to attach operators and associated labour costs when recording field tasks.
- Log in to your account online (learn more)
- Click on the Farm tab (top menu)
- Select People
- From the Contacts tab, edit an existing contact by clicking the three dots and select edit (or Add Contact)
- Click Equipment Operator
- Check the box Equipment Operator to display the default settings below
- Add an Applicator License (if applicable) for authorized or certified fertilizer and pesticide applications
- Enter a Unit Cost for hourly rate
- Check Trimble display access if applicable
- Add a Sign in ID (if required) for vehicle display access
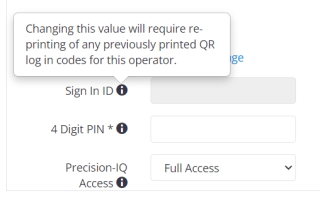
Note: changing this value will require reprinting of any previously printed QR login codes for this operator
11.Add an optional 4-digit PIN for vehicle display access
12.Add Precision IQ access.
13.Click Manage Groups to add, edit or delete equipment operator groups (click Close when done)
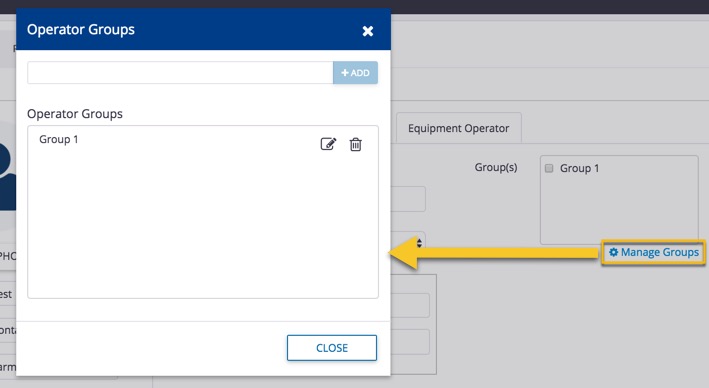
- Click Save (or Cancel) to return to the list of All Contacts
- Filter contacts by Type to view and manage all Equipment Operators:
- Click the pencil icon to edit Contact Properties
- Click the Equipment Operator tab
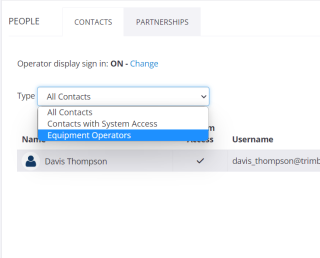
More options:
Learn more about operator settings available for integrated vehicle and equipment displays in the Fleet Management User Guide. For basic setup of vehicles and displays in Trimble Ag Software, check out the quick-start guides under Managing Fleet.
Contact our sales team to purchase additional user licenses and learn more about plans that meet your needs.
Find and keep your account information up-to-date for from your secure online account in Trimble Ag Software. Add an email address to ensure you're receiving the latest feature updates and service alerts, record your address to support purchases in the online Marketplace and select your Country to automatically display features available for your region. Your profile information can vary if you have more than one organization (aka account) associated with your Trimble ID.
- Log in to your account online (learn more)
- Click on the Farm tab (top menu)
- Select Profile to view or print your Client Information
- Edit details by clicking the Edit button (top right)

- Modify your client profile by adding:
- Company name - (required) also known as your Organization name within the account
- Name - contact name associated with the Company Name
- Title - position or job title
- Email - (required) enter one or more email addresses (separated by a semi-colon) that will be used to keep you or your team informed of feature updates or service alerts (such as Ag Premium Weather field-level precipitation and hail alerts)
- Home, work, cell or fax numbers - add optional contact information
- Address - (required) address used to manage licenses or purchase add-ons in the online Marketplace, including:
- State or Province (required) - select your location to automatically display features available in your region (such as legal land description options visible on the mobile app)
- Country (required) - select your location to automatically display other features available in your region
- Get from Address - click this button to automatically add optional GPS or latitude and longitude coordinates based on your address
Notes - add details for your own reference, such as how this account is being used in your business, etc.
- Carbon Aggregation - (visible to customers in Alberta, Canada only at this time) click the checkbox to sign up for the optional carbon credit program, to earn potential cash rebates in return for sustainable (zero-till) farm practices
- Click Save Info (or click Back to return to the previous screen without saving changes)
Assign labour costs by season or date range to farm contacts on your Trimble Ag Software online account, for use with the Ag Time Tracker™ add-on available in the online Marketplace. In addition to easy access from your mobile device when you want to call or email the people on your team, contacts can also be set up online with time tracker profiles and permissions so that your field operators can easily clock in and out of shifts and view time sheets on their mobile device.
- Log in to your account online (learn more)
- Click on the Farm tab (top menu)
- Select People
- From the Contacts tab, edit an existing contact by clicking the edit icon (or Add Contact)
- Click Time Tracker
![]()
- Add Wages by clicking the calendar icons to select a start and end date:
- Add an hourly Wage
- Click the check mark to finish (or click undo to cancel changes)
- Repeat (as needed) to add more date ranges and wages for this contact
- Click Save
- Next, add mobile access by clicking System Access
- Under Mobile Security, click +Add Permission to modify the default of Full Access
- Select Time Tracker from the Resource list
- Tip: Only include Time Tracker Admin when sharing reporting tools with supervisors or managers
- Select a Year (as needed) or leave as All Years
- Keep Permission as Edit
- Continue adding permission for remaining Resource items, as needed, to ensure this Contact can continue to access other areas of the account on the mobile app
![]()
- Click Save (or Cancel)
Learn more about using Ag Time Tracker.
When you're on the go or working in the field, it's simple to add a new crop year to your account using the Trimble Ag Mobile app so that you can use the app to quickly add fields to your account.
- Log in to the mobile app with the same Trimble ID used to access your online account (learn more)
- Tap the crop year (top left) visible under your account (organization) name
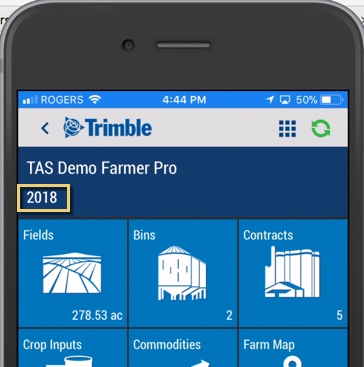
- Click New Year
- Enter four digits from the on-screen keypad, for the new crop year
- Click Done (or Dismiss to cancel)
Note: Crop years that are created on the mobile app will show up in your online account once a field has also been created on the mobile app
- Sync changes with the online account when you’re within cellular or wi-fi range, by returning to the home screen and tapping the green sync icon (top right)
- Later, log in to your account online to add more details to your new crop year
After naming your organization during the initial setup of your Trimble Ag Software account, organization administrators can manage the members and ownership of organizations associated with your account, edit organization settings, add an organization or delete an organization. When you're done here, check out other account settings that can be updated in your online account.
- Log in to your online account (learn more)
- Click the person icon (top right)
- Click Manage Organizations
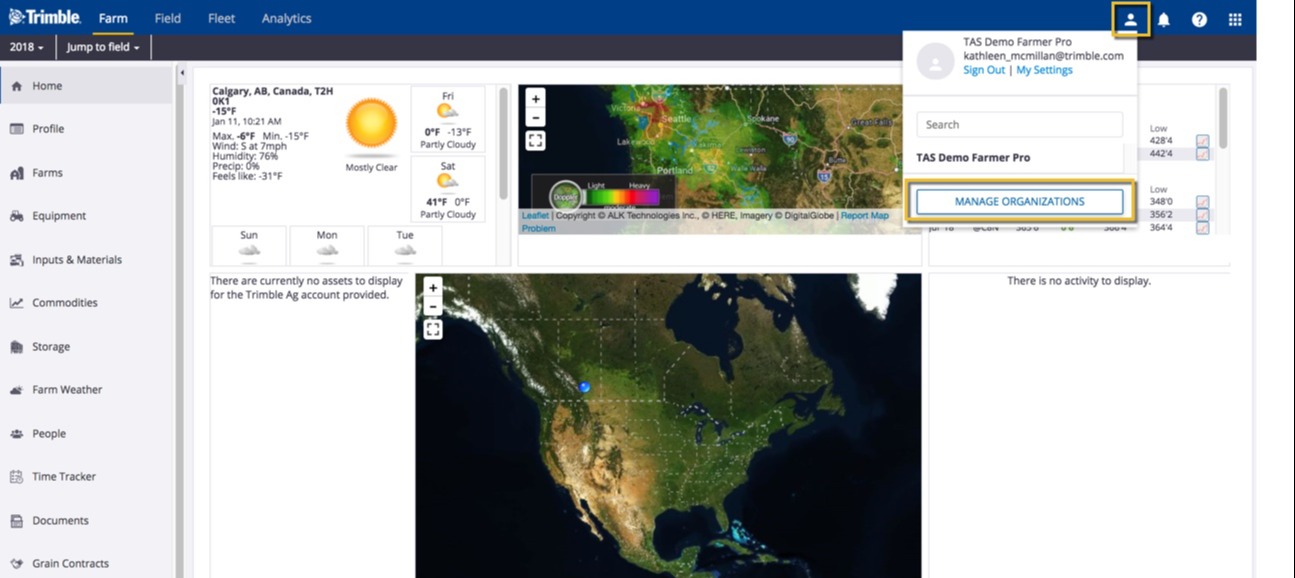
- Click the pencil icon to edit the organization details

- On the Edit Organization pop-up window, select options in each dropdown list or enter changes as needed
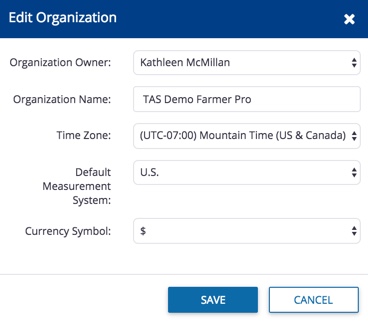
Organization Owner (also known as the Purchasing Organization used for managing licenses in the online Marketplace)
If a new organization owner is selected from the list of contacts already added to your account, the following notification will appear before changes are saved
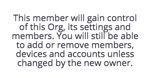
Organization members can click the notification icon (top right) to view new messages as account changes are made, then click the gear icon to mark as read, or click Show Previously Read

Organization Name (also known as the Company Name)
Time Zone - select from the dropdown list for regions around the world
Default Measurement System - select Metric or U.S. (also known as Imperial) used for automatic processing of your precision ag data
Currency Symbol - select from the dropdown list to choose Dollars, Pound Sterling or Euros for tracking field expenses
Click Save (or Cancel)
More options:
- Add an organization: click the +Create New button to add an organization that will not share your account data or plan features (contact our sales team to learn more about pricing and options that fit your needs)
- Delete an organization: click to select one or more organization names on your list, then click the Delete button to remove the organization including all associated data from your account
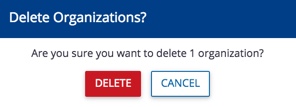
For help with deleting or recovering an organization, contact customer support or visit our Support page for assistance.
It's easy to set up a new Trimble ID, for easy, secure access to all of your Trimble accounts and services, including Trimble Ag Software.
- Visit our login webpage at agriculture.trimble.com and click the LOG IN button (top right). Select Software Customer Login.
- Click the Create new Trimble ID link (at the bottom)
- Enter your contact information (first name, last name, email address) then create a password and enter the CAPTCHA code shown on the screen
- Click Create New Account
- Go to your inbox and open the confirmation email from noreply_identity@trimblepaas.com (check your junk mail folder)
- Click the Activate account button in the email message, which will take you back to our website
- Click the link to login to your new account
That's it! If you still need help, reach out to our customer support team.
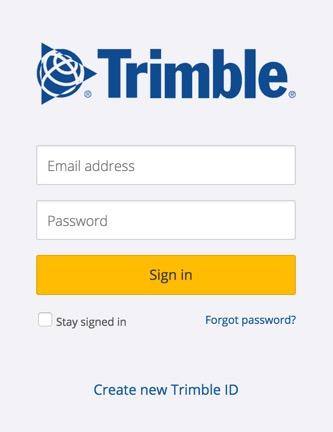
With access to Ag Time TrackerTM on your Trimble Ag Software account, your workers can easily fix mistakes on their time sheets right from their mobile device, saving you time on chasing updates.
- Log in to the mobile app with the same Trimble ID used to access the online account (learn more)
- Tap the Time Tracker tile
![]()
- View the Time Sheet summary by clicking the calendar icon at the top of the screen
- Expand and collapse time sheets for each month by tapping the arrow at the end of the blue row
- Tap any date record (white row) to view date and time stamp details with map locations for each
![]()
- Tap any record (white row) above the map to view the Time Sheet - Edit screen
- Tap to select a different Start/End Date and/or Start/End Time, to auto-calculate the Total Hours Worked
Tap to select one of three options:
- Save - update the account with changes to the selected clock-in/out record, and return to the Time Sheet details screen
- Delete - permanently remove the clock-in/out record (click Yes or No at the warning to complete this step)
- < back-arrow - return to the previous screen without saving changes
Sync changes with the online account when you're within cellular or wi-fi range, by returning to the home screen and tapping the green sync icon (top right)
![]()
Use the Field Manager Overview screen in your Trimble Ag Software online account to automatically track actual field-level expenses by crop year including cost per unit of production (CPUP). Record scouting and product recommendations, view Ag Premium Weather details, manage equipment activity, compare and convert budgets plans to actuals, and manage harvest data. Actual costs automatically roll up into this online summary as members of your team record field events online, sync activities from the mobile app or the desktop, or read-in tasks from vehicle displays or third-party accounts. From the Field Manager screen, you can also use the Field Map tab to view or export boundaries, view map layers, or manage field tasks that are imported or read-in from connected vehicle displays.
- Log in to your account online (learn more)
- Select the preferred crop year (top left)
- Click Jump to field and select the field name
- if two fields with the same name are shown, choose the field with a crop listed
- if you don’t see your field on the list (shows the first 20 fields), go to the Field menu and select Field Profiler, then click on the name of the field to open the Field Manager
- From the Field Manager screen, the default Overview tab is visible as shown below with the Expenses Breakdown that automatically calculates actual costs, with options that include:
Print (top right) to launch a pop-up with a print preview of this screen (press CTRL+P to print as PDF or hardcopy)
Manage - click the button (top right) to make changes to this field:
- Update - edit the field details (name, aces, legal land description and more)
- Delete Field - permanently delete this field from your account (confirm at the warning prompt or cancel)
- Split Field - split this field into more than one boundary for the selected crop year, prior to applying products to the field (learn more)
- New Crop - add a new crop sequence to this field when growing more than one crop for the selected crop year (learn more)
- Save Actuals as Crop Plan - copy this Field Manager summary as a new Field Planner/budget (learn more); note: this does not affect the high-level Crop Planner summary under the Field menu
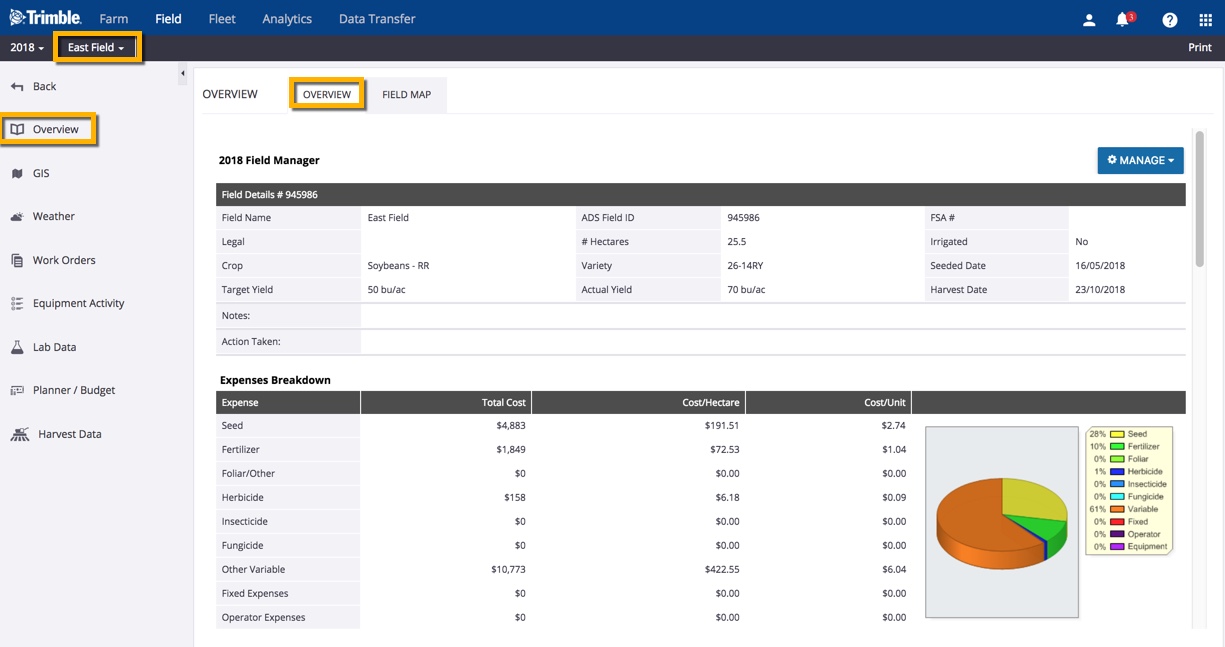
- Use various icons at the end (far right) of each category to manage tasks and expenses for this field during the selected crop year:
 Add record - enter the date, details and costs for a new record
![]() Edit record - adjust the date, details and costs for an existing record, or delete the record
Edit record - adjust the date, details and costs for an existing record, or delete the record
 List view - toggle to display records in date order (most recent at bottom)
 Group view - toggle to display records grouped by product name (A to Z)
![]() Chart view - toggle to display records in a bar chart (such as weather events)
Chart view - toggle to display records in a bar chart (such as weather events)
 Analyze - launches a form in a new browser tab to select and view various soil tests (press CTRL+P to print as PDF or hardcopy)
 Report preview - opens a pop-up with a detailed report for a single record including the field boundary (press CTRL+P to print as PDF or hardcopy)
- Scroll down the page to view and add actual field events or expenses including:
Seed - click the add record icon to display or edit the default crop type costs for any planned seed applications, then select one or more fields and click Add Application (or Close Window)
Soil Test Report - click the Add Test icon to view the Edit Soil Test screen for this field, then click Back to return to the Overview screen
Fertilizer Application - click the add record icon to add an analysis, manure or compost application, then select one or more fields and click Add Application (or Close Window)
![]() To record a fertilizer mix, click the Quick Blender (lighting bolt) icon to make selections from the pop-up window shown below, then click GO (or close the pop-up window to cancel)
To record a fertilizer mix, click the Quick Blender (lighting bolt) icon to make selections from the pop-up window shown below, then click GO (or close the pop-up window to cancel)
Product Application - view or edit verified tasks read-in from vehicle displays or third-party accounts, or click the add record icon to add any any planned fertilizer applications, then select one or more fields and click Add Application (or Close Window)
Other Expenses - click the add record icon to add any any other expense types (such as tractor repairs or lease costs), then select one or more fields and click Save (or Close)
Field Events - click the add record icon to add events without tracked costs (such as product application, mechanical, in-field support, weather/irrigation, or other events including communication, meeting, training or analytical), using the first two lines with an asterisk* to record farm-wide events, then click Update Events (or Close)
Weather and Irrigation Events - click the add record icon to add events without tracked costs (such as other, irrigation, rain, hail and frost), then click the plus icon to list more events by type and date, click to select one or more fields to apply the event to, then click Save (or Close)
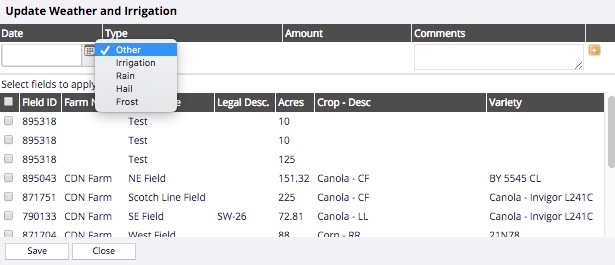
That's it! Learn more about managing field activities, as well as how to verify equipment task data.
With Trimble Ag Software, you can use online filters to turn map layers on and off, overlaid on boundaries across your farm. Adjust layers to view field and crop boundaries, benchmarks, guidance lines, landmarks, as-applied coverage maps, Crop Health Imagery, as well as management zones and vehicle tasks.
- Log in to your account online (learn more)
- Select the preferred crop year (top left)
- Click Jump to field and select the field name
- if two fields with the same name are shown, choose the field with a crop listed
- if you don’t see your field on the list (shows the first 20 fields), go to the Field menu and select Field Profiler, then click on the name of the field to open the Field Manager
- as an alternative, you can go directly to the GIS editor screen by going to the Farm menu and select Farms, then click on the Fields tab and click the edit icon next to a field name
Note: the direct-to-GIS method may not work if you see and select fields that were already deleted using the Field Profiler but were not yet retired as assets on the Farm menu
- From the Field Manager screen, select GIS from the left navigation menu
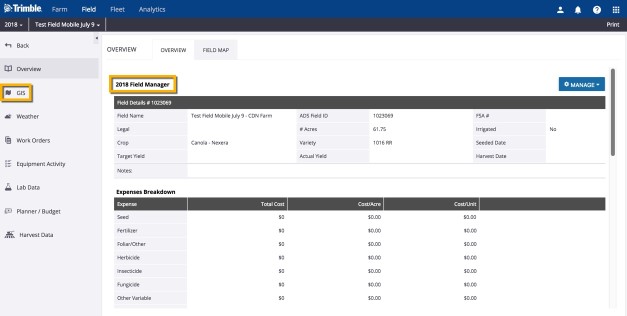
- From the Boundary tab, click the layers icon (top right)
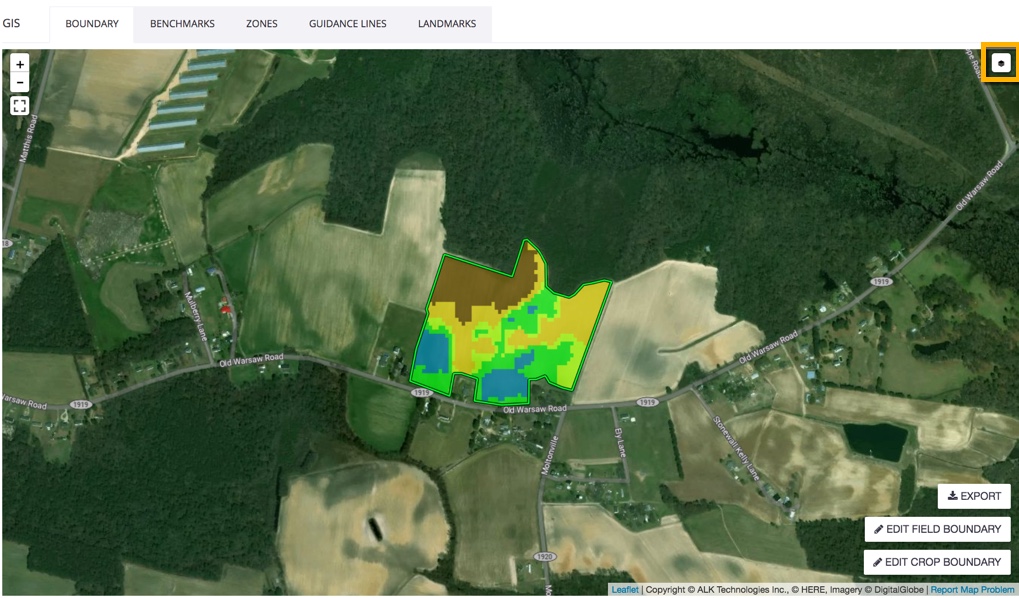
- On the Layers selection pane now visible to the right of the map, select from the following options:
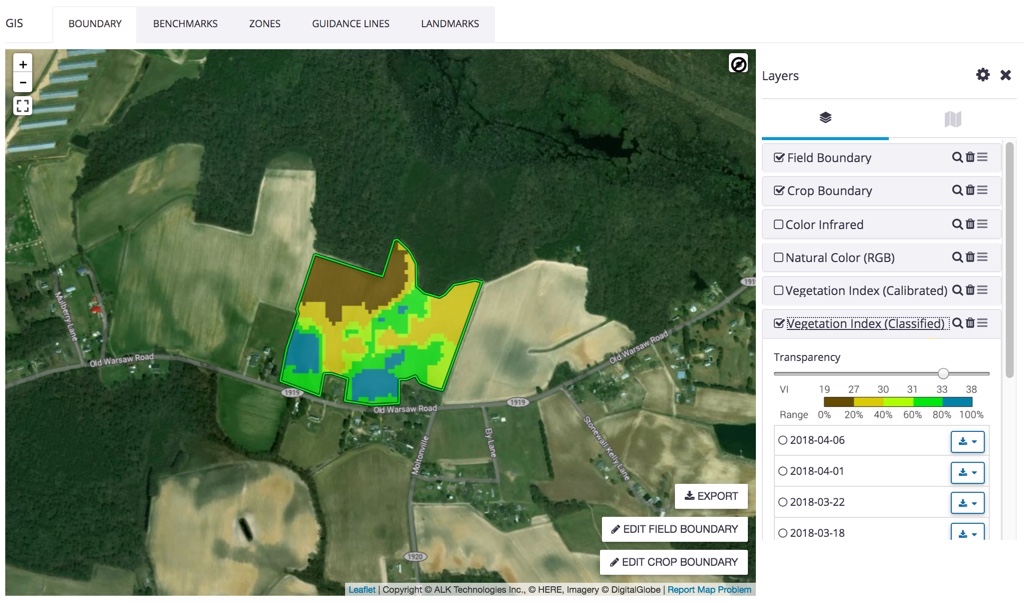
Manage Layers - click the gear icon to display the Manage Layers pop-up window, then click an arrow to expand/collapse categories, and check one or more categories then click Save (or Cancel)
Benchmarks - GPS locations for points or pins on a map
Crop boundary - tillable area, in some cases, may be smaller than a field boundary
Crop Health Imagery - in-season imagery to identify areas of stronger and weaker productivity, available in four indeces:
Color Infrared
- Vegetation is seen in red
- Highlights the vegetation variability
- More than 80% of vegetation response is in NIR (near infra-red)
Natural Color (RGB)
- Identifies the objects in the field
- Facilitates the ground truthing of vegetation index values
- Same color seen by our eyes
Vegetation Index (Calibrated)
- Calibrated Index
- Enables day-to-day and field-to-field comparisons
- Corrects for soil noise background
- Flows into Advisor Prime
- Scale 0 – 120 (non-vegetation to dense vegetation)
Vegetation Index (Classified)
- 5 classes of equal area
- Relative scale to accentuate whatever crop variability exists in a field
- Optimize drones flights
- Can be used for prescription
- Enables target scouting and tissue sampling
Guidance Lines - paths used by vehicles or implements for position accuracy
Imagery - view GeoTIFF images uploaded from the Field > Files menu
Landmarks - benchmarks, polygons and boundaries that identify non-tillable area
Management Zones - pattern of zones classifying spatial variability within a field
Tasks - as-applied coverage maps from vehicle display data
Transparency - click to adjust the slider bar to change map layer from opaque to transparent, when viewing multiple layers at the same time
Layers by date - scroll down to view files by date, then click to view a single layer at a time, with the option to download the selected layer in SHP (Shapefile) or TIF (GeoTIFF) format
- Click the Export button (bottom right corner of map) to download a single selected date layer in SHP (Shapefile) or KML (Keyhole Markup) format.
Related: Learn more about editing boundaries here.
Use the Trimble Ag Mobile to build work orders for your team, including associated fields, materials, equipment and weather restrictions, and assign it to an operator from your account contacts, including a planned start and end date. Keep track of progress as your operators start, pause and complete assigned work orders, with automated summaries that roll up into Trimble Ag Online.
Once you've activated your Trimble Ag Software account online and downloaded the mobile app, make sure that you have the following set up:
- Activate the free Work Orders module in the online Marketplace
- A Field
- A Contact to assign a work order to, who has mobile access to Work Orders
- Vehicle or Implements if you are going to be creating an order with Equipment
Quick Steps
- Go to the Home screen
- Tap the year to select preferred crop year
- Tap Work Orders tile
- Select a Field name
- Tap the + Add icon (top right corner)
- Tap + Add Field (required)
- Select one or more fields (required)
- Tap the disk icon to save (required)
- Enter a Task Name (required)
- Select an Operation if different from the default (Unknown)
- Tap the Materials icon to add Chemicals, Fertilizers, and Seeds (if present)
- Tap the Tractor icon to add Vehicles and Implements
- Tap the People icon to assign an Operator (shows all Contacts, not just Equipment Operators from People)
- Select a Planned Date and Expiry Date if different from the default (required)
- Tap and enter Weather Restrictions
- Tap to enter Crop Stage
- Enter Comments
- Tap the disk icon to save
Step-by-Step
- Log in to the mobile app with the same Trimble ID used to access your online account (learn more)
- From the mobile app’s home screen, select the preferred crop year (top left)
- Swipe up to view all tiles and tap the Work Orders tile
- In the Work Orders-Planned screen, tap the add + icon to add a new record
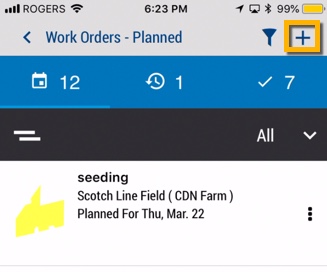
- In the Work Orders screen, tap + Add Fields (required)
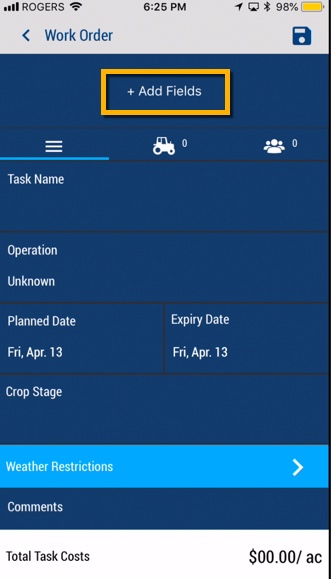
- From the Fields list, tap to check one or more fields (or tap again to remove a check mark)
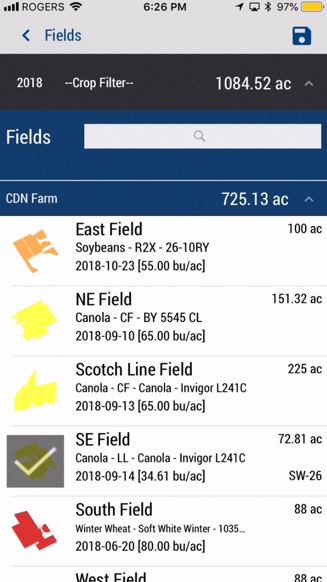
- Tap the disc icon to save the selection (required)
- On the Work Orders screen, tap to enter or select the options below:
- Pencil icon - modify the list of fields associated with this work order
- Task Name (required) - enter a name
- Operation - tap to select from the dropdown list (default is Unknown)

Tap the materials icon, then tap the plus icon
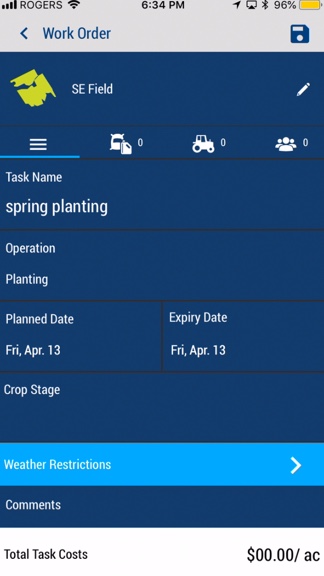
Select an item from the list (or tap Cancel)
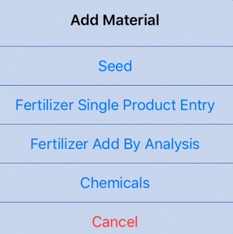
Edit the Seeding screen (learn more), then tap the disc icon to save changes (or tap the back arrow) to return to the previous screen
Continue adding fertilizer and chemicals, as needed, to the Materials screen, then tap the disc icon to save changes (or tap the back arrow) to return to the previous screen
Tap the tractor icon, then tap the plus icon
Select an item from the list, Vehicle or Implement (or tap Cancel)
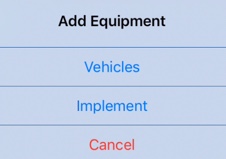
Tap a check box to select one or more vehicles assigned to your account (learn more), then tap the disc icon to save changes (or tap the back arrow) to return to the previous screen
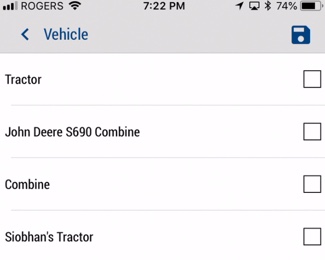
Tap the people icon to, then tap the plus icon
Tap a check box to select one or more Operators assigned to your account (displays all contacts and equipment operators assigned to your account; learn more), then tap the disc icon to save changes (or tap the back arrow) to return to the previous screen
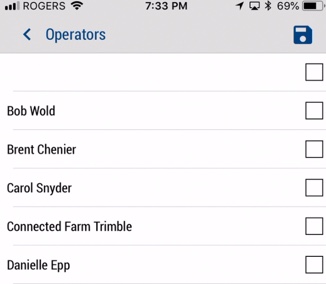
Planned Date and Expiry Date (required) - tap to select new dates (both default to today's date) tap the Tractor Icon to Add Equipment
Crop Stage - tap to select from the list (or tap the < back arrow to return to the previous screen)
Weather Restrictions - tap the blue bar to display the form, then tap the pencil icon to add minimum/maximum values for each category
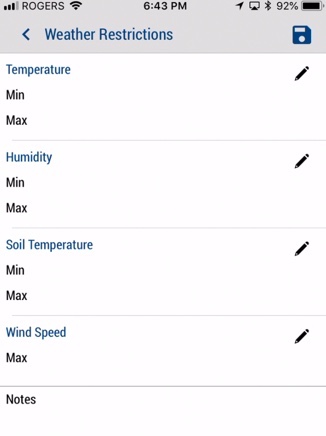
Add Notes
Note: For customers subscribing to the Ag Premium Weather add-on, a warning will appear on a work order if weather conditions are outside of minimum/maximum settings.
Comments - add notes as needed
- Tap the disc icon to save changes, to return to the Work Orders - Planned screen
- Sync changes with the online account when you’re within cellular or wi-fi range, by returning to the home screen and tapping the green sync icon (top right)
![]()
When the operator is ready to begin the task, go to the Work Order tile and and click the START button. The operator can also PAUSE to stop the counter. Click DONE to record the total task time, which appears as a cost per acre at the bottom of the work order screen.
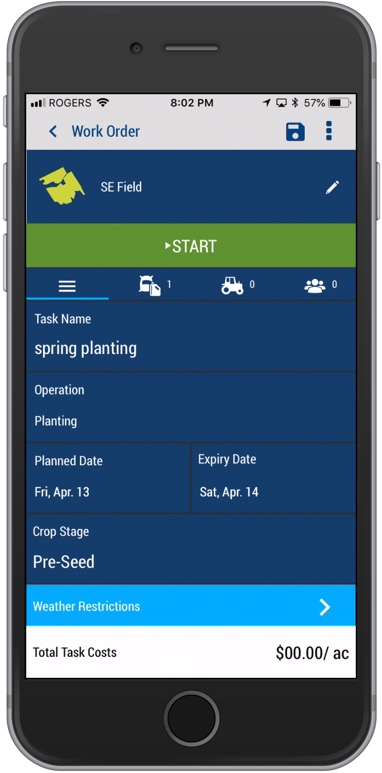
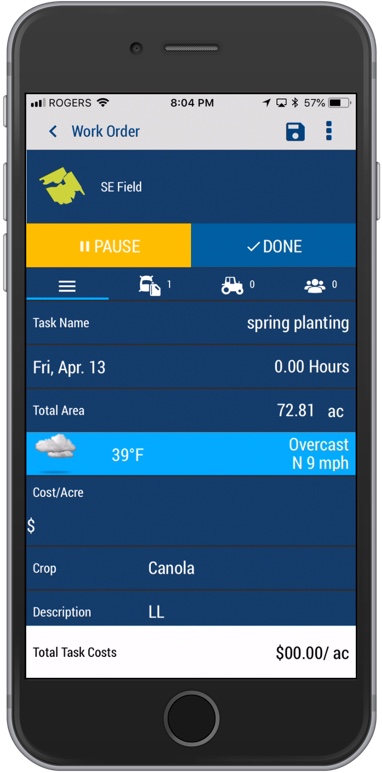
And that's not all. Watch for more step-by-step guides for Work Orders coming soon, or contact support.
Watch how it's done to get more out of Trimble Ag Desktop (formerly Farm Works) including features available in the add-ons, Advanced Desktop Accounting™ and WM-Subsurface™. These videos may feature the old Farm Works logo, but the functions are still relevant today.
Watch videos for Trimble Ag Desktop Watch videos for legacy Farm Works Mobile
Learn more about legacy Farm Works Mobile software for your hand-held vehicle displays (this is different from the Trimble Ag Mobile app available for iOS or Android mobile devices included with our Farmer plans).
And find the latest videos on our YouTube training playlists for the online platforms here.
Get the latest help for WM-SubsurfaceTM, available on its own or as an add-on for Trimble Ag Desktop software, to analyze topographic data on your farm and create drainage plans, as well as features for general mapping, field records and simple accounting. Click here to view, search (CTRL+F) download or print this PDF guide.
Contact our sales team to learn more about add-ons and options for Trimble Ag Software.
Download the PDF user guide for this legacy software, available in 10 languages including English. Click here to get started.
Learn more about legacy Farm Works Mobile software for your hand-held vehicle displays (this is different from the Trimble Ag Mobile app available for iOS or Android mobile devices included with our Farmer plans).
Sit back, relax, and see how it's done. Click here to browse our library of demo videos for Trimble Ag Software's online and mobile app features. Farm software just got a whole lot easier.
If you already have Trimble Ag Desktop installed and have purchased the Standard or Premium Annual Software Maintenance Plan, you can install the latest software fixes and updates from within the desktop software Help menu, or download the latest updates by clicking here.
Once the download is complete, click the file shown in the download pane at the bottom of your screen to automatically run the installation program (or go to the Downloads folder on your computer and click to run the program from there). Follow the prompts to complete the installation or check out the steps here.
Learn more about staying on top of the latest desktop software updates here. For help with reinstalling legacy Farm Works software or missing CD registration keys, contact our support team.
For the best performance when using Trimble Ag Software online, on the mobile app or on the desktop, make sure your systems and devices meet our minimum requirements. Each of our platforms has been tested by our developers to ensure you'll continue to have access to the full range of features in our software, by following the minimum standards (or greater), as outlined below.
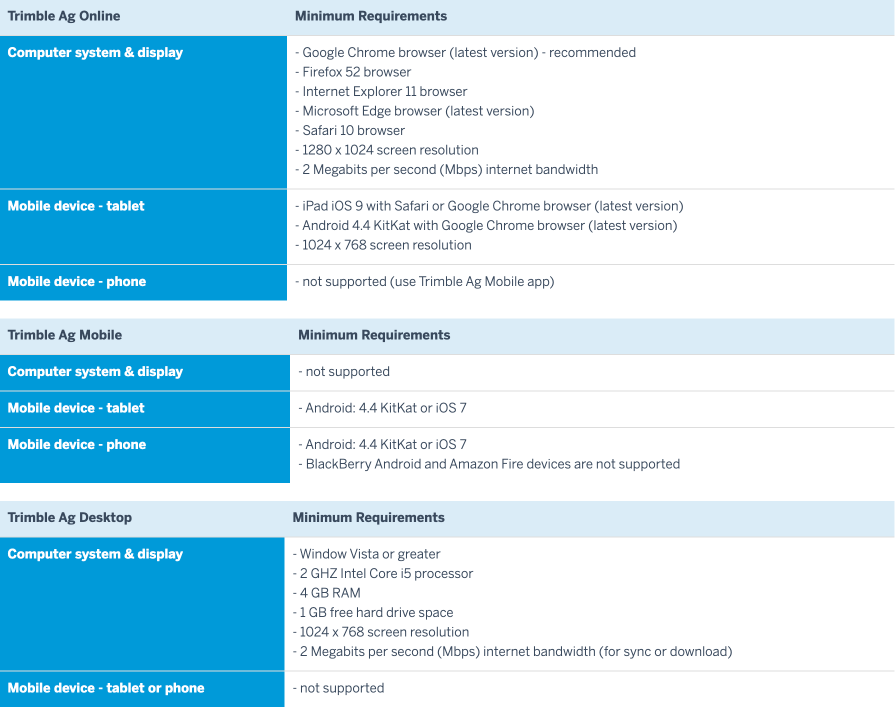
Trimble Ag Desktop is powered by Farm Works Software®.
Prerequisites
Before installing Trimble Ag Desktop software, make sure you have already reviewed the system requirements, activated your desktop license online, and downloaded the installation files from our website for Windows (or Windows emulator for Mac). If this is all new to you, let us walk you through the steps in our printable QuickStart Guide for Trimble Ag Desktop.
To automatically run the Windows installer:
- Click the file name to run the TAS Office*****.exe file from the download pane at the bottom of your screen (or from your Downloads folder).
- Select your preferred language and region from the dropdown lists and click OK
- Review and accept the License Agreement terms by clicking Yes
- Choose the destination for the software installation by clicking Browse, or click Next to accept the default location (c:\farmproj)
- Select the Program Folder for the software installation by clicking an item in the Existing Folders list, or click Next to accept the default location (Trimble Ag)
- At the login window, enter your Trimble ID email address and password used by your account Organization Owner
- Review the list of licenses and expiration dates purchased when you activated your desktop license (click Refresh to see recent purchases such as the Annual Software Maintenance Plan)
Note: only click Add License if you have an existing account and your list shows Update Support Plan or Annual Maintenance Plan
Tip: if you don’t see your licenses in the list, sign in to your online account to confirm that you can view your Current Licenses in the online Marketplace (under the Farm menu); if none are shown, click the person icon (top right in the online account) to see if you have more than one organization and check your Current Licenses again, which will confirm if a different email address is associated with your desktop software purchase
If a different email address was used for your purchase, contact our support team for assistance with completing the software installation
Note: for licenses from 2017 or earlier, you may be prompted to enter a Proof of Purchase Code (POPN) or CD Key provided with the purchase of your software. For help with missing POPN codes or CD registration keys for older software licenses, contact our support team.
- Click Finish to start the installation (may take several minutes)
Note: if you're using the WM-Subsurface™ add-on, you may also be prompted to install Microsoft® Direct X® components to view 3D maps (review the agreement, click I accept the agreement and click Next, then click Finish)
- At the final prompt, safely eject any USBs or CDs from your computer, then select Yes, I want to restart my computer now
- Click Finish to complete the installation
- Wait for your computer to restart
- From your computer’s Start menu, select the program Trimble Ag Software, or click the Trimble icon on your desktop
- When you use the software for the first time, you'll be prompted to select any third-party data sources from the list (click OK to download your preferred drivers so that Trimble Ag Desktop can process those data types)
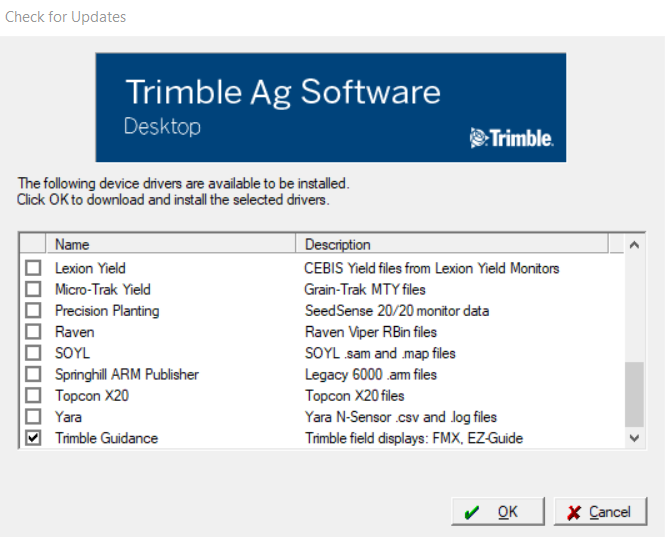
- Click Yes to accept any installation prompts for each of your selected drivers, then click Yes to restart your computer at the prompt
Once your computer restarts, launch the desktop software — no password required — to begin working on your farm project (learn more).
Use the links below to download or reinstall legacy Farm Works Software purchased prior to the Trimble Ag Software launch in 2016. If you're missing your CD registration key, contact our support team for assistance.
- Download Farm Works Mobile 2016.03
- Download prior software versions (includes desktop and mobile)
- Download prior Farm Works User Guides (available in multiple languages)
- Register Farm Works Mobile
Ready to upgrade to Trimble Ag Software? Get started here or contact our sales team to learn more.
Trimble Ag Software can read in and export your precision ag data from a wide range of supported vehicle displays and third-party accounts. Check out our data compatibility and data transfer charts to see if your system and files are supported, or contact customer support for more help.
Trimble Ag Software Fleet Data Compatibility Chart
Trimble Ag Software Vehicle Data Transfer Chart
Learn more about FarmStream, an advanced productivity tool within Trimble Ag Software that can be turned on or off from the TMX-2050, GFX-750, GFX-350 or FmX display, in the Fleet User Guide.
Here are a few handy links to other Fleet documentation:
Having issues with logging into your Trimble Ag Software account? We're here to help. Check out our troubleshooting tips below, featuring automated help from our website.
Login Webpage for Trimble Ag Software
Find our login webpage by visiting agriculture.trimble.com, then click the LOGIN button on the top right corner of the page. Select Software Customer Login.
Click ""Forgot password?"" if you need help recovering your Trimble ID password.
If you still need help, reach out to our customer support team.
When equipment data is read-in to Trimble Ag Software through file imports or wireless connections with vehicle displays or third-party accounts, it's held for verification before the data becomes part of a field record. You can edit or delete the task details to fix errors, merge or reassign tasks, and control whether to add tasks to maintain the accuracy of your field records and costs. Once you verify the task data, the information can be used in reports and coverage maps in the online account or on the mobile app.
- Log in to Trimble Ag Software online (learn more)
- Select the preferred crop year (top left)
- Click the Field tab (top menu)
- Select Equipment Activity from the left menu navigation to display a summary of tasks for all fields
Note: tasks flagged with a warning icon will alert you to missing information (such as a crop or crop year) that is required before data can be added to your field records
- Adjust the table view by clicking:
- Filter By to view information by Date, Client : Farm : Field, Crop, Operation, Vehicle, Implement, Operator, Material or Is Verified
- Click X Clear Filter to show the default view
- any column heading to sort table rows in ascending or descending order
- Click the task Name to display Summary details in a pop-up window, including:
- Map tab with options to view different coverage maps (based on how the vehicle display was configured), change the base map type to Satellite or Roads, download KML or SHP files as well as edit boundary
- From here, you can also click the buttons (bottom left) to Verify Task without changes, or Edit task details (tip: use the Edit option first if the task displays a warning icon that indicates missing information, only visible on the main list shown in step 4)
- Inputs tab with details on any vehicles and implements used including duration and cost for the task, as well as a link to files from the display
- Click the file name to view more details, including the File Type, Transfer Method, File Size, Status and Errors & Warnings, with options to D__ownload File__ or Reprocess File
- Click the buttons (bottom left) to Verify Task without changes or Edit
- From the main list (shown in step 4) you can also use buttons on the bottom of the screen to manage task data:
Verify - select one or more tasks to automatically add the data to field records without any changes
Tip: use the Edit option first if the task displays a warning icon that indicates missing information
- Merge - select two or more tasks associated with the same field to permanently merge data into one task (at the prompt, click Yes or No to continue, as this change cannot be undone)
- Reassign - select a task in order to move all other tasks with the same crop to the same field and time frame (crop year), as shown in the confirmation message example below (at the prompt, click Reassign or Cancel, or Edit related tasks to resolve mismatches before trying again)
- +Add - create a new task by selecting a field and manually entering the task details
- Delete - select one or more tasks to remove the data from the Equipment Activity list (at the prompt, click Delete or Cancel)
- Edit - select a single task to review and change the task details, as shown below:
In the Summary information at the top of the screen, review and edit the following:
- Field name (required) - click the pencil icon at the top of the screen
- Crop Zone (required) - select from the list of crop years in the account, or click the plus icon to add a new crop year
- Task name (required) - click to edit the text displayed
- Start/End Date and Time (required) - click the date and time shown to display the calendar and clock options and change as needed, then click Apply to automatically update the total Time Worked
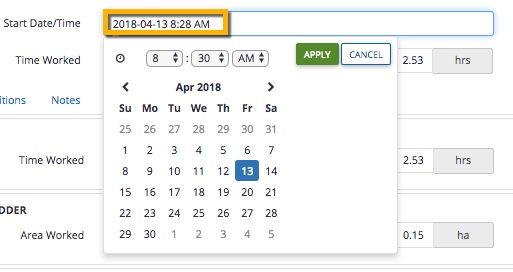
- On the Resources tab, review and edit the following areas (as needed):
- Time Worked, Area Worked and Cost - click to edit the text displayed for each vehicle, implement or operator
- Add Operator - click the button to select a name from the list of operators in your account
- Add Vehicle - click the button to select a name from the list of vehicles assigned to your account
- Add Implement - click the button to select a name from the list of implements assigned to your account
- Add Material - click the button to add a Chemical, Fertilizer, Lime, Mix, Seed or Water from the list of materials in your account
On the Conditions tab, add information to capture the following (as needed):
- Weather - click to select the Date/Time Recorded and enter text to record Temperature, Humidity, Wind Speed, Wind Gust Speed, select Wind Direction and select Sky observations (note: units of measure shown will reflect your individual settings)
- Field - click to select options for Soil Condition, Growth Stage and Application Method
On the Notes tab, enter any additional comments
Click Save (or Cancel)
That's it! Return to the Equipment Activity screen any time to review or change task details. Click here for more ways to view and use vehicle data in your account.
Options
Track vehicle location when hardware powered off
Traditional Fleet
Yes
FarmStream Fleet
No
| Options | Traditional Fleet | FarmStream Fleet |
|---|---|---|
| View vehicles on map | Yes | Yes |
| View vehicle details for selected machine | Yes | Yes |
| Vehicles listed in Fleet Widget | Yes | Yes |
| Options | Traditional Fleet | FarmStream Fleet |
|---|---|---|
| See your list of vehicles | Yes | Yes |
| Configure the columns | Yes | Yes |
| Column options: | ||
| Date last Reported – Relative time | Yes | Yes |
| Date Last Reported – Calendar Time | Yes | Yes |
| Last Known Status | Yes | Yes |
| Engine Hours | Yes | Yes |
| Alert (Type/Name/Generated) | Yes | Yes |
| Delay Response Threshold | Yes | N/A |
| Last Operator Name | No | Yes |
| Last Operator Login | No | Yes |
| Last Location | Yes | Yes |
| Last Reported Speed | Yes | Yes |
| Vehicle Type | Yes | Yes |
| Fuel Level | Yes | Yes |
| Vehicle Make | Yes | Yes |
| Organize vehicles into groups | Yes | Yes |
| Vehicles States: | ||
| Working | Yes | Yes |
| Moving | Yes | Yes |
| Stopped | Yes | Yes |
| Off | Yes | Yes |
| Speeding | Yes | Yes |
| Rushing | No | Yes |
| No GPS | No | Yes |
| Delayed | No | Yes |
| Pending | No | Yes |
| Create a new vehicle | Yes | Yes |
| Create or manage a delay threshold | Yes | N/A |
| Export Vehicles | Yes | Yes |
| Use implement switch to define working | Yes | N/A |
| Options | Traditional Fleet | FarmStream Fleet |
|---|---|---|
| Vehicle last updated | Yes | Yes |
| Vehicle icons | Yes | Yes |
| Vehicle last known status | Yes | Yes |
| Telematics Device Serial Number | Yes | N/A |
| Display Device Serial Number | No | Yes |
| Manufacturer | Yes | Yes |
| Last location when vehicle last reported | Yes | Yes |
| Delay response threshold | Yes | N/A |
| Edit vehicle | Yes | Yes |
| Calibrate Engine Hours | Yes | N/A |
| Move Vehicle to another group | Yes | Yes |
| Delete vehicle | Yes | Yes |
| Options | Traditional Fleet | FarmStream Fleet |
|---|---|---|
| Vehicle location history | Yes | Yes |
| Color location markers by machine state | Yes | Yes |
| Export location history | Yes | Yes |
| Show alerts on Vehicle History page | Yes | Yes |
| User configurable speeding | Yes | Yes |
| Options | Traditional Fleet | FarmStream Fleet |
|---|---|---|
| Engine Hours | Yes for compatible vehicle platforms | Yes for compatible vehicle platforms |
| Fuel Level | Yes for compatible vehicle platforms | Yes for compatible vehicle platforms |
| Fuel Rate | Yes for compatible vehicle platforms | Yes for compatible vehicle platforms |
| Boost Pressure | Yes for compatible vehicle platforms | Yes for compatible vehicle platforms |
| Coolant Temperature | Yes for compatible vehicle platforms | Yes for compatible vehicle platforms |
| Electrical Potential | Yes for compatible vehicle platforms | Yes for compatible vehicle platforms |
| Battery Voltage | Yes for compatible vehicle platforms | Yes for compatible vehicle platforms |
| Engine Load | Yes for compatible vehicle platforms | Yes for compatible vehicle platforms |
| Engine Oil Pressure | Yes for compatible vehicle platforms | Yes for compatible vehicle platforms |
| Engine Speed | Yes for compatible vehicle platforms | Yes for compatible vehicle platforms |
| Hydraulic Oil Temperature | Yes for compatible vehicle platforms | Yes for compatible vehicle platforms |
| Intake Manifold Temperature | Yes for compatible vehicle platforms | Yes for compatible vehicle platforms |
| Trasmission Oil Temperature | Yes for compatible vehicle platforms | Yes for compatible vehicle platforms |
| Coolant level | Yes for compatible vehicle platforms | Yes for compatible vehicle platforms |
| Hydraulic Oil Pressure | Yes for compatible vehicle platforms | Yes for compatible vehicle platforms |
| DEF(Urea) Level (Diesel Exhaust Fluid) | Yes for compatible vehicle platforms | Yes for compatible vehicle platforms |
| Engine Oil Level | No | Yes for compatible vehicle platforms |
| Hydraulic Filter | No | Yes for compatible vehicle platforms |
| Hydraulic Fluid Level | No | Yes for compatible vehicle platforms |
| Options | Traditional Fleet | FarmStream Fleet |
|---|---|---|
| Downloading files from a vehicle | Yes | Yes |
| Sending files to a vehicle (when AutoSync not enabled) | Yes | Yes |
| Options | Traditional Fleet | FarmStream Fleet |
|---|---|---|
| Geofence Alerts | Yes | No |
| Ignition Alerts | Yes | No |
| Curfew Alerts | Yes | No |
| Create Geofences | Yes | No |
| Machine Alerts | No | Yes |
| Rushing Alerts | No | Yes |
| Options | Traditional Fleet | FarmStream Fleet |
|---|---|---|
| Create/Edit operators | Yes | Yes |
| Create/Edit operator groups | Yes | Yes |
| Import operators | Yes | Yes |
| Export operators | Yes | Yes |
| Send operators to display | Yes | Yes |
| Manage job titles | Yes | Yes |
| Print QR codes | Yes | Yes |
| Options | Traditional Fleet | FarmStream Fleet |
|---|---|---|
| Compare utilization of vehicles | Yes | Yes |
| Utilization using FmX, TMX-2050, GFX-750, or GFX-350 Display | No | Yes |
| Utilization using FmX Display and DCM-300 modem | No | No |
| Utilization using FmX Display and DCM-300 modem | Yes | No |
| Utilization using DCM-300 modem only | Yes | Yes |
| Utilization states: | ||
| Working | Yes | Yes |
| Moving | Yes | Yes |
| Stopped | Yes | Yes |
| Off | Yes | Yes |
| Speeding | No | Yes |
| Rushing | No | Yes |
| No GPS | No | Yes |
| Delayed | No | Yes |
| Pending | No | Yes |
"To run FarmStream Fleet, a vehicle must have an FmX® integrated display, a GFX-750™ display, a GFX-350™ display or a TMX-2050™ display installed. FarmStream can use one of many wireless connectivity options including the DCM-300 modem as well as the GX450 modem, SNM941 Connected Site Gateway, Wi-Fi, and WAN gateways.
Customers may use the Precision-IQ or FmX+ app on the TMX-2050 display or the Precision-IQ app on the GFX-750 or GFX-350 display. The Precision-IQ app prior to version 5.50 firmware for TMX or 1.50 firmware for GFX-750 has limited FarmStream functionality only.
Customers who have the DCM-300 modem and the FmX or TMX-2050 display set up on a vehicle can choose whether they want to use the traditional or FarmStream version of Fleet for that vehicle. Customers who own these devices can use FarmStream and traditional Fleet on different vehicles in their fleet and see the data from both versions of Fleet in one organization.
Customers using traditional Fleet can still use the DCM-300 modem to track their fleet’s utilization, but traditional Fleet does not link with the display and provides utilization data solely based on vehicle movement and the optional use of an implement switch.
The following table summarizes the hardware options for FarmStream Fleet:
| Hardware used | Description and requirements |
|---|---|
| DCM-300 modem, FmX display | If the DCM-300 modem is used with FarmStream, it is used as a modem only and not as a vehicle CAN interface. The FmX display requires version 10.01 or higher firmware. |
| DCM-300 modem,TMX-2050 display | If the DCM-300 modem is used with FarmStream, it is used as a modem only and not as a CAN interface. The TMX-2050 display requires version 4.3.1 or higher firmware for the FmX+ app and version 5.50 or higher for the Precision-IQ app. |
| GX450 or SNM941 modem, FmX display | If the GX450 or SNM941 modem is used with FarmStream, it is used as a modem only and not as a CAN interface. The FmX display requires version 10.01 or higher firmware. |
| GX450 or SNM941 modem, TMX-2050 display | If the GX450 or SNM941 modem is used with FarmStream Fleet, it is used as a modem only and not as a CAN interface. The TMX-2050 display requires version 4.3.1 firmware for the FmX+ app and version 5.50 or higher for the PIQ app. |
| Third party WAN gateway device, FmX display | FarmStream Fleet may be used with a third-party WAN gateway device for connectivity, such as a cellular device. It must be connected to the display. The FmX display requires version 10.01 or higher firmware. |
| Third party WAN gateway device,TMX-2050 display | FarmStream Fleet may be used with a third party WAN gateway device for connectivity, such as a Wi-Fi or cellular device. Smartphone tethering may be used as a source of connectivity for the TMX-2050 display. The TMX-2050 display requires version 4.3.1 or higher firmware for the FmX+ app and version 5.50 or higher for the PIQ app. |
| GX450 or SNM941 modem,GFX-750 or GFX-350 display | If the GX450 or SNM941 modem is used with FarmStream, it is used as a modem only and not as a CAN interface. The GFX-750 display requires version 1.50 firmware or higher for full FarmStream functionality. Any version of GFX-350 firmware is compatible with Farmstream. |
| Third-party WAN gateway device,GFX-750 or GFX-350 display | FarmStream Fleet may be used with a third-party WAN gateway device for connectivity, such as a Wi-Fi or cellular device. Smartphone tethering may be used as a source of connectivity for the GFX display. The GFX-750 display requires version 1.50 firmware or higher for full FarmStream functionality. Any version of GFX-350 firmware is compatible with FarmStream. |
The following table summarizes the hardware options for traditional Fleet:
| Hardware used | Description and requirements |
|---|---|
| DCM-300 modem, no display | This version of the traditional Fleet uses the DCM-300 modem to obtain utilization data based on vehicle movement and the optional use of an implement switch. |
| DCM-300 modem,TMX-2050 display | This version of the traditional Fleet uses the DCM-300 modem to obtain utilization data based on vehicle movement and optional use of an implement switch. It does not link the DCM-300 modem with the TMX-2050 display. |
| DCM-300 modem,FmX display | This version of the traditional Fleet uses the DCM-300 modem to obtain utilization data based on vehicle movement and optional use of an implement switch. It does not link the DCM-300 modem with the FmX display. |
Some differences between the traditional and FarmStream Fleet include:
Alerts
Geofence, curfew, and ignition alerts are available in traditional Fleet only. Machine and rushing alerts are available in FarmStream Fleet only.
For a detailed list of differences between the two types of Fleet, refer to the feature comparison chart.
For information on how to use Fleet, refer to the user guide, available here.
The same part numbers are used for both traditional and FarmStream versions of Fleet.
| Part Number | Description |
|---|---|
| 81017-05 | Farmer Core |
| 81017-04 | Display Connection |
| 81017-01 | Farmer Pro |
| 81017-03 | Farmer Fit |
To activate FarmStream Fleet, assign a Farmer Core, Farmer Pro or Farmer Fit license to the customer’s organization (in the Reseller Admin site or in Marketplace – Farmer Pro is only available in Marketplace). In Trimble Ag Software, assign a Display Connection license to the display to be used and link that display to a vehicle in the customer’s organization. You must enable FarmStream on the display. More information on these steps is included in other sections in this document.
To activate traditional Fleet, assign a Farmer Core, Farmer Pro or Farmer Fit License to the customer’s organization. Link a vehicle in the organization with a DCM-300 modem. A Display Connection license is not needed.
The following cables are used to connect the display to the Vehicle CAN port – select the cable to match the type of vehicle.
| Part Number | Description |
|---|---|
| 86995-01 | Cable Assy, FarmStream, CAN diagnostic port to FmX integrated display / TM-200 Module |
| 90147-01 | Cable Assy, Autopilot™ system and FarmStream, Vehicle CAN interface, John Deere R & RT series |
| 87754-01 | Cable Assy, FarmStream, Vehicle CAN interface, Rogator 2005 Models 8841 & 984 |
| 115447 | Cable Assy, Farmstream, CAN Interface Adapter for GFX-750 |
For more information, refer to the FarmStream cabling guide.
Licenses for FarmStream are managed in the Reseller Admin site and in Fleet.
To use FarmStream , a vehicle requires a Display Connection License. To use a Display Connection license, the vehicle's organization must have a Farmer Core, Farmer Fit, or Farmer Pro license.
Documentation on how to set up a Farmer Core license and a Display Connection License is here:
Quick Reference Card for Farmer Core
For Resellers only, a user guide for the Reseller Admin Site is below. It contains information about assigning these licenses and managing customers in the Reseller Admin site.
To set up the FmX, GFX-750, GFX-350 or TMX-2050 display to use FarmStream and have it report into the Trimble Ag Software, you must have the following:
- A Trimble Ag Software account, a Farmer Core Farmer Fit or Farmer Pro license assigned to the account, and a Display Connection license assigned to a display, as described in the licensing section. To create an account, go to www.trimbleag.com
- A wireless connection to the Internet (Wi-Fi, Cellular, and so on) for communications, such as the DCM-300, SNM941 or GX450 modem.
- Cabling to connect the display to your vehicle (see Part numbers in Cables section and Cable Guide).
You must also have done the following. There are different setup instructions depending if you are using FmX, FmX Plus App or PIQ:
- If using FmX or FmX Plus, added and activated the FarmStream plugin. See Activating the FarmStream Fleet Plugin.
- The Utilization app must be present and active for all customers using Precision-IQ and for customers using the FmX Plus app with TMX firmware 4.6 or higher. See Utilization app section. AutoStart should be turned on.
- If using Precision-IQ for FarmStream, make sure the Operator Sign in feature is turned on. This feature is turned on in the Trimble Ag Software account under the ""Data Transfer"" menu and choosing ""Settings"". If AutoSync is not enabled, the feature can be turned on by opening the operator app, tapping on the gear and enabling operators.
- Complete the vehicle and implement setup settings for sending data to the Trimble Ag Software. See Implement reporting and Vehicle Monitoring for FmX or FmX Plus or Settings in Precision-iQ to use the Utilization app for FarmStream Reporting for Precision IQ.
- Firmware version 10.01 or higher is required for the FmX and version 4.3.1 or higher is required for the TMX, or firmware 5.5 or higher is required for Precision-IQ on TMX. Firmware 1.5 or higher is required for the GFX-750 display.
Activating the FarmStream Fleet Plugin - FmX Plus or FmX
Please do the following to activate the FarmStream Plugin:
- To use FarmStream with the FmX display or FmX Plus app, open the FmX Plus field application, or using an FmX display:
- In the Home screen, tap Settings.

Note: To add or remove features / plugins, you must access the Configuration screen from the Home screen.
- At the Configuration screen, tap Add / Remove.
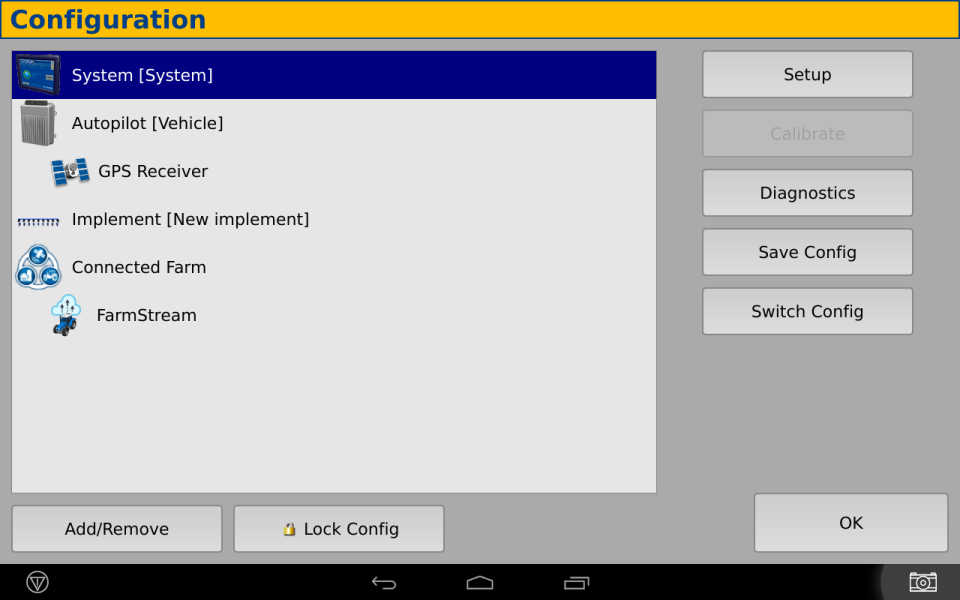
- Select the FarmStream plugin from the list of plugins and then tap Add. The Select Active Plugins screen appears:
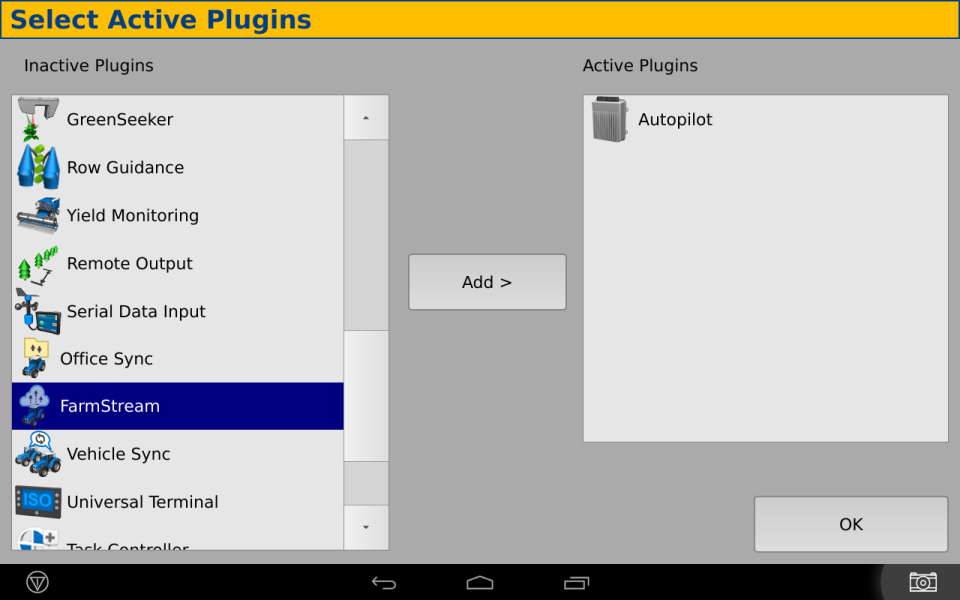
- Tap OK. The system returns you to the Configuration screen.
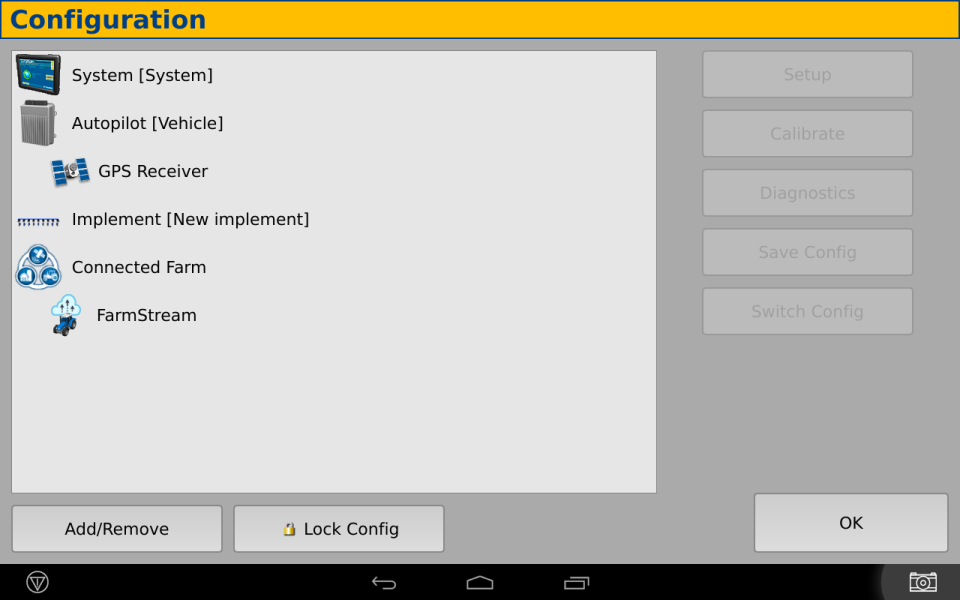
The plugin has now been activated.
Set Up the Port - FmX Plus App
If using an EXP-100 expander module with the FmX Plus app (required for firmware versions lower than 5.5) do the following steps.
- From the Configuration screen, choose system then tap setup.
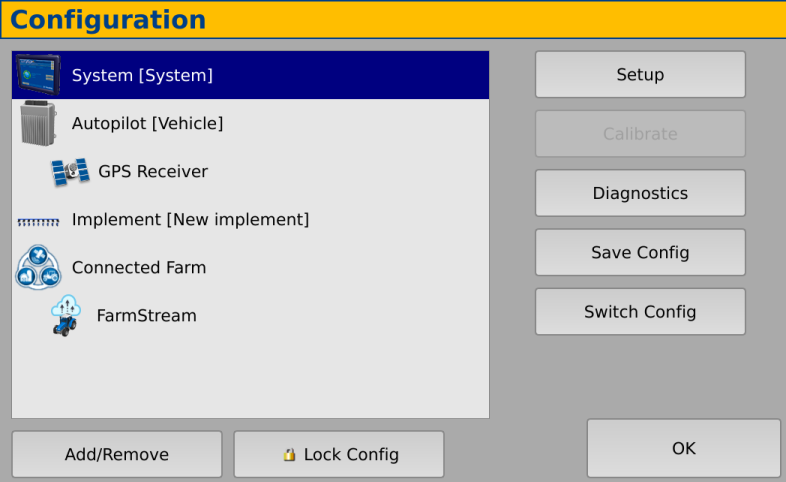
- Select Port setup and tap Setup.
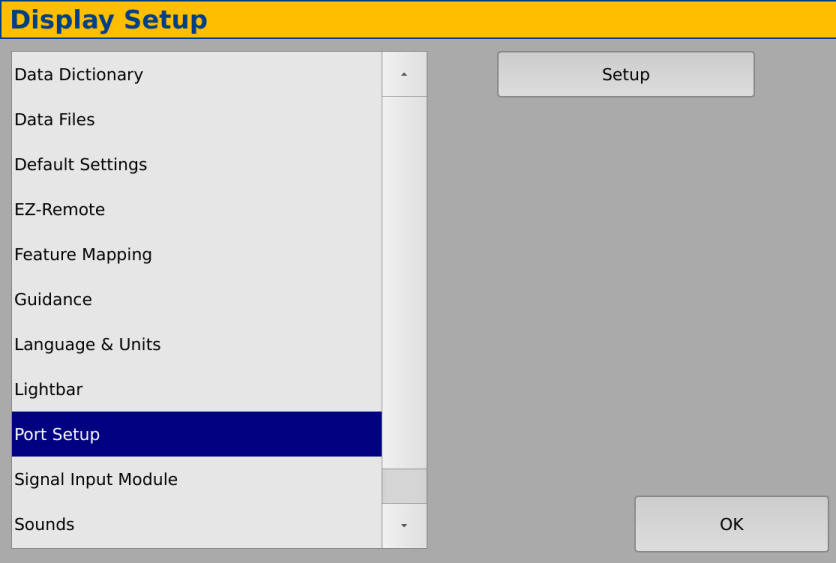
- Next to the EXP-100 #1 tap the select menu and choose the serial number of the EXP-100 device you are using.
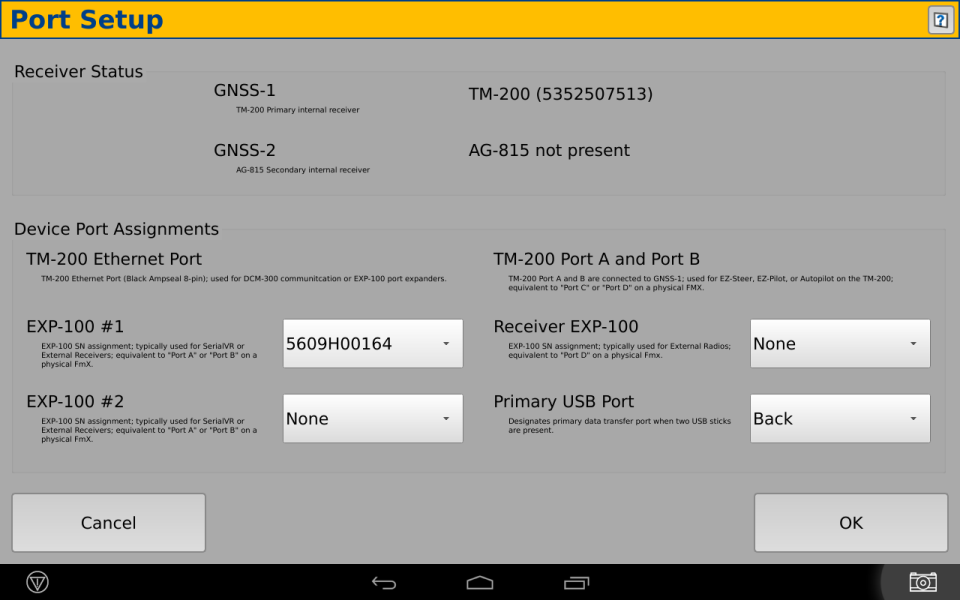
Set Up the Port - FmX
If using an FmX display, do the following steps.
- In the Configuration screen, select FarmStream, then tap on Setup.
- Select the correct port on the display for connecting to the vehicle.
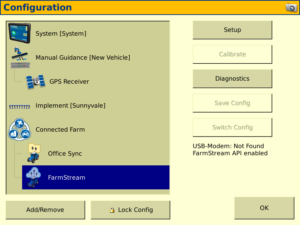
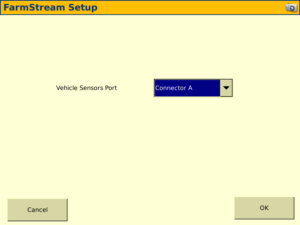
If an operator exceeds the functional speed limit for an implement, possible damage can occur to the implement, the vehicle, the crop, or the field. The FmX integrated display or TMX-2050 display (using the FmX Plus app) can send information to Fleet in the Trimble Ag Software solution regarding the speed of vehicles and implements.
For Implement Setup settings, from the configuration page select implement:
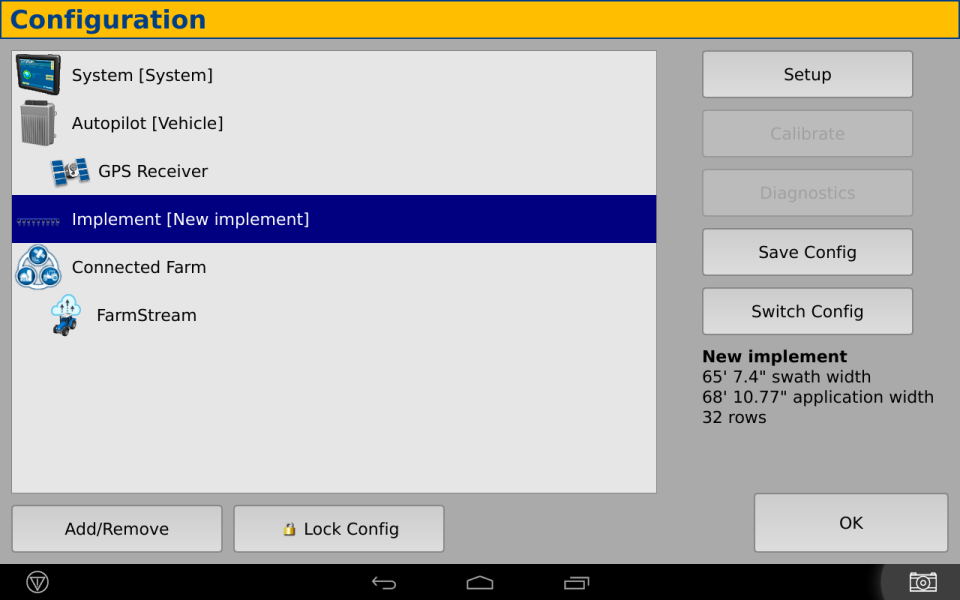
On the Reporting tab, these settings determine the information that is sent from the FmX integrated display or TMX-2050 display to Fleet in the Trimble Ag software:
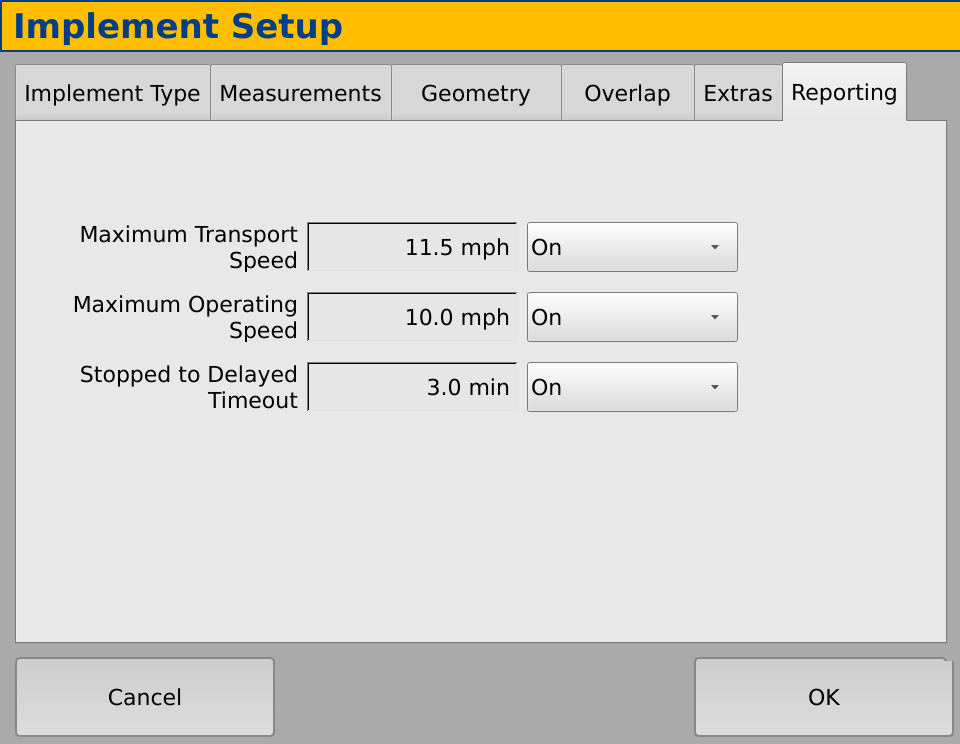
| Setting | Description |
|---|---|
| Maximum Transport Speed | The functional speed limit for transporting the implement. The options are On or Off. Maximum Transport Speed is used to determine when a vehicle enters the “speeding” state. The minimum of Max Transport and Max Moving speed will be used in this determination; Max moving speed is configured under the vehicle setup (Monitoring tab). If Maximum Transport Speed is turned off, the Maximum Moving Speed for the vehicle is used to determine the “speeding” threshold (if Maximum Moving Speed is turned on). |
| Maximum Operating Speed | The functional speed limit for the implement when coverage logging is on. The options are On or Off. Maximum Operating Speed is used to determine when the vehicle enters a “rushing” state. |
| Stopped to Delayed Timeout | The length of time the vehicle can be paused before the vehicle is considered delayed. The options are On or Off. Stopped to Delayed Timeout is the amount of time that will pass after the vehicle has entered a “stopped” state before it’s considered to be in a “delayed” state (and the operator may be prompted to select a reason for the delay). Note: the timeout value is set in minutes. |
In the Monitoring tab you can select to send information about the vehicle speed to Fleet in the Trimble Ag Software. Any amount that the vehicle travels over this speed is reported as speeding.
From the Configuration page, select Autopilot (Vehicle):
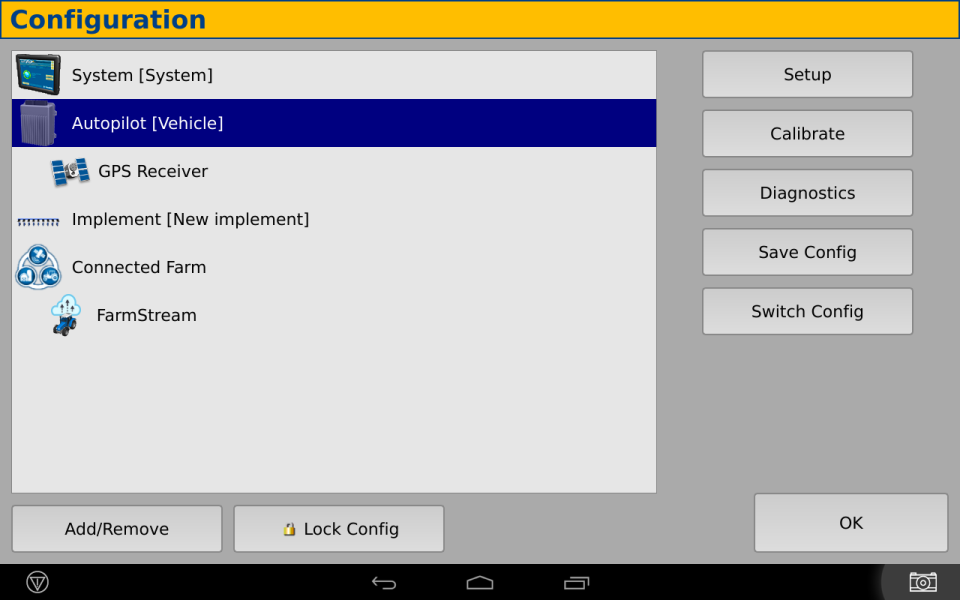
Select the Monitoring tab. If you set the Maximum Moving Speed to Off this means that the ""speeding"" state will not be used for the vehicle.
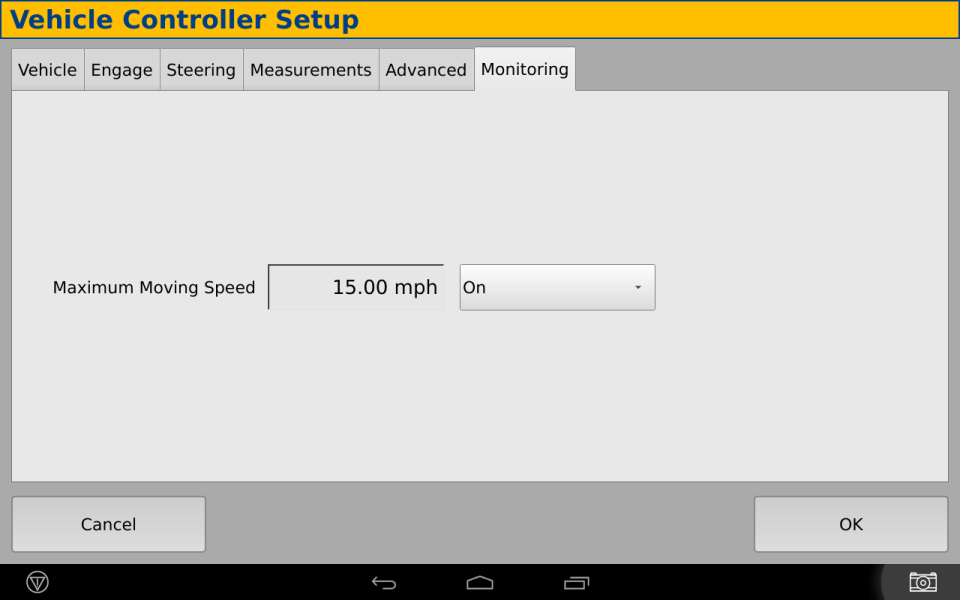
In the Enter the maximum moving speed for this vehicle screen, tap the buttons to set the maximum moving speed for the vehicle and then tap OK. This sets the threshold speed, above which the vehicle will considered to be ""speeding"". See also the Maximum Transport Speed that can be configured as part of Implement Setup.
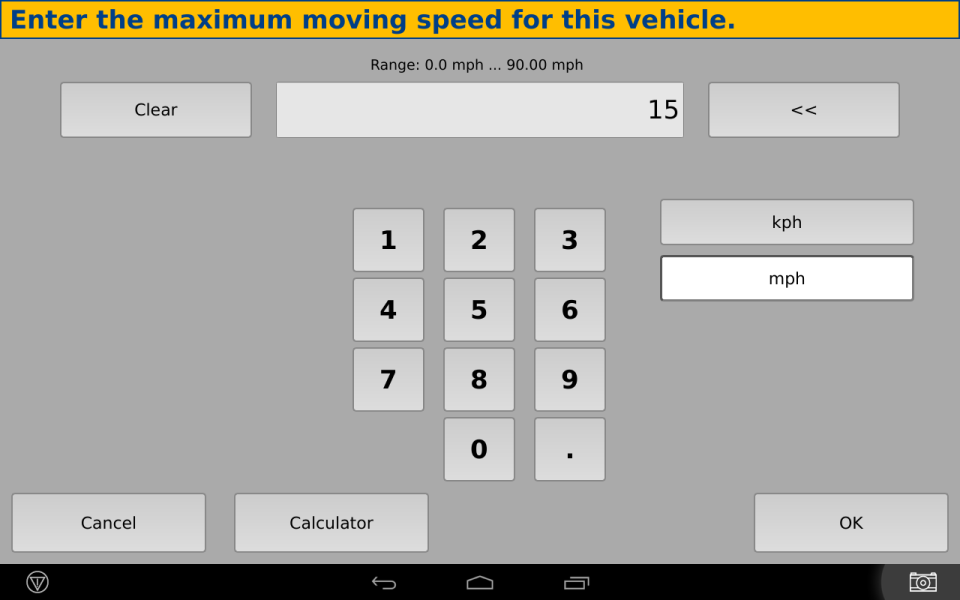
In this example, the Maximum Moving Speed has been set to 15 mph.
If delay reasons are enabled, and if the stopped to delayed timeout threshold is reached, the operator will be presented with a screen to explain the reason for the delay. This delay reason will be reported in the Trimble Ag Software.
In the Configuration screen, the user can see the FarmStream diagnostics. This shows the current vehicle sensors being reported.
The three sensors that are reportedin the FmX+ app are Fuel Level, Fuel Rate, and Engine hours.Additional sensor data may be viewable in the Utilization app, depending on what sensors are reported by the vehicle.
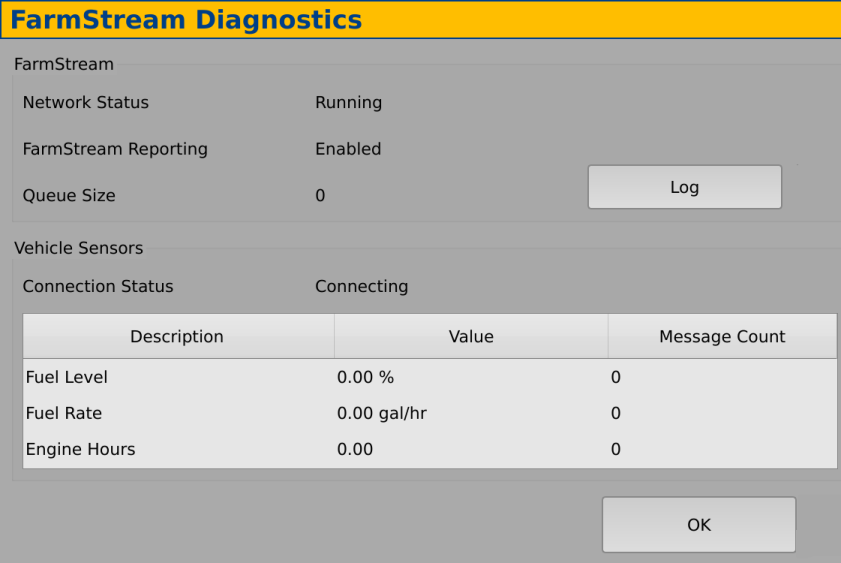
To use the Utilization app and FarmStream Fleet reporting on the TMX-2050, GFX-350 or GFX-750 display with the Precision-IQ™ application, you must first set up the thresholds in the Precision-IQ app.
In the Home screen, tap the Precision IQ icon to open the app.
After opening Precision-IQ, you can set up the Implement and Vehicle settings for the Utilization app, so the utilization data shows up as you want it to in FarmStream Fleet.
To set the Vehicle settings, tap on the vehicle tile on the Precision-IQ screen.
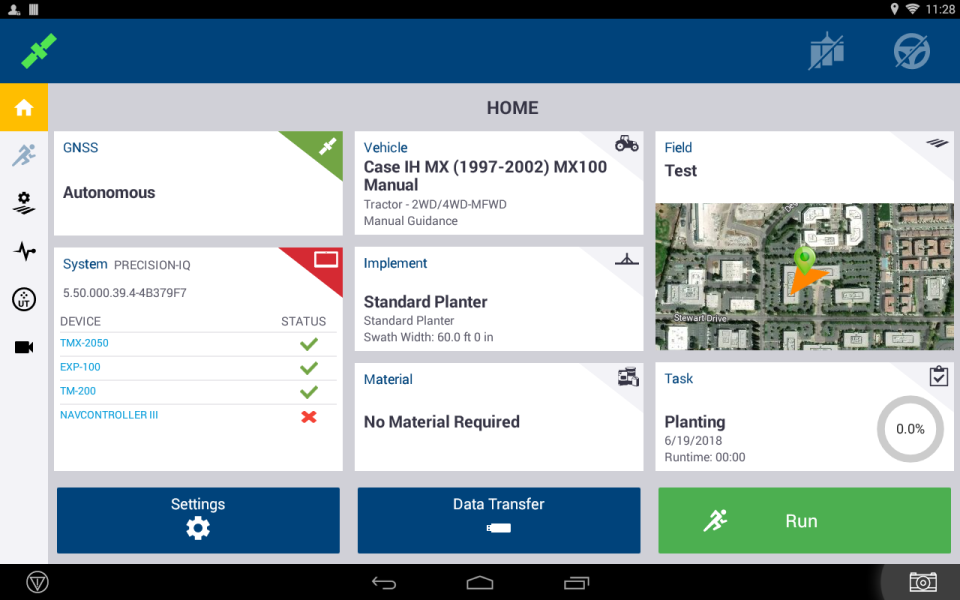
Edit an existing vehicle or create a new one. In the PRODUCTIVITY tab, set a threshold for the vehicle maximum moving speed for the Utilization app. Any time that the vehicle travels over this maximum moving speed, it is reported as speeding. If you turn the Maximum Moving Speed off this means that the “speeding” state will not be used for the vehicle in FarmStream Fleet.
Note: The PRODUCTIVITY tab is only visible if the Operator Sign in feature is turned on. This feature is turned on in the Trimble Ag Software account under the “Data Transfer” menu and choosing “Settings”. If AutoSync is not enabled, the feature can be turned on by opening the Operator app, tapping on the gear and enabling operators.
To set the maximum moving speed option, tap Maximum Moving Speed. Choose a maximum moving speed for the vehicle and then tap the Check button. There is also an option to display the speed in US or Metric units. The range of the allowed moving speed that can be selected is noted in the dialog:
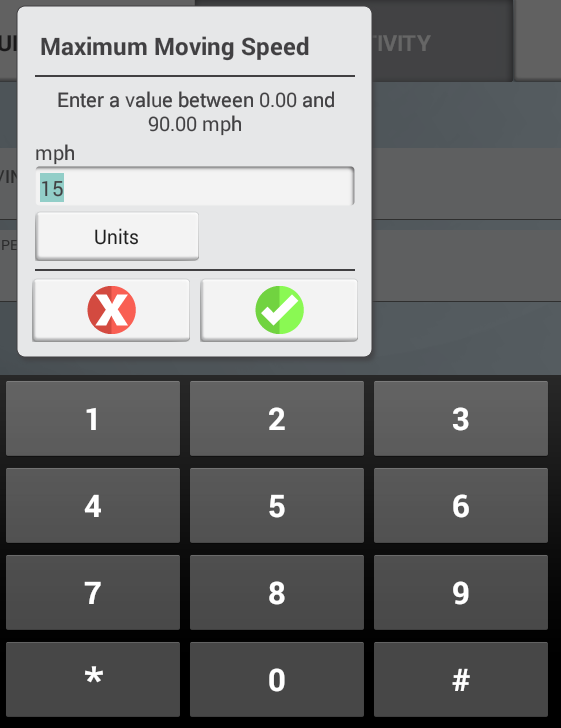
To set the Implement thresholds for the Utilization app, tap the Implement tile in the PIQ screen:
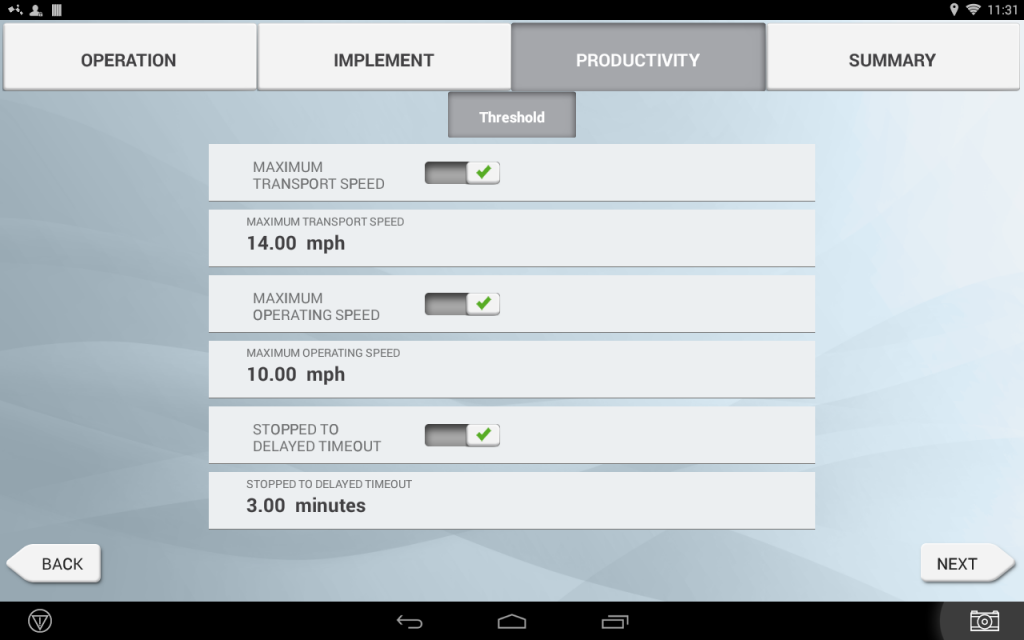
If an operator exceeds the functional speed for an implement, possible damage can occur to the implement, the vehicle, the crop or the field. The GFX-750 or TMX-2050 display can send information about the implement status to FarmStream Fleet in the Trimble Ag Software solution.
To set up the implement, go to the PRODUCTIVITY tab in the Implement settings. Edit an existing implement or create a new one.
Note: The PRODUCTIVITY tab is only visible if the Operator Sign in feature is turned on. This feature is turned on in the Trimble Ag Software account under the “Data Transfer” menu and choosing “Settings”. If AutoSync is not enabled, the feature can be turned on by opening the Operator app, tapping on the gear and enabling operators.
These settings determine what information is sent about the implement from the Utilization app to FarmStream Fleet.
The table below describes the different settings options:
| Setting | Description |
|---|---|
| Maximum Transport Speed | The functional speed limit for transporting the implement. The options are On or Off and a numerical value for the speed. Maximum Transport Speed is used to determine when a vehicle enters the “speeding” state. The minimum of Maximum Transport and Maximum Moving speed will be used in this determination; Maximum moving speed is configured under the vehicle setup (PRODUCTIVITY tab). If Maximum Transport Speed is turned off, the Maximum Moving Speed for the vehicle is used to determine the “speeding” threshold (if Maximum Moving Speed is turned on). |
| Maximum Operating Speed | The functional speed limit for the implement when coverage logging is on. The options are On or Off and a numerical value for the speed. Maximum Operating Speed is used to determine when the vehicle enters a “rushing” state. |
| Stopped to Delayed Timeout | The length of time the vehicle can be paused before the vehicle is considered delayed. The options are On or Off. Stopped To Delayed Timeout is the amount of time that will pass after the vehicle has entered a “stopped” state before it’s considered to be in a “delayed” state (and the operator may be prompted to select a reason for the delay). Note: the value is set in seconds but displayed in minutes |
To set the Maximum Transport speed, tap on Maximum Transport Speed and enter a value in the range indicated. Select the Units, if required. Tap on the green check to save.
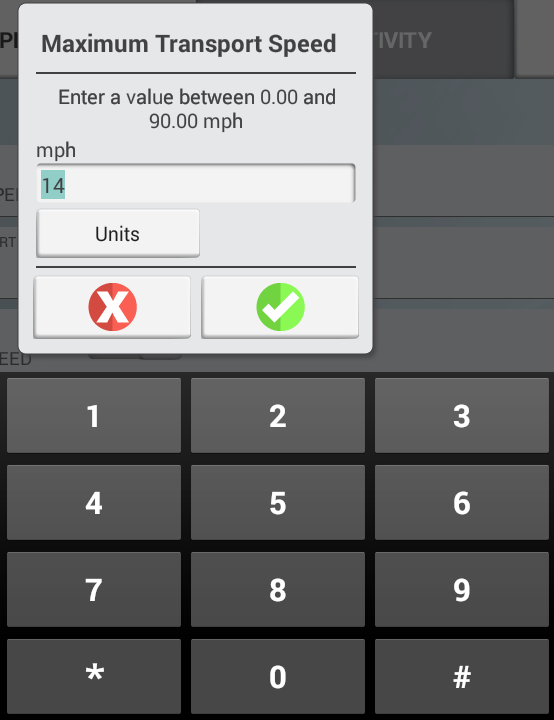
Tap on the buttons Maximum Operating Speed and Stopped To Delayed Timeout to set the values and/ or select units for these two parameters.
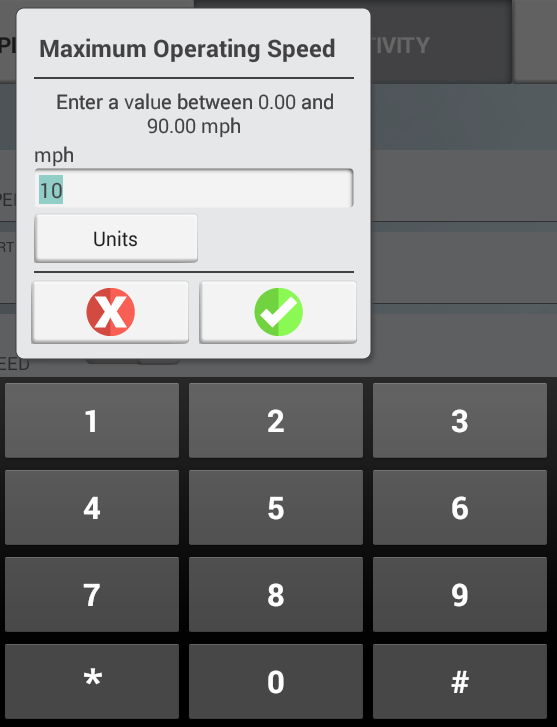
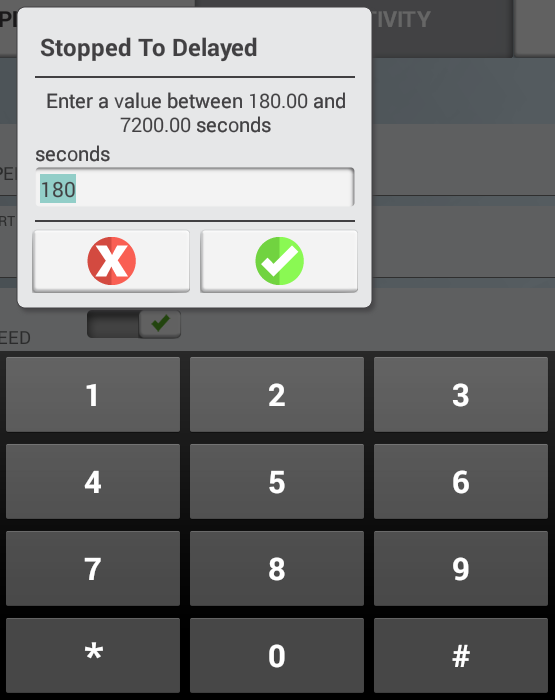
Signing in as an operator is not required for Utilization or FarmStream to run, but if you want to see operator information in the application, you must sign in. In order to use operator login with PIQ, the Enable Operators (Operator Sign In) feature must be turned on. This feature can be turned on in the Trimble Ag Software account by logging in and going to Data Transfer -> Settings -> Syncing and turning on Operator Sign in. If AutoSync is not enabled, this feature can be turned on by opening the Operators app, tapping on the gear and clicking on Enable Operators.
If AutoSync is not being used, to set up operator information, turn on your TMX-2050, GFX-750 or GFX-350 display. You should see the Operators app. Tap on the Operators app icon to launch it.
Operators can be created in the Fleet page of the Trimble Ag Software under ""Operators"" or under the Farm page under ""People."" All operators in the TMX-2050, GFX-750 and GFX-350 display’s organization are automatically sent to the TMX-2050, GFX-750 and GFX-350 display when it has connectivity. These operators can be seen in the Operators app. If operators in the Fleet or Farm page are changed, any changes will be visible in the Operator app after the app has been killed and restarted, or when the TMX-2050 or GFX-750 display has rebooted.
Operators can also be created locally on the display, but they will not be sent to the Trimble Ag Software to be seen on the Fleet page. These local operators will not show in the Connected Farm menu in the Operator app.
Login to the Operator app in order to track who is using the vehicle, for reporting in the Utilization app and FarmStream:
Enter or scan your operator PIN to login. Once logged in, the operator information will be recorded along with any utilization data.
The Utilization app should be installed automatically together with display firmware. You should see the Utilization app installed with all other apps on your display.
If it is not present, or the utilization app needs to be updated, from the Launcher screen, tap on the App Central icon. Make sure that you have connectivity on your display so that you will be able to access App updates.
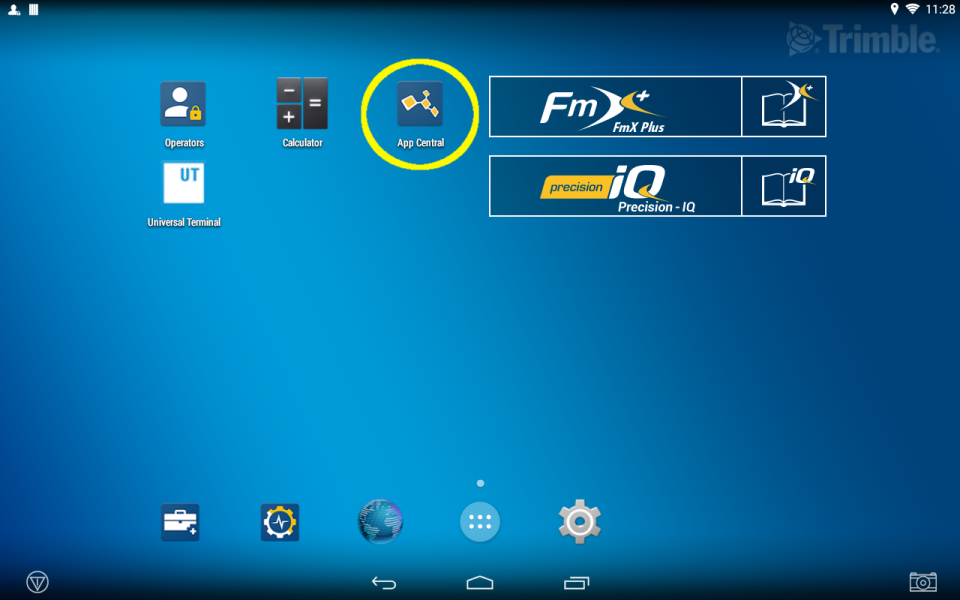
You will land on the Browse Apps page. Make sure “ALL APPS” is selected. Look for the Utilization app.

Tap on the Utilization app and it will open. You should see an option to Install or Update the app
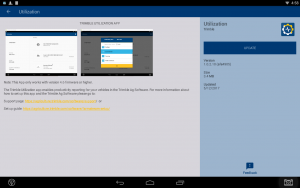
Tap on Install or Update, and the app will be downloaded.

If you agree to it, tap yes on any confirmation messages that check that you want to add or update the app.
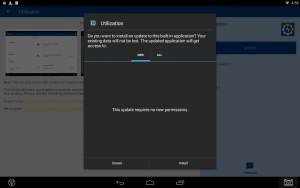
After installation, you will see the options to either uninstall or open the app. Tap on “OPEN.”
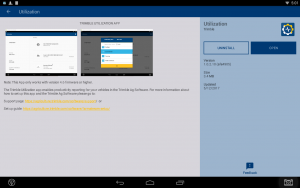
You will now be able to see Utilization information if using PIQ for FarmStream. If you use FmX+ for FarmStream, you must download the app but don't need to do any other setup with it. For other information on how to set up FarmStream, please refer to the other sections of this document.
Make sure to check the Auto Start feature of this app so it start automatically each time you power on the display:
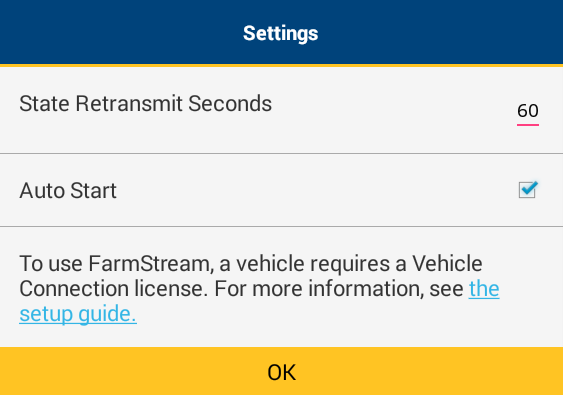
If it didn’t before, now the Utilization app icon should be shown with all other apps as an option to select:
In the screen where you can access all apps on your display, tap the Utilization app to start it.
The following is the Utilization app screen. It shows the operator (if available), vehicle status, vehicle thresholds, and implement thresholds.
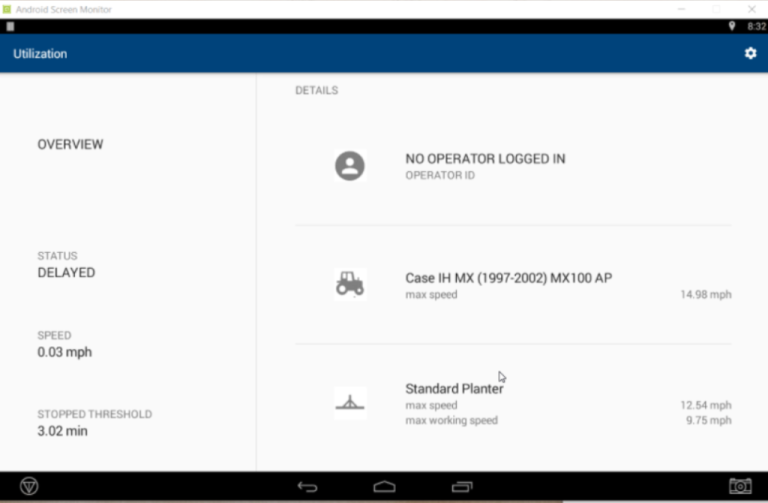
If you tap on the settings gear in the upper right corner, you can set how many seconds elapse before a state is re-transmitted to FarmStream Fleet, and whether you want the app to AutoStart when the display is turned on. AutoStart is set to Off by default. If AutoStart is turned off, the user will need to open the Utilization app manually each time for this feature to work. There is also a reminder that a vehicle requires a Display Connection (formerly Vehicle Connection) license in order to use FarmStream Fleet.
When using FarmStream, check the box to enable Auto Start.
If the delay reason feature is enabled on the display, and the vehicle is stopped past the amount of time specified in the Stopped To Delayed timeout, a message will pop up, with a list of delay reasons for you to select.
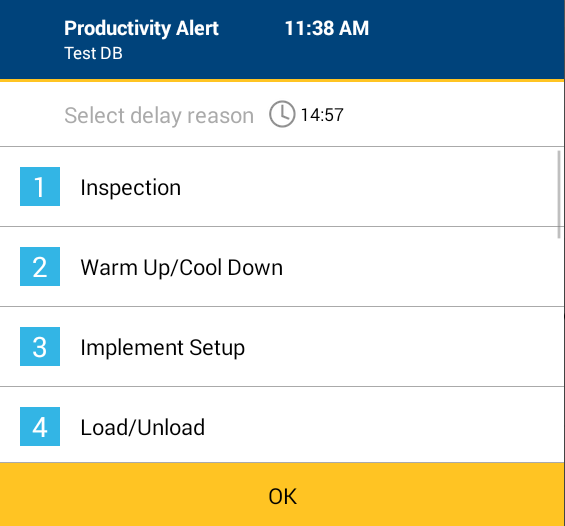
Scroll through the list of reasons for the delay and tap on the numbered reason. Delay reasons are customized for the particular implement that is set up:
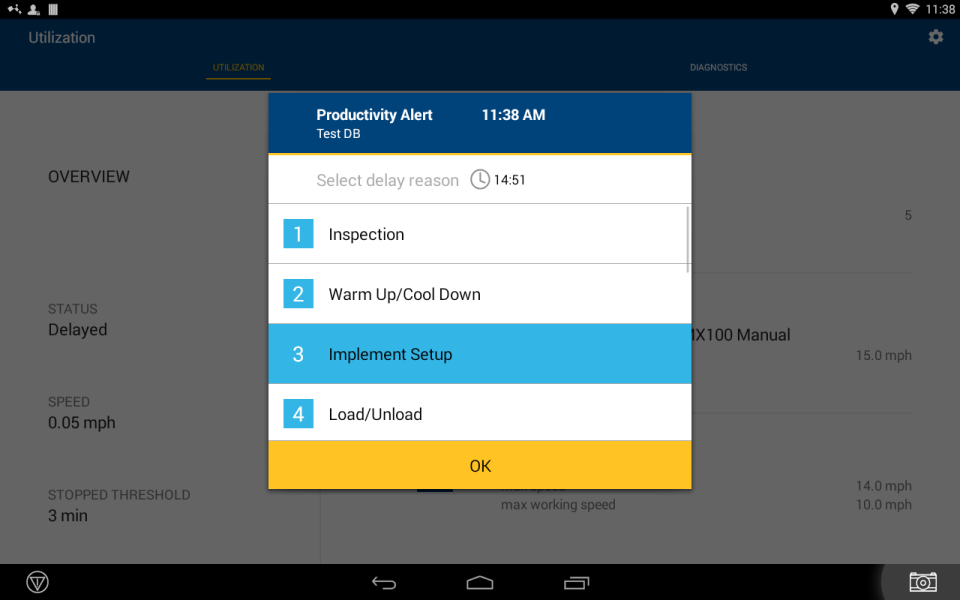
If a device does not have connectivity and the Utilization app has been enabled, you will see a warning message telling you that the Utilization app may cause memory on the device to become full. You should enable the connectivity of the device or disable the Utilization app until connectivity is restored.
Check the diagnostics page to see the status of FarmStream running and all the sensor data available for that vehicle.
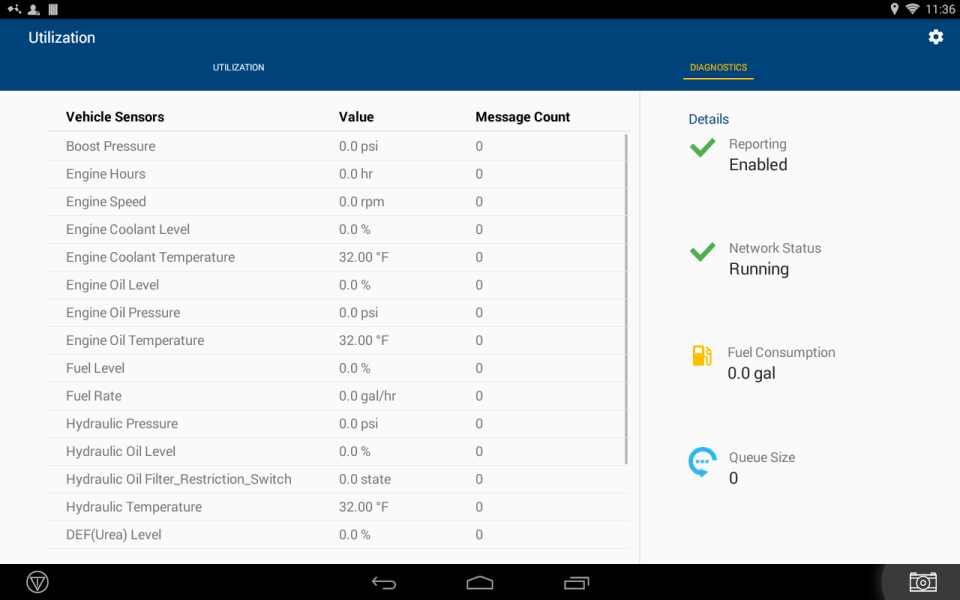
Location Setting for both the TMX-2050, GFX-750 and GFX-350 Display
From the home screen, go to SETTINGS
Select Location (under the ""Personal"" category)
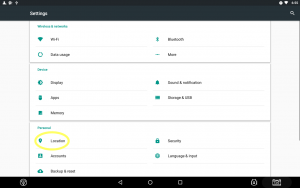
Turn On the Location Setting
If Using GFX-750 or GFX-350 Display
If using this app with the GFX-750 or GFX-350 display, then you must set the following permissions on the GFX-750 or GFX-350 display:
From the home screen, go to SETTINGS:
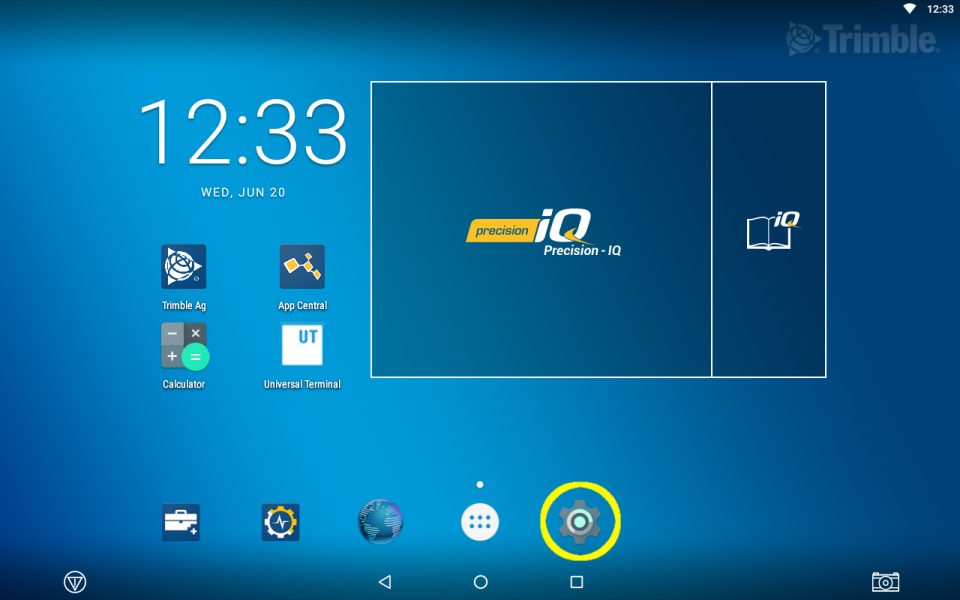
Select Apps:
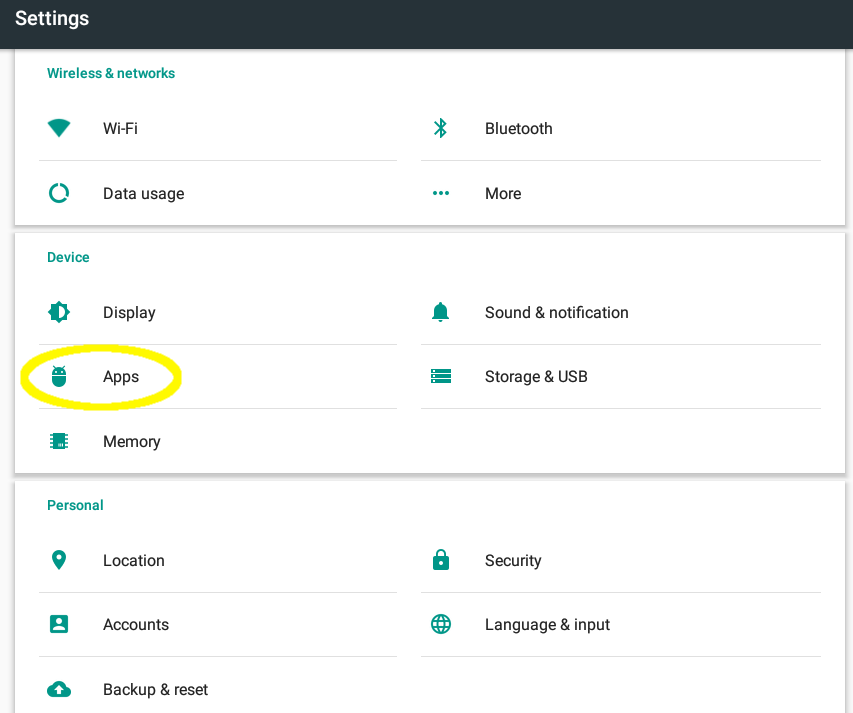
Select Utilization:
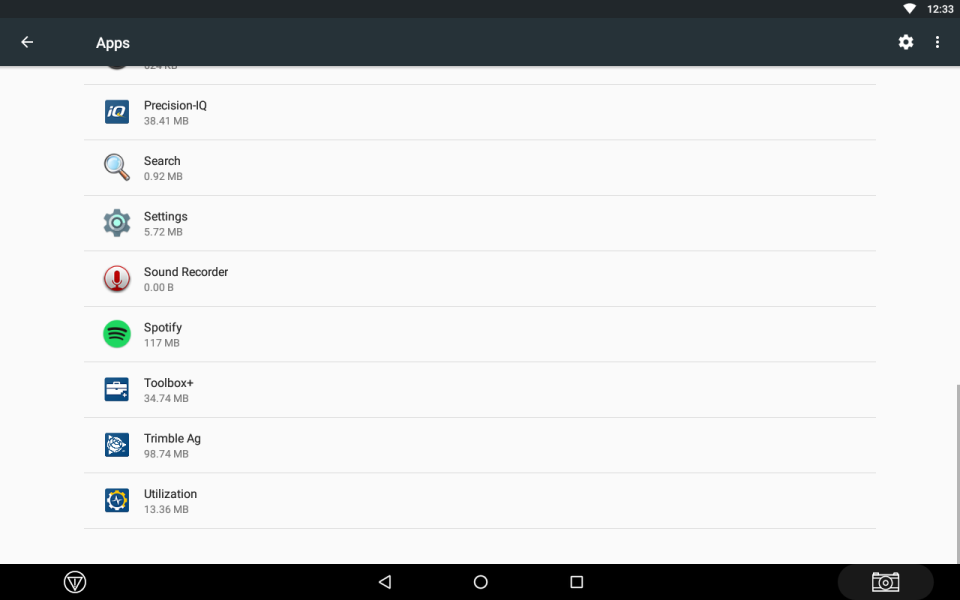
Select Permissions:
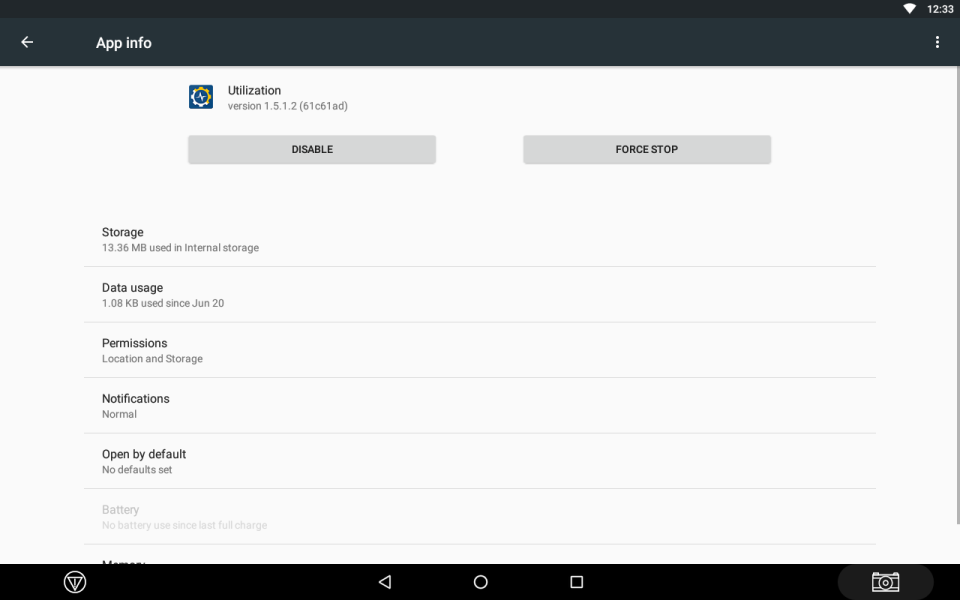
Enable Storage:
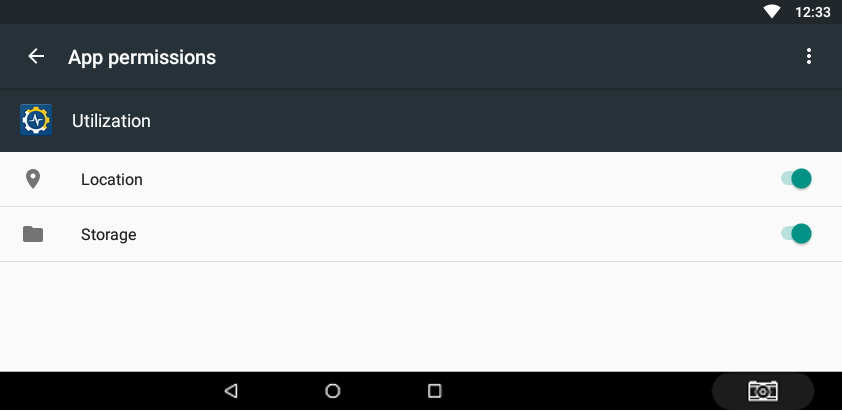
Agriculture Business Area
Trimble Inc.
Trimble Agriculture Division
10368 Westmoor Drive
Westminster, CO 80021
USA
agriculture.trimble.com
Copyright and Trademarks
© 2014-2020, Trimble Inc. Trimble, the Globe & Triangle logo, Connected Farm, and FmX are trademarks of Trimble Inc., registered in the United States and in other countries. Autopilot, Precision-IQ, GFX-350, GFX-750 and TMX-2050 are trademarks of Trimble Inc. All other trademarks are the property of their respective owners.
Release Notice
This is the May 2020 release of the FarmStream Fleet Setup Guide. It applies to version 1.0 of the FarmStream Fleet solution.
Product Warranty Information
For applicable product warranty information, please refer to the Warranty Card included with this product, or consult your Trimble reseller.
FarmStream Fleet provides more detailed vehicle utilization and sensor data using the FmX®, GFX-750™, GFX-350™ or TMX-2050™ display and a wireless connection. There is no need for a DCM-300 modem when using FarmStream Fleet, but the DCM-300 can be used as a wireless connection.
Farming operations with more than a few vehicles and hired operators may struggle to keep tabs on equipment and operator productivity—the Fleet solution targets operations where managers are responsible for a staff of operators but cannot sit with each employee to monitor their performance and compliance.
FarmStream Fleet provides vehicle utilization data using the FmX, GFX-750 or TMX-2050 display. Utilization settings are configured in the display instead of the Trimble Ag Software interface.
There is no need for a DCM-300 modem when using FarmStream Fleet, but the DCM-300 modem can be used with FarmStream Fleet as a communication device.
The FarmStream Fleet solution provides some different features than traditional Fleet. For a detailed comparison, refer to the Feature Comparison Matrix.
FarmStream Fleet is included as part of the Trimble Ag Software Display Connection license. Display Connection Licenses are purchased separately from the Farmer Core licenses.
The Display Connection license is assigned to a vehicle in Fleet in the Trimble Ag Software.
No.
If a vehicle is associated with an FmX, GFX-750, GFX-350 or TMX display that has FarmStream Fleet enabled, you cannot also associate it with a DCM-300 modem to use for traditional Fleet.
In the Fleet site select a vehicle and go to its individual vehicle page. This page will show whether FarmStream has been enabled. It will say "FarmStream on" or "FarmStream off". "FarmStream on" means it is using the FarmStream Fleet features, and "FarmStream off" means it is not using Farmstream.
From your Trimble Reseller. The part numbers and price for a license that includes FarmStream Fleet (which is part of a Display Connection License and also requires a Farmer Core or equivalent license) is the same as for traditional Fleet.
Yes.
With the release of FarmStream Fleet, you are no longer able to use the productivity features of traditional Fleet with both the DCM-300 modem and the FmX or TMX display.
The productivity features of traditional Fleet is now based on the DCM-300 modem and does not include information from the FmX or TMX display, for example, inDelay Reasons.
No. You can use the same account and organization that you use for your traditional Fleet vehicles.
FmX integrated display, GFX-750 display, GFX-350 display or TMX-2050 display.
A Cable to connect the display to the vehicle. The GFX-750 and GFX-350 display also requires an additional adapter cable.
| Part Number | Description |
|---|---|
| 86995-01 | Cable Assy, FarmStream, CAN diagnostic port to FmX integrated display / TM-200 Module |
| 90147-01 | Cable Assy, Autopilot™ system and FarmStream, Vehicle CAN interface, John Deere R & RT series |
| 87754-01 | Cable Assy, FarmStream, Vehicle CAN interface, Rogator 2005 Models 8841 & 984 |
| 115447 | Cable Assy, FarmStream, CAN Interface Adapter for GFX-750, GFX-350 |
A WAN gateway device (Wi-Fi, Cellular, etc.) for communications, such as the DCM-300, SNM941 or GX450 modem.
For more details and recommended hardware, refer to the FarmStream Fleet setup guide and the FarmStream Cable guide.
If you have not turned on FarmStream Fleet for an FmX or TMX-2050 display, you can assign a vehicle to both the DCM-300 modem and the FmX or TMX-2050 display. You can't assign a DCM-300 modem to a vehicle with a GFX-750 or GFX-350 display. If you turn on FarmStream for a vehicle with any type of display, DO NOT ASSOCIATE THE VEHICLE WITH A DCM-300 MODEM AS ITS TELEMATICS DEVICE - FARMSTREAM WILL NOT WORK PROPERLY. The DCM-300 modem (or other modem used) works in the background as the communication device.
If you select a display for a vehicle, this indicates which vehicle you want your Data Transfer (Office Sync or AutoSync) data to be associated with for that particular vehicle.
Currently, FarmStream Fleet is available on the FmX, GFX-750, GFX-350 or TMX-2050 displays only. It is not available on the CFX-750TM display.
To run FarmStream Fleet on the FmX or TMX-2050 display using the FmX Plus app, you need the free FarmStreamplugin.
To run FarmStream with PIQ on the TMX-2050, GFX-350 or GFX-750 display you must enable operators as a first step and use the Utilization app.
Firmware version 10.01 or higher is required for the FmX and version 4.3.1 or higher is required for the TMXusing the FmX+ app. Version 5.5 or higher is required for TMX using the PIQ app. Version 1.5 or higher is required for the GFX-750 display. Any version of firmware on the GFX-350 will support FarmStream.
For more information, refer to the FarmStream Fleet Setup Guide.
Yes. AutoSync is only available on displays with Precision-IQ.
The Vehicle Sync functionality requires a DCM-300 modem. The vehicle cannotuse the Vehicle Sync functionality if no DCM-300 modem is installed.
No. There is no need to provision the GX450 or SNM941 modem in FarmStream Fleet (ie associate it with a vehicle), the modem is just a router for the display.
Version 10.01 is required for the FmX and Version 4.3.1 is required for the TMX using the FmX+ app. Version 5.5 or higher is required for TMX using the PIQ app. Version 1.5 or higher is required for the GFX-750 display. All versions of firmware for the GFX-350 display will support FarmSteram.
Refer to the following documentation:
FarmStream and Traditional Fleet Feature Comparison Matrix Fleet User Guide FarmStream Fleet Setup Guide FarmStream Cable Guide
Traditionally, the DCM-300 modem has been the primary device used to communicate vehicle position, sensor data, and other information from a vehicle to the Fleet website. While the DCM-300 modem can still be used with Fleet, FarmStream is the preferred set up for Fleet. FarmStream uses a specially configured TMX-2050, GFX-750, GFX-350, or FmX display, together with a communication device (such as the DCM-300, SNM941, GX450 or RV55 modem) to send operation data from the vehicle to view in Fleet. For information on how to set up a vehicle for Fleet using FarmStream, please refer to this guide.
Note: Firmware Version 10.01 or higher is required for the FmX and Version 4.3.1 or higher is required for the TMX to run FarmStream. Version 1.5 or higher is required for the GFX-750 to have full FarmStream functionality. (Limited FarmStream functionality is available for earlier versions of GFX-750 firmware.) Any version of firmware for the GFX-350 supports FarmStream.
Depending on whether you set up a vehicle the traditional way with a DCM-300 modem or with FarmStream, different features for that vehicle are viewable in the Fleet website. Please refer to this chart to compare the features available for a vehicle with the traditional set up and FarmStream set up.
No matter how you choose to set up a vehicle, the vehicle data is available in the same Fleet user interface and is accessible from the same user login. Different vehicles in the same organization can be set up using either traditional or FarmStream equipment, if desired. The way to tell which version of Fleet a vehicle is using is by going to the Vehicles page and selecting a vehicle. If a vehicle is using the traditional set up, it will say ""FarmStream Off"", and if a vehicle is using the FarmStream setup it will say ""FarmStream On"". See below image that illustrates this:

The Fleet website allows you to manage mixed fleets to help improve operator performance and overall efficiency. You can:
- View and download fleet positions overlaid on background imagery.
- Identify the current and historical status of vehicles such as moving, working, stopped, or off.
- Manage alerts.
- Monitor vehicle engine hours.
Use the Fleet website to analyze the performance of your vehicles by connecting to their CAN bus system. Information gathered can be used to enhance productivity, efficiency, and swift decision-making. You can:
- Manage fuel usage, battery voltage, oil pressure, and other valuable diagnostics. (Available sensors depends on the Fleet set up and the data reported from the vehicle.)
- Monitor vehicle health and performance.
- Capture time spent moving, working, stopped, or off and show delay reason.
- Collect vehicle sensor data over a period of time and display the accumulated data in a graph.
See also Creating Delay thresholds.
Customers must have the Farmer Fit, Core, or Pro license for their organization and a Display Connection license for their device in order to use most of the Fleet features described in this document. Customers using Farmer Starter will see only a limited feature set.
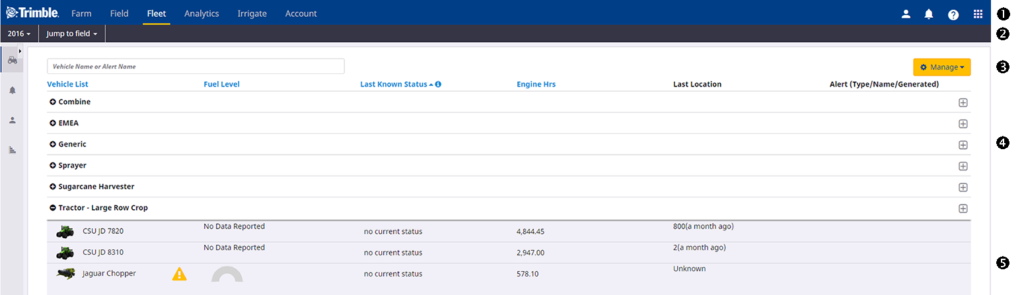
Description
- Menu bar. This allows you to access the Farm, Field, and the Fleet tab.
- Fleet screen menu bar. The items are: Vehicles, Alerts, Operators, Utilization, and Fleet Map (Fleet Map is only available with a Farmer Core license).
- Search field. Enter a vehicle or alert name into this field. To clear the results, and return to the screen on display, delete the search text.
- Startup page (Vehicles page).
- Expanded vehicle information (opened by clicking the + icon for the Vehicle Group on the left-hand side of the screen.
This screen is configurable so that you can choose which information to display about your vehicles - the following information can be displayed:
| Item | Description |
|---|---|
| Vehicle List | Allows you to organize your fleet by vehicle group (for example, Tractor – 4WD), name vehicles as required, and move vehicles  Click the plus icon next to a vehicle group to show all vehicles included in this group. Click a vehicle name to display its status. See Vehicle Status screen Click the plus icon next to a vehicle group to show all vehicles included in this group. Click a vehicle name to display its status. See Vehicle Status screen |
| Date Last Reported: Calendar Time | The last time a vehicle reported in, in calendar time. |
| Date Last Reported: Relative Time | The last time a vehicle reported in, relative to the current time |
| Last Known Status | The last known status of a vehicle. The options are: |
| Stopped: The vehicle has been is stationary for more than 15 seconds. | |
| Working: The vehicle is moving. When the optional Implement Switch is selected and installed on the DCM-300 modem, Working is defined as the vehicle moving and the implement switch as active. | |
| Moving: The vehicle is moving but the implement switch is inactive (not working). This state is only reported when the optional work switch is installed for the DCM-300 modem. | |
| Off: The vehicle’s ignition is turned off. | |
| Pending (FarmStream only): The vehicle has not yet communicated state information for this time period. | |
| Speeding: The vehicle’s speed exceeded a defined threshold. | |
| No GPS (FarmStream only): The vehicle has lost its GPS signal. | |
| Delayed (FarmStream only): The vehicle is stationary for an extended period of time. | |
| Rushing (FarmStream only): The vehicle is working but moving too quickly. | |
| Engine Hrs | The number of hours the engine has been in use. |
| Alert (Type / Name / Generated) | Display the most recent alert for this vehicle in the past 24 hours. See Alerts, 26 |
| Last location | The last location the vehicle reported in. If it was in a field, it will show the field name, otherwise it will show the address. |
| Last Reported Speed | The last reported speed of the vehicle. |
| Vehicle Type | Type of vehicle. |
| Vehicle Make | Make of vehicle. |
| Fuel Level | Fuel level of the vehicle (if reported by the vehicle). |
| Last Operator Name (FarmStream only) | The name of the last operator to log in to that vehicle. |
| Last Operator Login (FarmStream only) | The login of the last operator to log in to that vehicle. |
| Manage | When you click this button, a drop-down list appears. From here you can: |
Manage Groups, see Creating a new group Set up a New Vehicle, see Creating a new vehicle Create or edit a Delay Threshold, see Creating Delay Thresholds Export Vehicles Configure Columns, see Configuring Columns |
- In the information banner of the vehicle status screen, select Calibrate Engine Hours from the drop-down list:
The Calibrate Engine Hours screen appears:
The screen shows the Current Engine Hours. This value establishes a baseline for engine hours as measured from the alternator's R-terminal. Engine hours taken directly from the CAN bus require no adjustment. If the hours are negative or otherwise incorrect (which may occur, for example, if the telematics device is moved from one machine to another), you can enter the correct value to re-calibrate the system.
- Enter the correct value, if required, and then click Save. If the value is correct, click Cancel.
Any update will take effect the next time the vehicle reports to the Trimble Ag Software solution.
- Select Move Vehicle to another Group from the menu on the Vehicle Status screen for the vehicle you want to move.
- Check the radio button next to the group that you want to move the vehicle to:
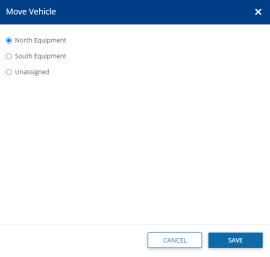
- Click Save.
- In the information banner of the vehicle status screen, select Delete Vehicle from the drop-down list:
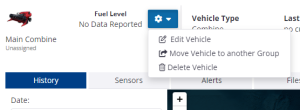
The Delete screen appears.
- Click Delete.
The file management feature allows you to access the original data files from the FmX® integrated display, TMX-2050™, GFX-750™, GFX-350™, or the CFX-750™ using the Fleet solution. This eliminates the need for a USB drive for data transfer from the display. Customers can quickly download / upload their field operation data files.
Files can be managed in Fleet from the individual vehicle’s Files tab.
For files to and from an individual vehicle, open the Files tab:
- In the Vehicles tab, click the vehicle name.
- Click the Files tab:
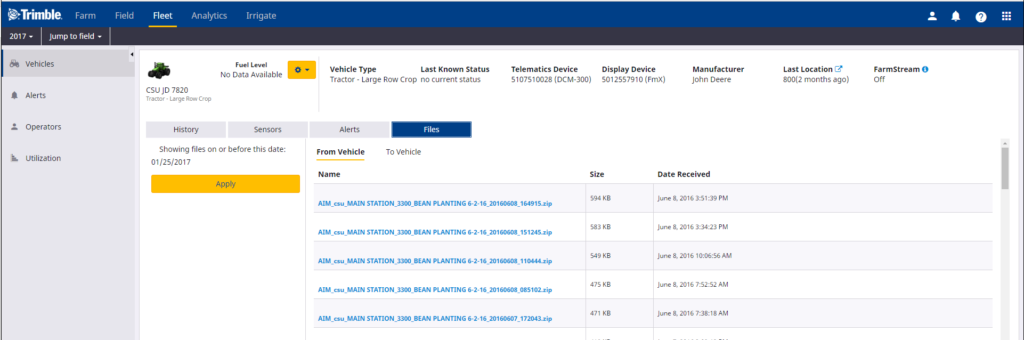
- Select a date from the date picker to view all the available files from a particular day up to the present and then click Apply.
- Click the file name that you want to download. It will default to From Vehicle which shows all files sent from a vehicle.
| Field | Description |
|---|---|
| Name | The name of the file. |
| Size | The size of the file. Files must be less that 50 MB. |
| Date Received | The date on which the file was received. |
- Save or open the selected file.
To view all files sent to a vehicle for a particular time period, or to upload a file to a vehicle, click To Vehicle:
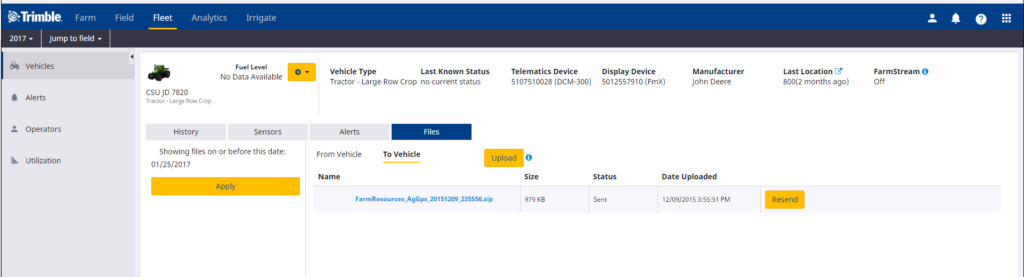
| Field | Description |
|---|---|
| Name | The name of the file. |
| Size | The size of the file. Files must be less that 50 MB. |
| Status | The status of the upload process. |
| Date Uploaded | The date on which the file was uploaded. |
| Resend | Click to resend the file, if required. |
To upload a file to a vehicle click Upload and then select the required file. Files must be less than 50 MB. This upload feature only works for displays with Office Sync enabled. Displays with AutoSync enabled can’t use the Upload feature.
- Click the Manage button, and then select Manage Groups from the drop-down list,
- In the Manage Equipment Group screen, enter a name and then click plus icon to create a new equipment group. Alternatively, select a group name from the Choose field and click to edit an existing group name:
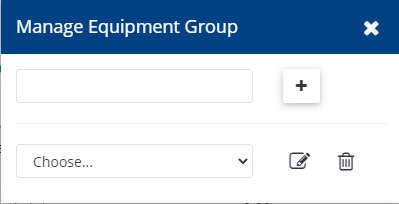
The new group is added to the Vehicles screen.Vehicles and implements can now be assigned to the new group. The new group will only appear on the Vehicles screen once a vehicle has been assigned to it.
- To assign a vehicle to a group, or to move it to a different group select the Move Vehicle option from the Vehicles Status page.
- Plus sign to add more vehicles to a group with a vehicle already in it, click on the same line as the group name on the Vehicles page:
- In the Add Vehicles to < Group > screen, select the vehicle(s) that you want to add to the group and then click Save.

- Implements can be added to groups by going outside of Fleet to the Farm -> Equipment -> Implements screen and editing an implement by clicking on the edit icon. In the edit screen you can select a group for that implement.
Click the Manage button, and then select New Vehicle from the drop-down list: Enter the information to satisfy the required fields.
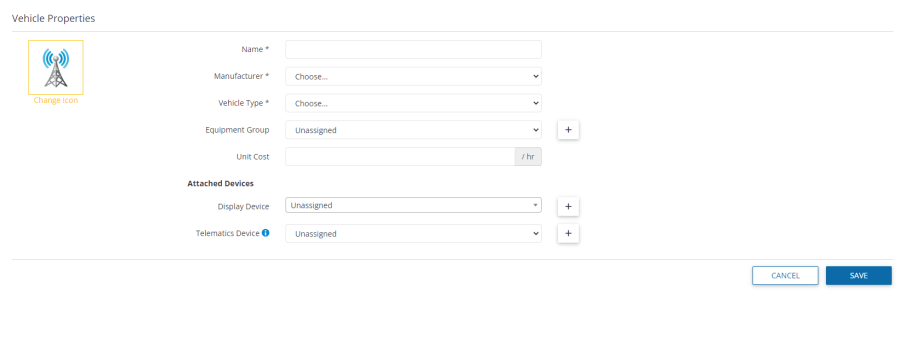
A Display Connection license is required to use most of the features of Fleet. Display Connection licenses can be purchased and assigned to a Display. You can tell on the Vehicles page which vehicles don’t have devices with display licenses assigned by the yellow warning icons.
When creating a new vehicle, it will not have a Display Connection license assigned and the screen will notify you if there are any licenses available to assign. If there are no licenses available to assign, contact your reseller to purchase licenses.
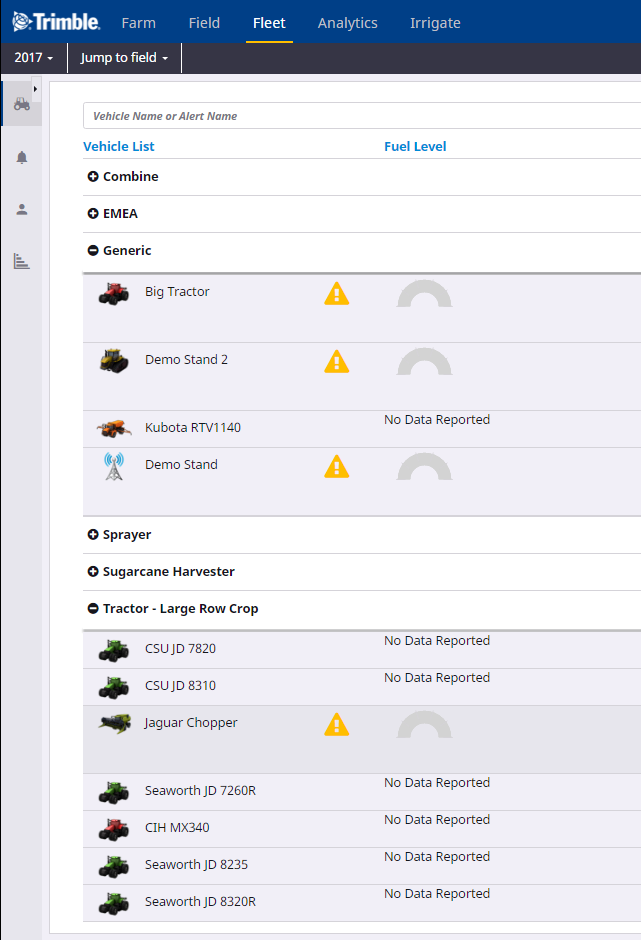
If licenses are available to assign, select the "Add License" option to assign a license to the devices. A window will pop up to confirm you want to assign one of your available licenses to the vehicle. Once a license has been assigned to a vehicle it can’t be moved to another vehicle. Be sure to click on""ASSIGN"" and then ""SAVE"" when done.
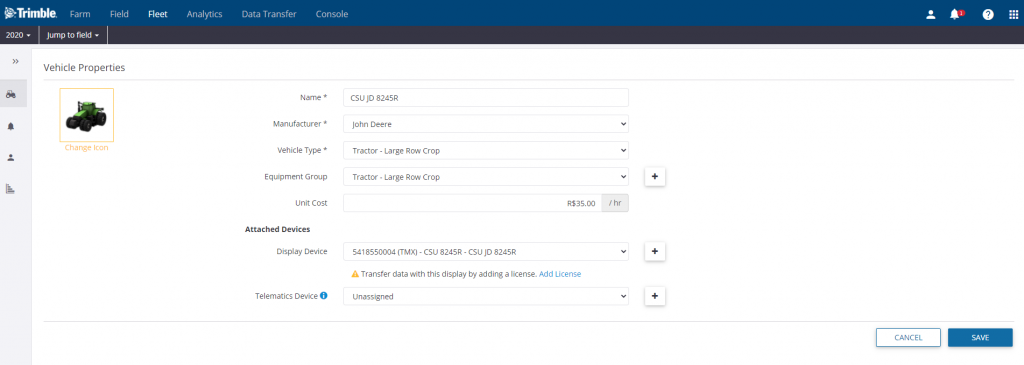
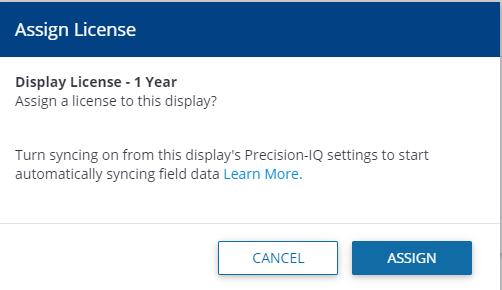
If you confirm, the vehicle will show that it has an active Display Connection License with an expiration date:
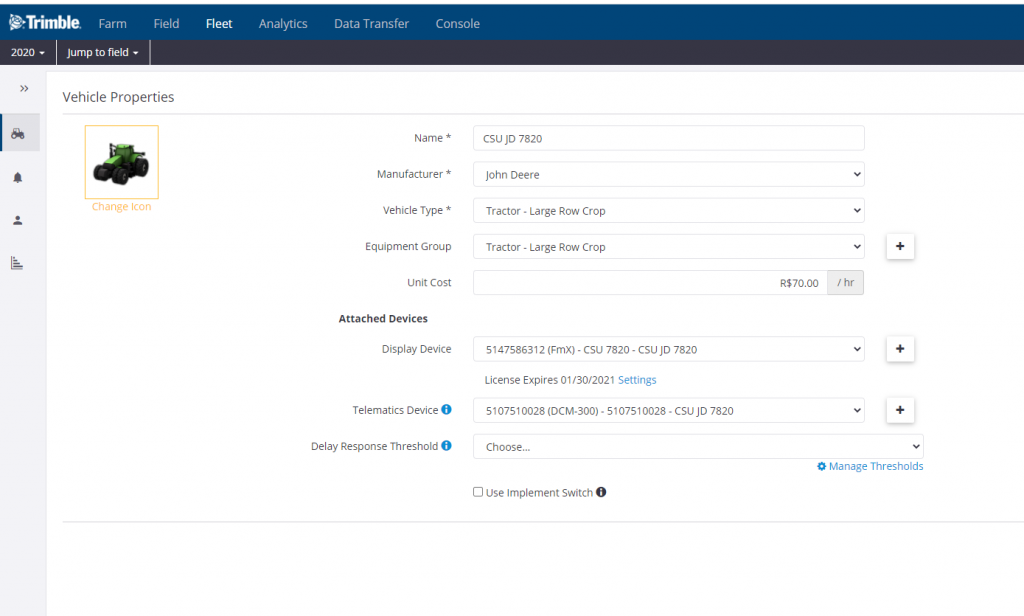
To edit a vehicle, in the Vehicle Status screen (see Vehicles status screen), select Edit Vehicle from the drop-down list:
Make changes to the fields as required and then click Save. For an overview of the fields, see Creating a New Vehicle. In addition, if a telematics device is selected in this screen, you can also select the Delay Response Threshold for the vehicle to determine when a vehicle is delayed and the setting of the implement switch.
If using Traditional Fleet, there is also a link to go to the Create Delay Threshold screen to create a new Delay Threshold. see Creating Delay Thresholds (traditional Fleet Manager only). If you select Manage Thresholds, a warning appears:
- Plus icon in the Fleet main page, click next to the vehicle group that you want to add vehicles to.
- In the Add Vehicles screen, select the check box next to the vehicle(s) that you want to add to the group:
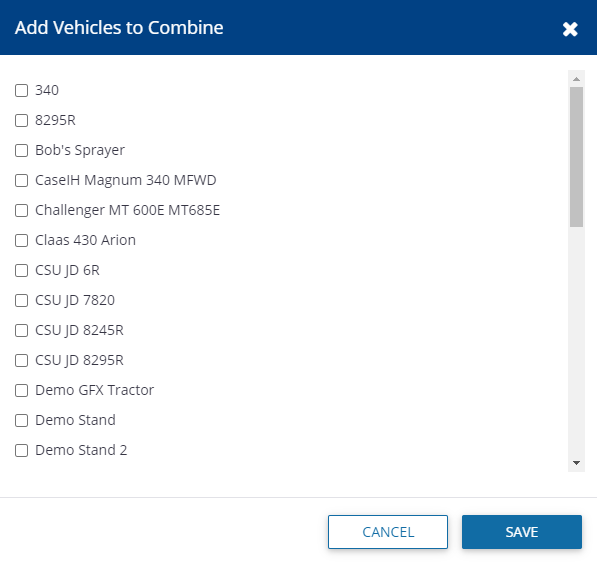
Note – You may not assign a vehicle to more than one group.
- Click Save.
- From the Manage drop-down list, select Delay Thresholds (For traditional Fleet only):
- You can do one of the following:
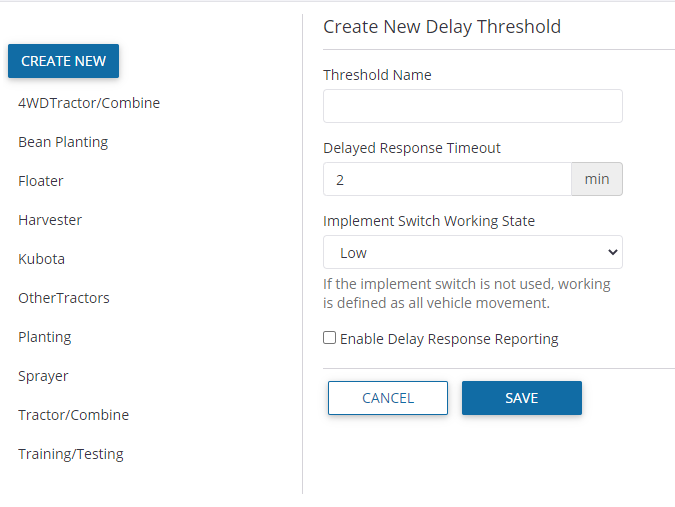
To view and/or edit an existing Delay Threshold, click a threshold name on the left of the screen, and then make the required changes.
To create a new Delay Threshold, click Create New.
- In both instances, complete or edit the fields as follows:
| Item | Description |
|---|---|
| Threshold Name | Enter a suitable threshold name, for example Harvester. |
| Delayed Response Timeout | Enter the duration in minutes to indicate to the system that the vehicle is delayed. For example, if the vehicle is stopped for three minutes, the system will flag it as having been delayed. |
| Implement Switch Working State | Select Low or High from the drop-down list. This will define when the vehicle is working. Note – If the implement switch is not used, Working is defined as all vehicle movement. |
| Enable Delay Response Reporting | Select this checkbox to allow the operator to enter delay reasons on the display. |
| Agree to firmware update | A note may appear prompting you to agree to update the DCM-300 firmware if needed to support a new threshold: 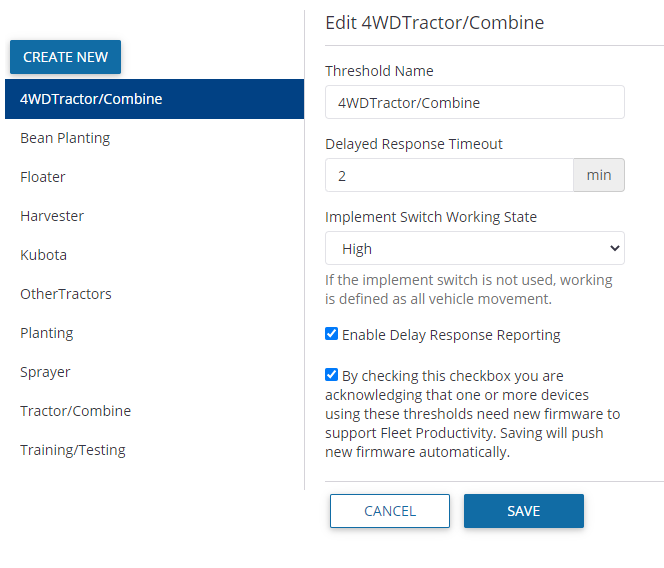 |
- From the Manage drop-down list, select Configure Columns.
- In the Manage Columns screen, select the data that you want to view:

- Drag the columns to arrange them in the order you prefer to see them and then click Save.
The Fleet website has an alert mechanism that warns you when a vehicle requires immediate attention:
- Use a Geofence alert (traditional Fleet set up only) to be notified when a vehicle has entered or left a closed boundary that you defined.
- Use a Curfew alert (traditional Fleet set up only) to be notified when a vehicle ignition is turned on during the off-hours you defined.
- Use an Ignition alert (traditional Fleet set up only) to be notified if the ignition is turned on or off for that vehicle.
- Use a Machine alert (FarmStream Fleet set up only) to be notified on fault codes from a machine. See the user interface for supported fault codes.
- Use a Rushing alert (FarmStream Fleet set up only) to be notified if a vehicles goes into the Rushing machine state.
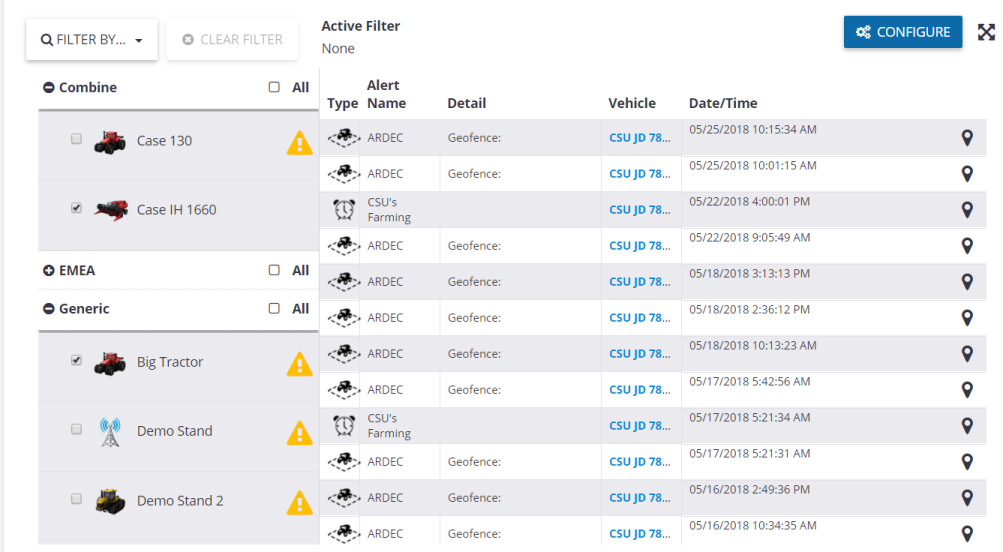
- In the Alerts tab, click Configure.
- The edit icon in the list of configured alerts, click .
- Make any required changes and then click Save. For a list of the fields, see Creating an alert.
- In the Alerts tab, click Configure.
- In the list of configured alerts, click next to the alert that you want to remove:
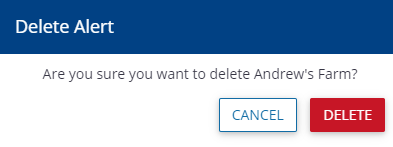
- Click Delete.
- In the Alert tab, click Configure.
- From the Manage drop-down list, select New Alert from the drop-down list.
- In the Creating Configured Alert screen, complete the fields as follows:
- Click Save.
- In the Alerts tab, click Configure.
- From the Manage drop-down list, select Geofences.
- In the Geofences screen you can do the following:
- Click edit icon to review or edit the geofence details.
- Click edit icon to delete the geofence.
- Click Create to create a new geofence.
- The edit icon in the list of geofences, click next to the geofence you want to view or edit.
- If required, you can change the Name of the geofence and then click Save.
Note – When using the point-based drawing tool to create a geofence, you can only edit the points once you have completed the geofence boundary, but before you save it.
- The trash icon in the list of geofences, click next to the geofence that you want to remove:

- Click Delete. Once a geofence is deleted, it is removed from all alerts where it was selected.
- Go to Manage -> Geofences. In the Geofences screen, click Create.
- In the Geofence screen, enter a Name for the geofence.
- Zoom in on the area where you want to create the geofence.
- Select one of the Drawing tools. Click the map to create a point to start the geofence. Follow the instructions given for each drawing tool to create a shape.
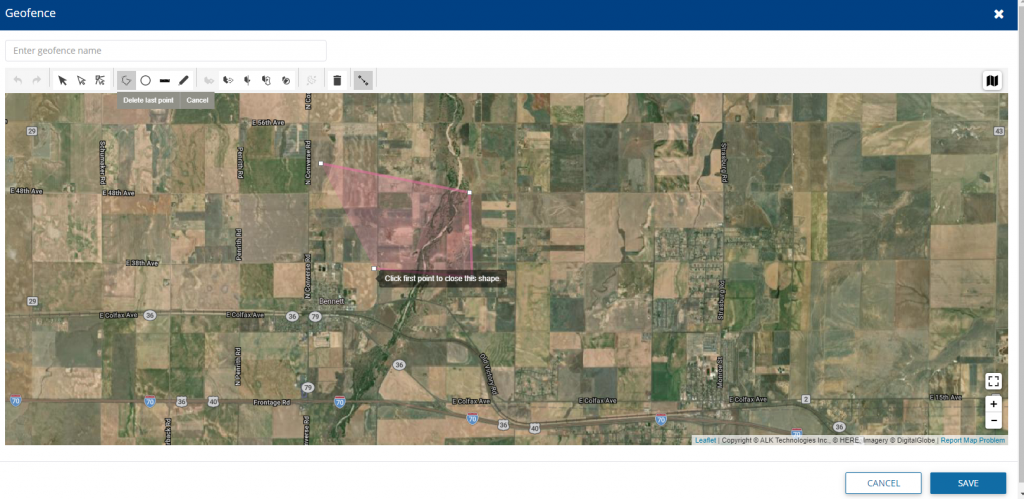
If you make a mistake, you may do any of the following:
Click Cancel and then start again. This will remove all points. Depending on what drawing tool you are using, you may be able to:
Move points by dragging them to a new location. Delete points by selecting the point and then clicking X.
- Click Save. The geofence will now be available for selection in the Alerts screen. Once you have saved the geofence, you will no longer be able to edit the points.
Note – The Fleet website limits geofence creation to 100 geofences per organization. A geofence cannot have more than 50 points.
- In the Alert tab, click Configure.
- From the Manage drop-down list, select Contacts.
- In the Contacts screen, you can do the following:
From the drop down menu next to each contact, you may select to Edit or Delete a contact.
From the Manage menu, you may choose to Add Contact, Send Operators to Vehicles, Print Operator QR Codes, or manage the Operator Display Sign In for that contact. Refer to each of the corresponding sections for more details.
- To get to the Contacts page, click on Alerts, then click on Configure, then from the Manage menu, select Contacts
- On the Contacts page, in the list of contacts, click on the menu to the right of the contact you want to view or edit and select ""Edit.""
- If required, make any changes and then click Save. For a list of the fields
- To get to the Contacts page, go to Alerts, then click on Configure, then from the Manage menu, select Contacts
- From the Contacts page, In the list of contacts, click the menu to the right of the contact that you want to remove:
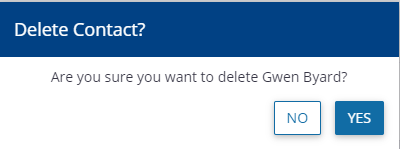
- Click Yes. Once a contact is deleted, it is removed from all alerts where it was selected.
- To get to the Contacts page, go to Alerts, then click on Configure, then from the Manage menu, select Contacts
- In the Contacts page, click Manage -> Add Contact:
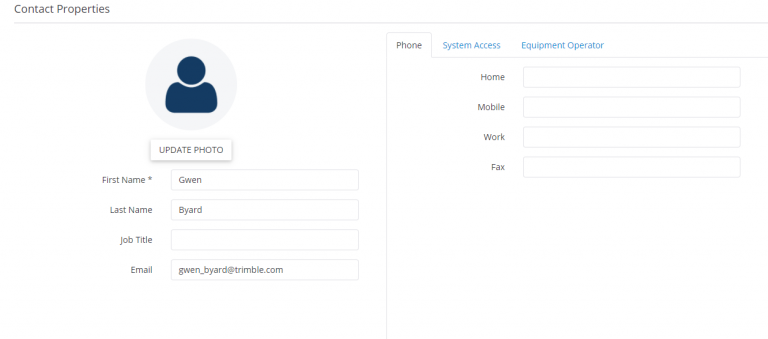
- Complete the fields in the screen. If you are an org administrator, you will be able to assign access levels in the web software for a contact. Org admins can also make a contact an operator and give them a login and an access level on a display. "Full Access" operators can edit and delete resources on a display, while "Select Only" operators can view. Non-Admins can create contacts but not assign access levels.
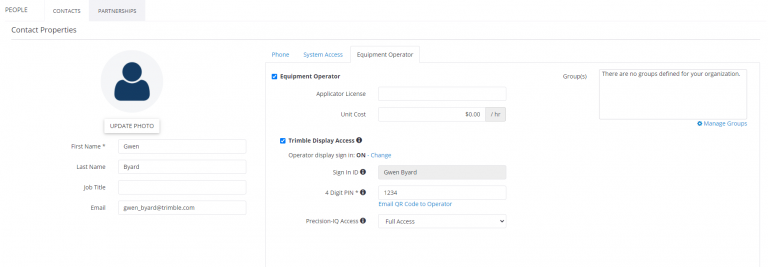
- Click Save.
This screen shows the following information:
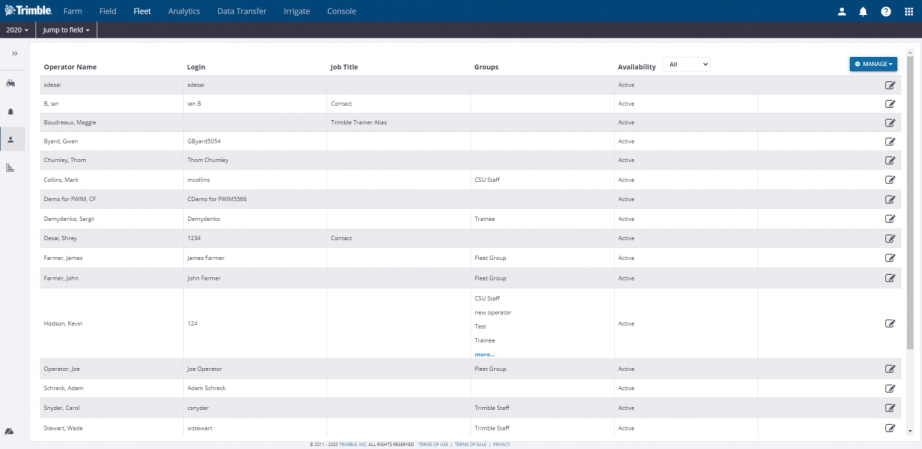
| Item | Description |
|---|---|
| Operator Name | The name assigned to the user by the administrator. |
| Login | Login name. The login is used for the display – it is also the unique identifier for duplicate names. |
| Job Title | The job title of the operator. |
| Groups | The group(s) (if applicable) that the operator is assigned to. |
| Availability | The options are All, Active, and Inactive. You can filter the list by selecting an option from the drop-down list next to the column header. |
| Manage Menu | This menu allows you to create a new Operator, a new Operator Group, Send operators to vehicles, Import/Export Operators, and Print QR codes. See corresponding sections for more information on each function. |
Editing operator details
- In the list of operators, click the edit symbol next to the operator you want to view or edit.
- Change any fields, as required and then click Save.
Overview
Operator Permission can be used to limit Precision-IQ operators’ access to certain display functionality and settings. Note that Operator Sign-In must be enabled to use Operator Permissions.
To set the Operator Permission Level for an Operator
- On the Contacts page, use the 3-dot menu to select “Edit”
- From the Contact Properties page select the “Equipment Operator” tab
- On the Operator Permissions options, select a permission level.
Permission Levels - Summary
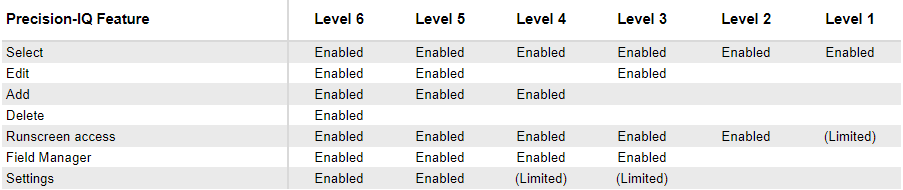
Permission Levels - Detail
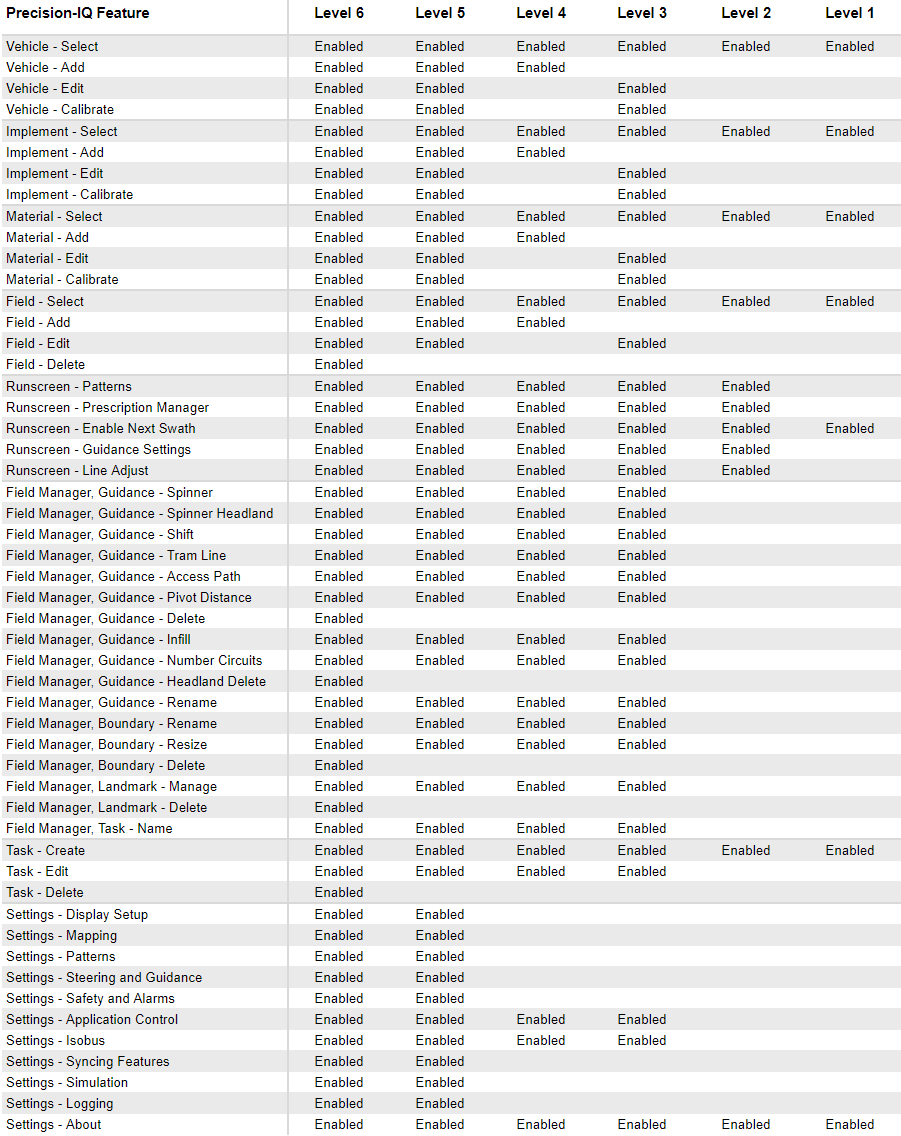
- From the Operators page, from the Manage menu, click on New Operator Group. Enter a name for the new operator group and then click on +ADD.
- OR - from the Alerts page, click on Configure, then from the Manage menu, select the Contacts page. From there, you will see a list of contacts. Select the Edit option from the menu to the right of a contact to edit that contact. Click on the Equipment Operator tab, and select Manage Groups:
- Enter a name for the new operator group in the empty box and then click on +ADD. If you are coming to this dialog from the Alerts page, groups can also be edited or deleted from this dialog box.
This feature is only enabled for FmX integrated displays on a vehicle with an active Display Connection (formerly Vehicle Connection) license. TMX-2050, GFX-750, and GFX-350 displays automatically download all operators when they have connectivity and are visible in the Operator app on the display.
- In the Operators tab, select Send to Vehicles from the Manage drop-down list—this will send a list of operators to the display on the selected vehicle for login purposes:
- In the column on the left, select a group (and by definition, all members of that group, see Trainee, above) or individual operators (see CSU Staff) by selecting the check box next to the user/group name.
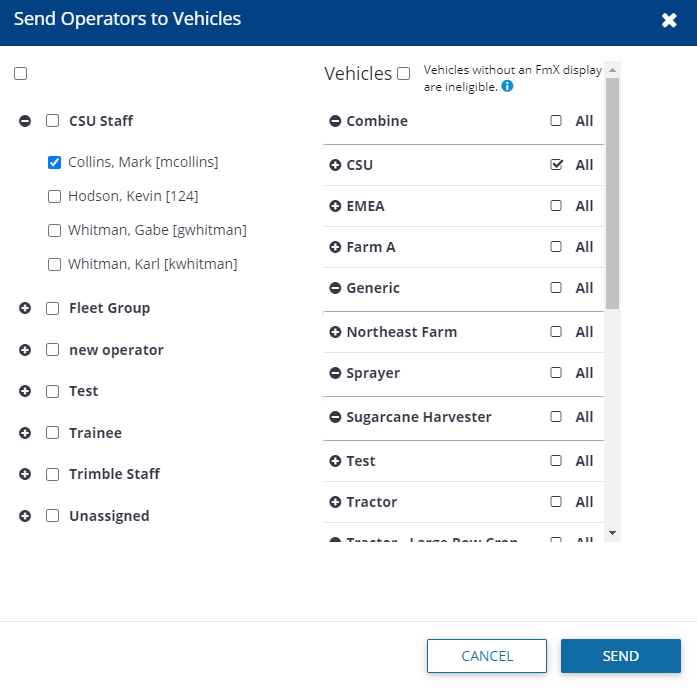
- In the Vehicles column on the right, select a Vehicle Group or individual vehicle(s).
- Click Send to assign the selected Operator(s) to the selected Vehicle(s).
- Click X to close the screen.
Operators can be imported from a .csv or .xls file, or from an existing organization. The following is an example of a .csv or .xls file import:
| LoginID | First Name | Last Name | Job Title | Group |
|---|---|---|---|---|
| BSmith1 | Bob | Smith | Operator1 | GroupA |
| JSmith1 | John | Smith | Operator1 | GroupB |
Operators are added to the Operator list or Group specified if the Login ID, Last Name, and First Name fields are specified and the Login ID does not already exist. If any row fails to import, the import will continue with the next row.
The check for Login ID duplication is not case sensitive (that is, the system will not create JSmith1 if jsmith1 already exists).
You must create groups in the user interface before you import operators.
- If the Group does not exist the operator is not imported and the row fails.
- If no Group is specified in the .csv file, the operator is created and added to the Unassigned list.
- Group is a match if it contains the same characters, regardless of case (that is, GroupA or groupa).
Job Title is added for each job title in the file and depends on the number of characters. It is a match if it contains the same characters, regardless of case (for example, Foreman or foreman).
An Import report is created that includes the following:
- Any rows that did not import due to insufficient or duplicate data.
- The number of successful logins created.
- The groups that could not be found during the import.
To import operators from a .csv or .xls file:
- In the Operators tab, select Import Operators from the Manage drop-down list.
- Click From a File and then click Choose File.
- Navigate to and select the required file and then click OK.
- Click Import.
- Click Done.
- In the Operators tab, select Export Operators from the Manage drop-down list.
- You may be prompted to save or open the Operators.csv file.
If you open the file, you will see all information entered in the system earlier in the order Login ID, First Name, Last Name, Job Title, Group and Availability:
- In the Operators tab, select Print QR Codes from the Manage drop-down list.
- In the Print QR Codes screen, select the staff for whom you want to print the QR codes. These codes are used to log in to a display:
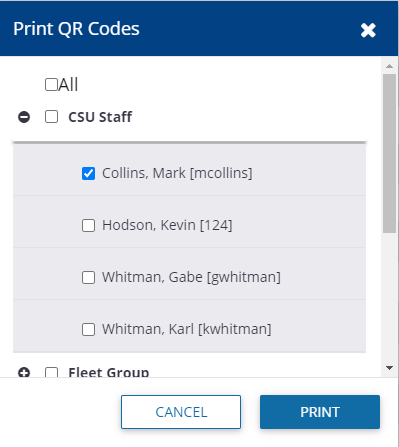
- Click Print. The QR code is printed, with the name of the person for whom it is intended:

The Fleet Utilization reporting feature allows users to evaluate the performance of their machines over a chosen 24 hour period. Vehicle status is displayed, showing states such as moving, working, off, or stopped. The time in each state is calculated and displayed:

You can now compare the utilization of each vehicle over the selected time.
- In the Utilization tab, enter a Start date, time and duration.
- Select the group, and within that group, the vehicles for which you want to compare utilization:
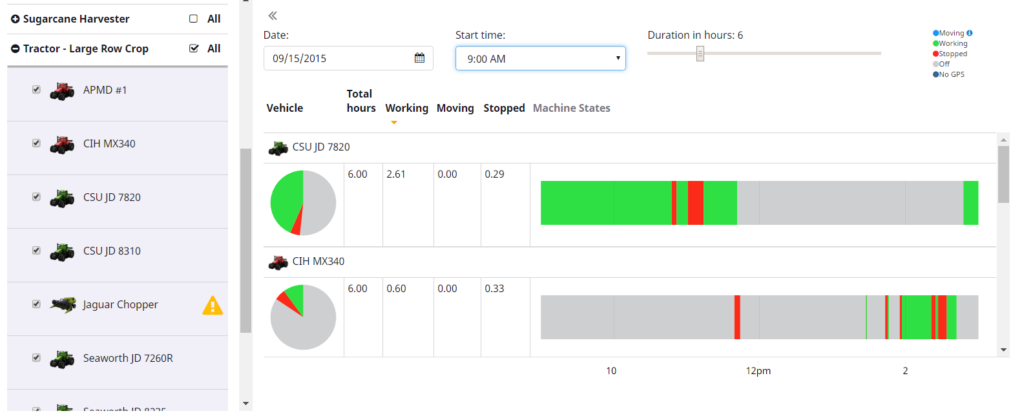
A graphic appears comparing the vehicles for the selected period. To decode the graphic, use the indicators (for example, Green = Working) that appear at the top of the screen.
For the traditional setup of Fleet, the vehicle states are Working, Moving, Stopped, and Off.
For the FarmStream setup of Fleet, the vehicle states are Working, Moving, Stopped, Off, Speeding, Rushing, No GPS, and Delayed.
If Fuel rate is supported by the vehicle CAN bus, then Fuel Consumption can be reported in the utilization page and will show up in the tool tip as you hover over the different states."
The Fleet website can show vehicle information from some external applications, including Raven Slingshot and JD Link. To set up a vehicle from a third party application,
Go to the Data Transfer page and select Settings and API Connections.
On this page, you will see any existing connections between your organization and an external account/
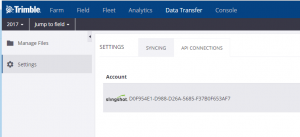
To add another connection to an external account, click on “+ Add Account” and select the type of external account to add.
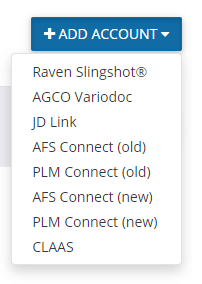
For each account, you will need to supply credentials for accessing the third party website. For Raven Slingshot, you will need to enter an Access Key that is generated on the Slingshot website. Contact Raven to purchase the Access Key.
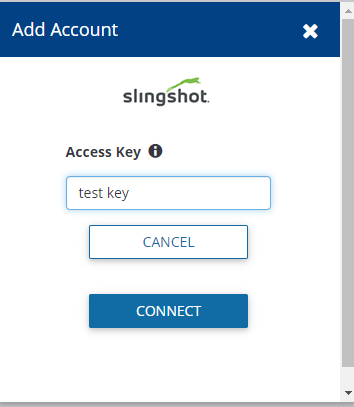
For Raven Slingshot accounts linked to your Trimble Ag Software account, you will see any Raven devices in the list of available devices and you can link it to a vehicle in your Trimble Ag Software account.
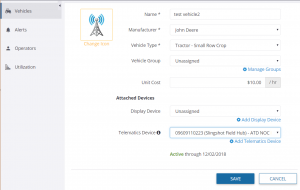
You will then be able to see vehicles from your Raven Slingshot account in Fleet Manager.
Agriculture Business Area
Trimble Inc.
Trimble Agriculture Division
10368 Westmoor Drive
Westminster, CO 80021, USA
Copyright and Trademarks
© 2020, Trimble Inc. Trimble, the Globe & Triangle logo, Farm Works Software, and FmX are trademarks of Trimble Inc., registered in the United States and in other countries. Connected Farm, Farm Works, GFX-350, GFX-750, and TMX-2050 are trademarks of Trimble Inc. Microsoft and Internet Explorer are either registered trademarks or trademarks of Microsoft Corporation in the United States and/or other countries. All other trademarks are the property of their respective owners.
Release Notice
This is the June 2020 release of the FarmStream Fleet Help Guide.
Product Warranty Information
For applicable product warranty information, please refer to the Warranty Card included with this product, or consult your Trimble reseller."
Trimble IDは手軽に作成でき、Trimble Ag Softwareを含むすべてのTrimbleアカウントやサービスに簡単かつ安全にアクセスできます。
- ログインページagriculture.trimble.comを開き右上の「ログイン」ボタンをクリックし、「ソフトウェアサービスお客様ログイン」を選択
- ページ下部の「新規Trimble IDを作成」 リンクをクリック
- 連絡先情報(名, 姓, メールアドレス)を入力し、 パスワード を設定して、画面に表示される CAPTCHA(キャプチャ)認証コード を入力する
4.「新規アカウントの作成」をクリックする 5.「noreply_identity@trimblepaas.com」 から送信された登録確認メールを開く(迷惑メールフォルダも確認してください) 6. メール内の 「登録を完了する」 をクリックするとTrimbleのウェブサイトに戻ります 7. リンクをクリックし ログイン すれば登録完了です
これでアカウント作成は完了しました!ご質問等ございましたら お客様サポートチームへご連絡ください。。
This dashboard allows you to view your entire Fleet within a single sitemap, along with your Field Task History. This feature is only available with Farmer Core licenses.
To access this feature first locate the Fleet section on the top bar of your organization’s site once you've logged in. Hover over this to see a drop down menu and select “Fleet Map” from the list.

Once selecting this you will be directed to the following screen displaying an “Asset List” that details all of your vehicles, a map showing all of your fields grouped into numbers based on site location, and a Field Task List that projects the task history associated with your organization. From this screen you may narrow your search by selecting a specific vehicle or field.
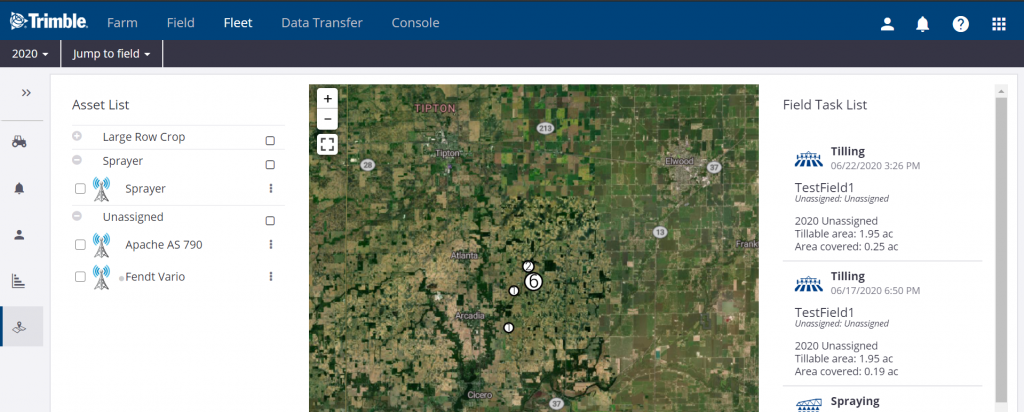
By clicking on individual tasks your sitemap will produce a zoomed in glimpse of that project.

You will also have the option to view further information by selecting “Details” in the upper right corner of the individual tasks.
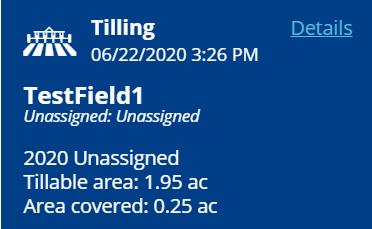
Within the “Details” window you will see a summary of the task specifics. You can toggle through to view map layers based on speed, area, elevation, guidance mode, and other data relevant to the task performed.
By clicking on “Inputs” within the “Details” window, you will be able to look at the asset totals used.
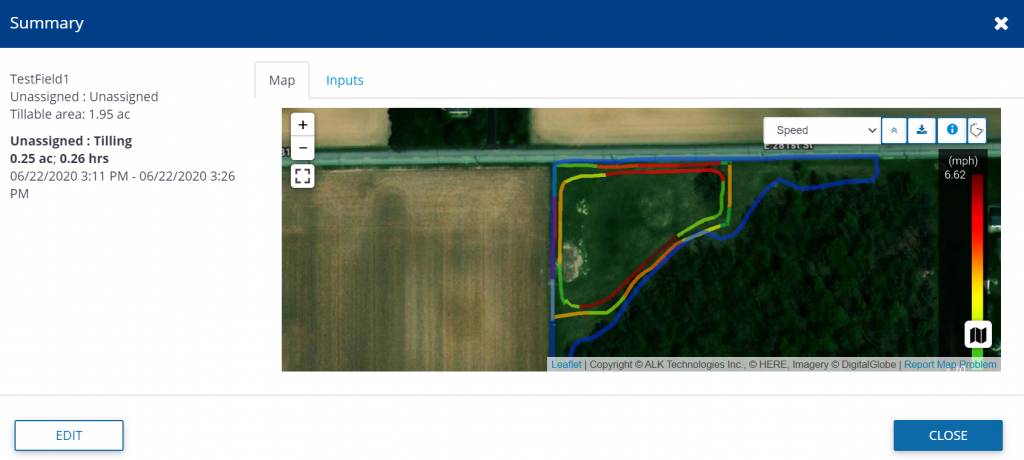
If you would like to modify a task, selecting “Edit” within the “Details” window will allow you to change a variety of different attributes of the task including adding operators, vehicles, implements, and materials.
To get to the Contacts page, go to Alerts, then click on Configure, then from the Manage menu, select Contacts
From the Contacts page, you can turn on Operator Display Sign In by going to the Manage menu and selecting Operator Display Sign In. Turning this feature on will require all operators to sign in to access Trimble displays in your organization. This feature requires AutoSync to be enabled.

Through well-known brands, including Fendt®, GSI®, Massey Ferguson®, Precision Planting®, PTx Trimble and Valtra®, AGCO Corporation delivers farmer-focused solutions to sustainably feed our world through a full line of tractors, combine harvesters, hay and forage equipment, seeding and tillage implements, connected precision farming solutions, grain storage and protein production systems, as well as replacement parts.
©2024 AGCO Corporation